Armored Brigade is the definitive, and most flexible Cold-War-turned-Hot wargame ever produced.
After a brief time with the preview build, I was given the honor to review Matrix Games and Slitherine’s new Armored Brigade. Something that helps me a little is that I’ve been fortunate enough to have some experience with it already — as I had played the free version for years. However, this new iteration blows my old, and previously played version(s), out of the bunker.
Two things (kind of) took me out of the ‘comfort zone’ of my wargaming experience. Firstly, it’s the Cold War (1965-1991) — that’s definitely not cold anymore in Armored Brigade. This means that all of the equipment is from that time-span, rather than my usual, the WWII Orders of Battle.
Secondly, Armored Brigade is not turn-based, but rather real-time with pause. You can also play it as WEGO, but I’ll get to that later. However, when it comes to these points and my comfort zone, comfort, schmomfort. Shhh, don’t tell the Big Boss, but I’ve been playing way-too-much Armored Brigade.
Good lord, what a game and engine these guys have put together! It’s simply astounding. And thankfully, considering all of its depth, the starting few scenarios ease you into some of the more complex concepts. Beware though, this thing is a monster. And that’s coming from somebody who loooves monster war games.
There’s always a debate in wargaming and (4X, actually) about playing smaller versus larger maps. My answer is always the same: the bigger, the better. I don’t want to sit down with a wargame and play through it in an hour or two. I want my brains to be fried by the time it’s done, whenever that might be. Now, I’m not saying I’d like each to be an outing like War in the Pacific’s penchant for literally taking years for one game — but I do want a long-lasting, time-consuming, brutal slugfest.
Armored Brigade will give you that, plus a ton more. That old, “ best-laid plans” saying immediately springs to mind. You can plot and strategize all you want…, right up until you hit the start button. If you’re not paying attention to all of it then things will go to Hell in a hurry. I’ll stop right here and admit I only played two of the fifteen single missions, because of the…
Custom Scenarios
Random Map Generator. Armored Brigade has one of the finest, most intense random map generators ever created. Whatever kind of conflict you want to set up between 1965 and 1991, around parts of Germany or Finland (or a tiny portion of California), you probably can. There are so many options that it is mind-boggling. Everything from map size, to different force selection, army sizes, army composition, etc. are available to tweak to your heart’s desire. There is also a ton of items to adjust… just to get a game going. Of course, you can mostly use the defaults, just set the map area and go. Me? Oh, no, no, no. I have to fiddle with every minuscule option and adjustment possible. That’s simply how my tank tracks roll.
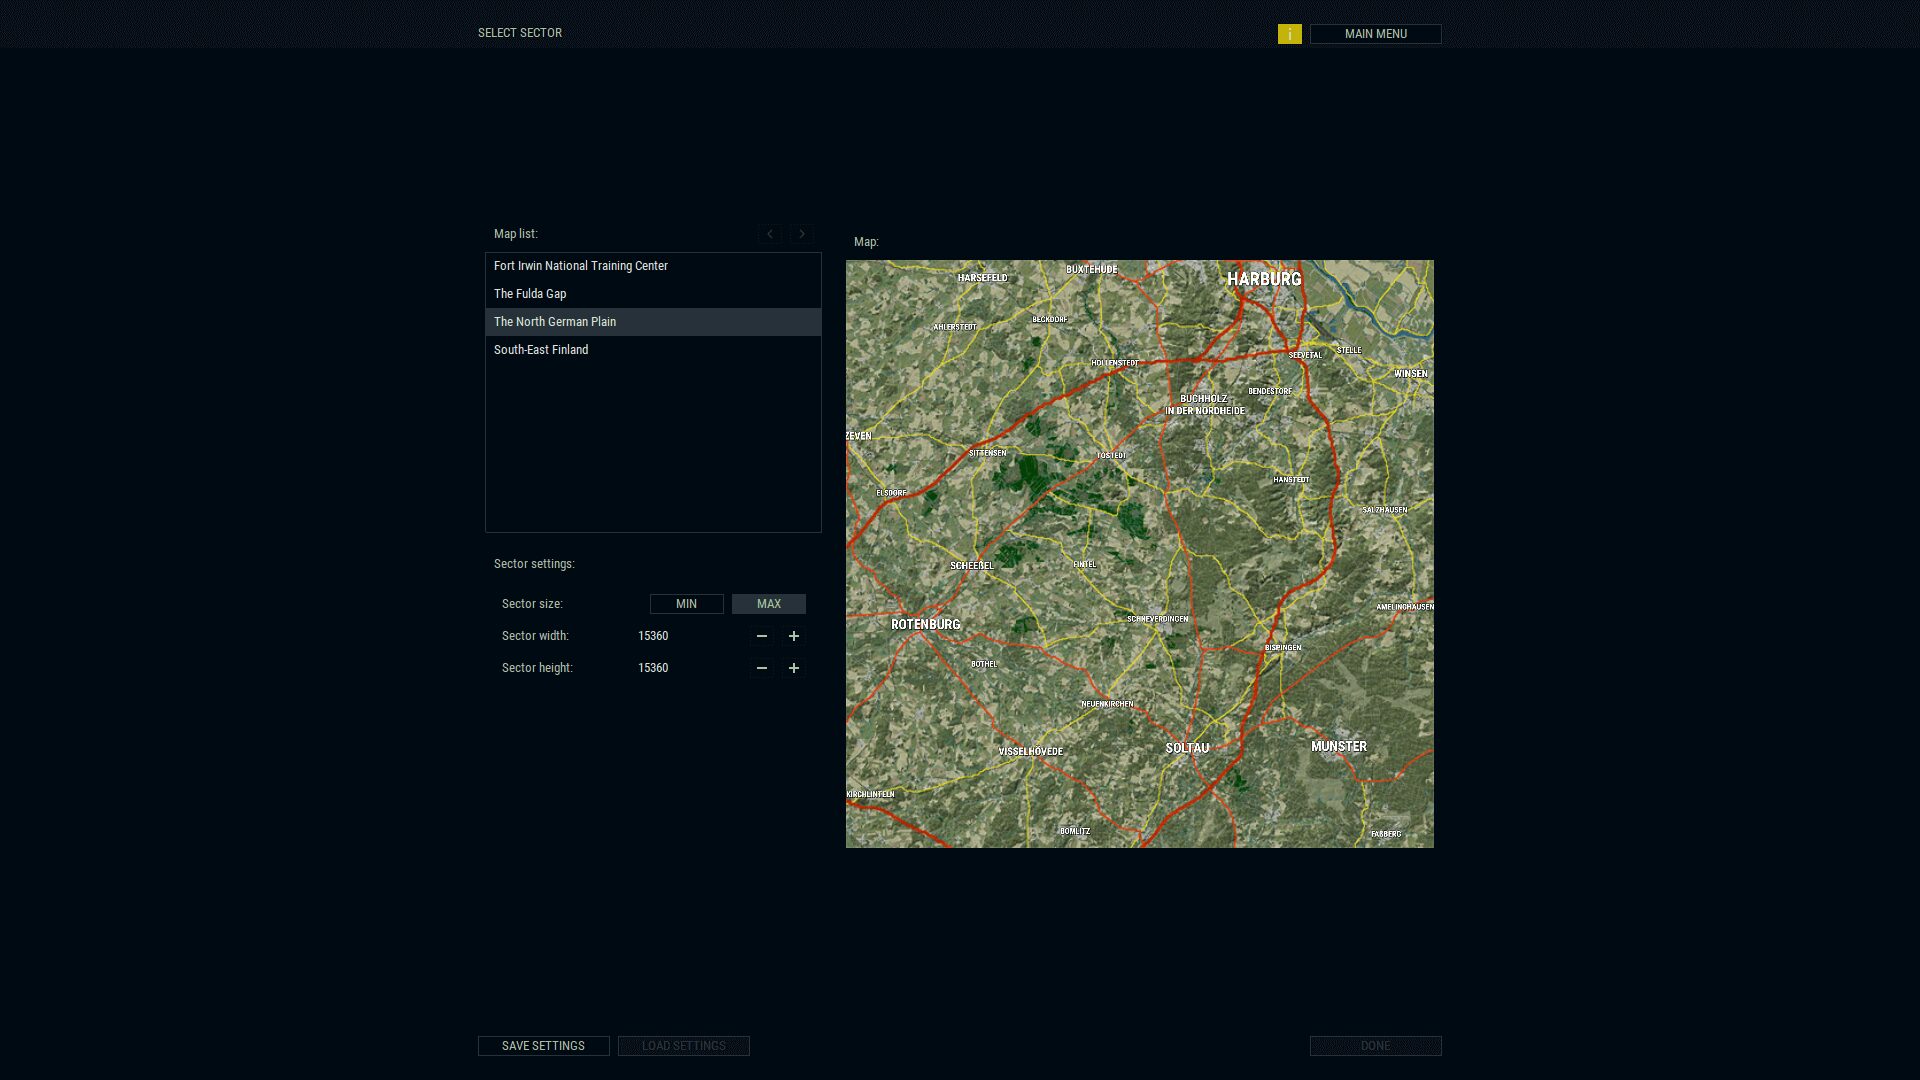
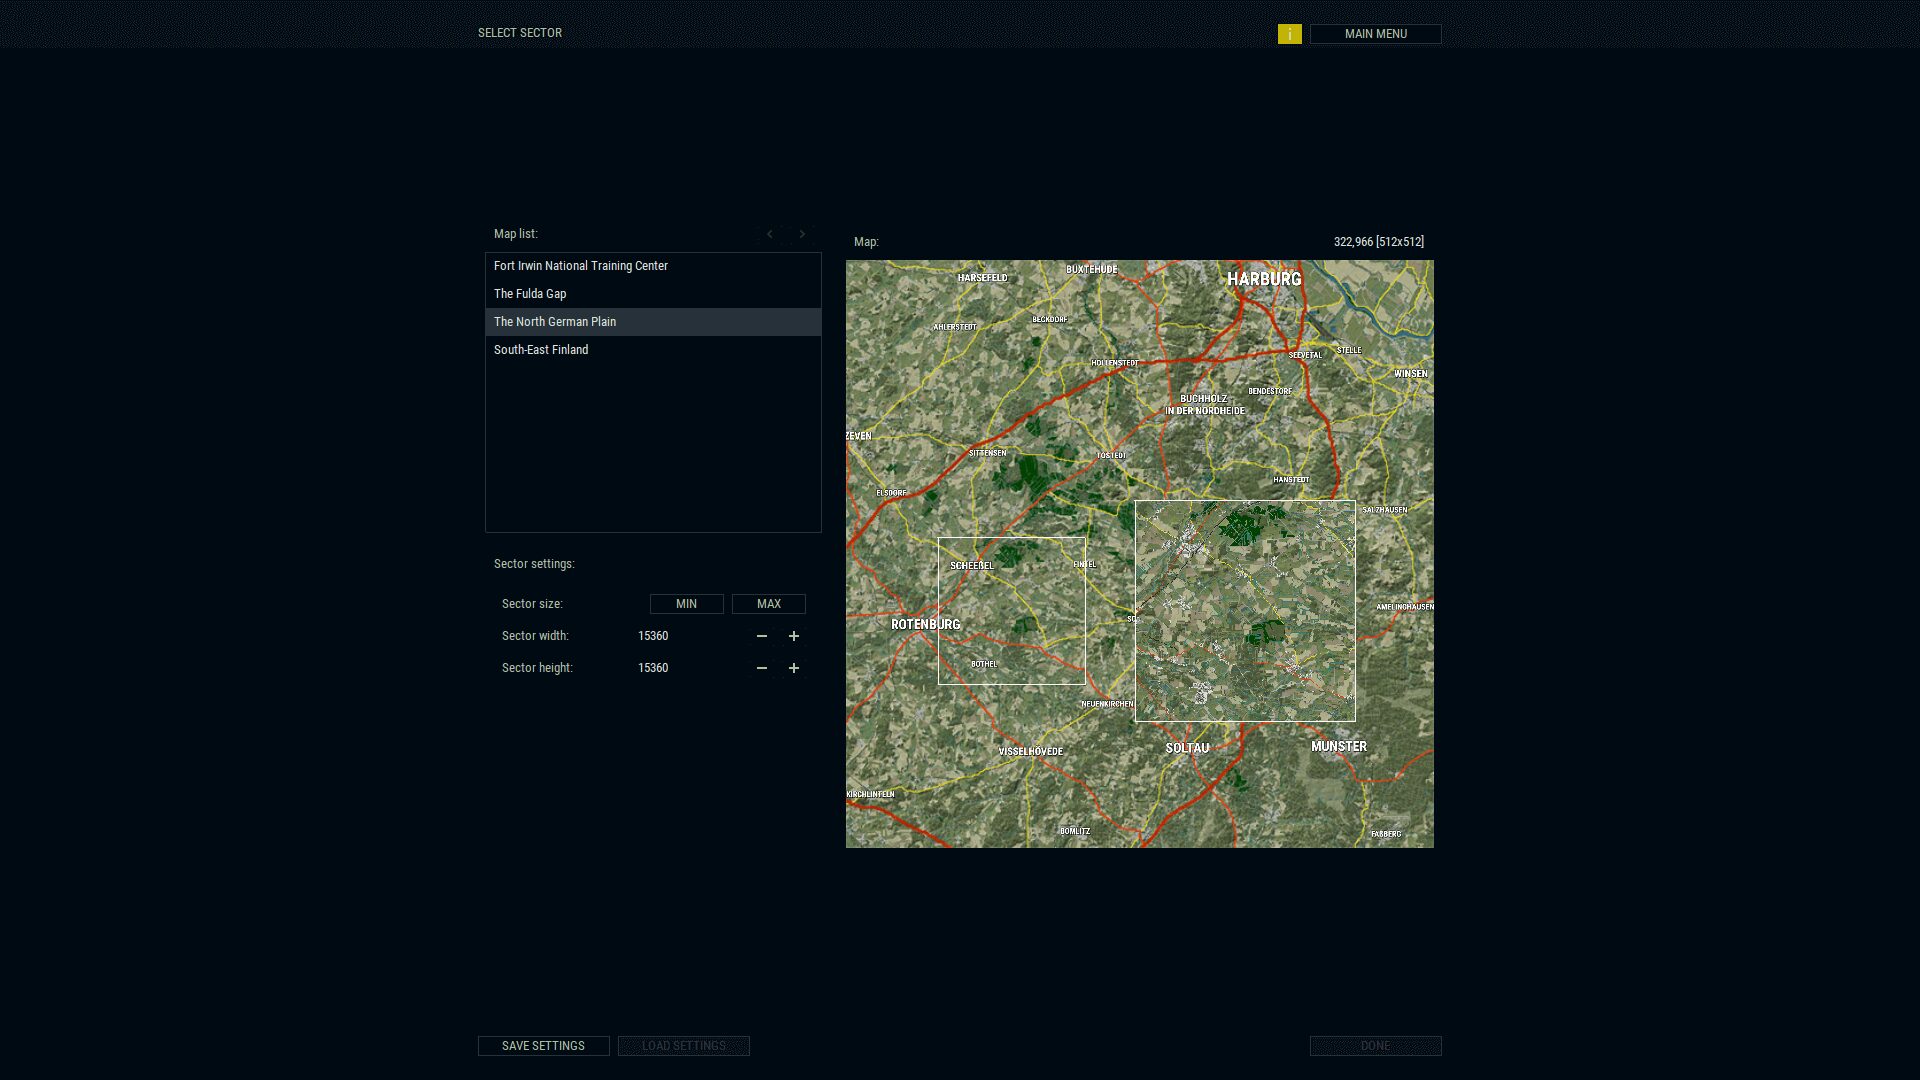
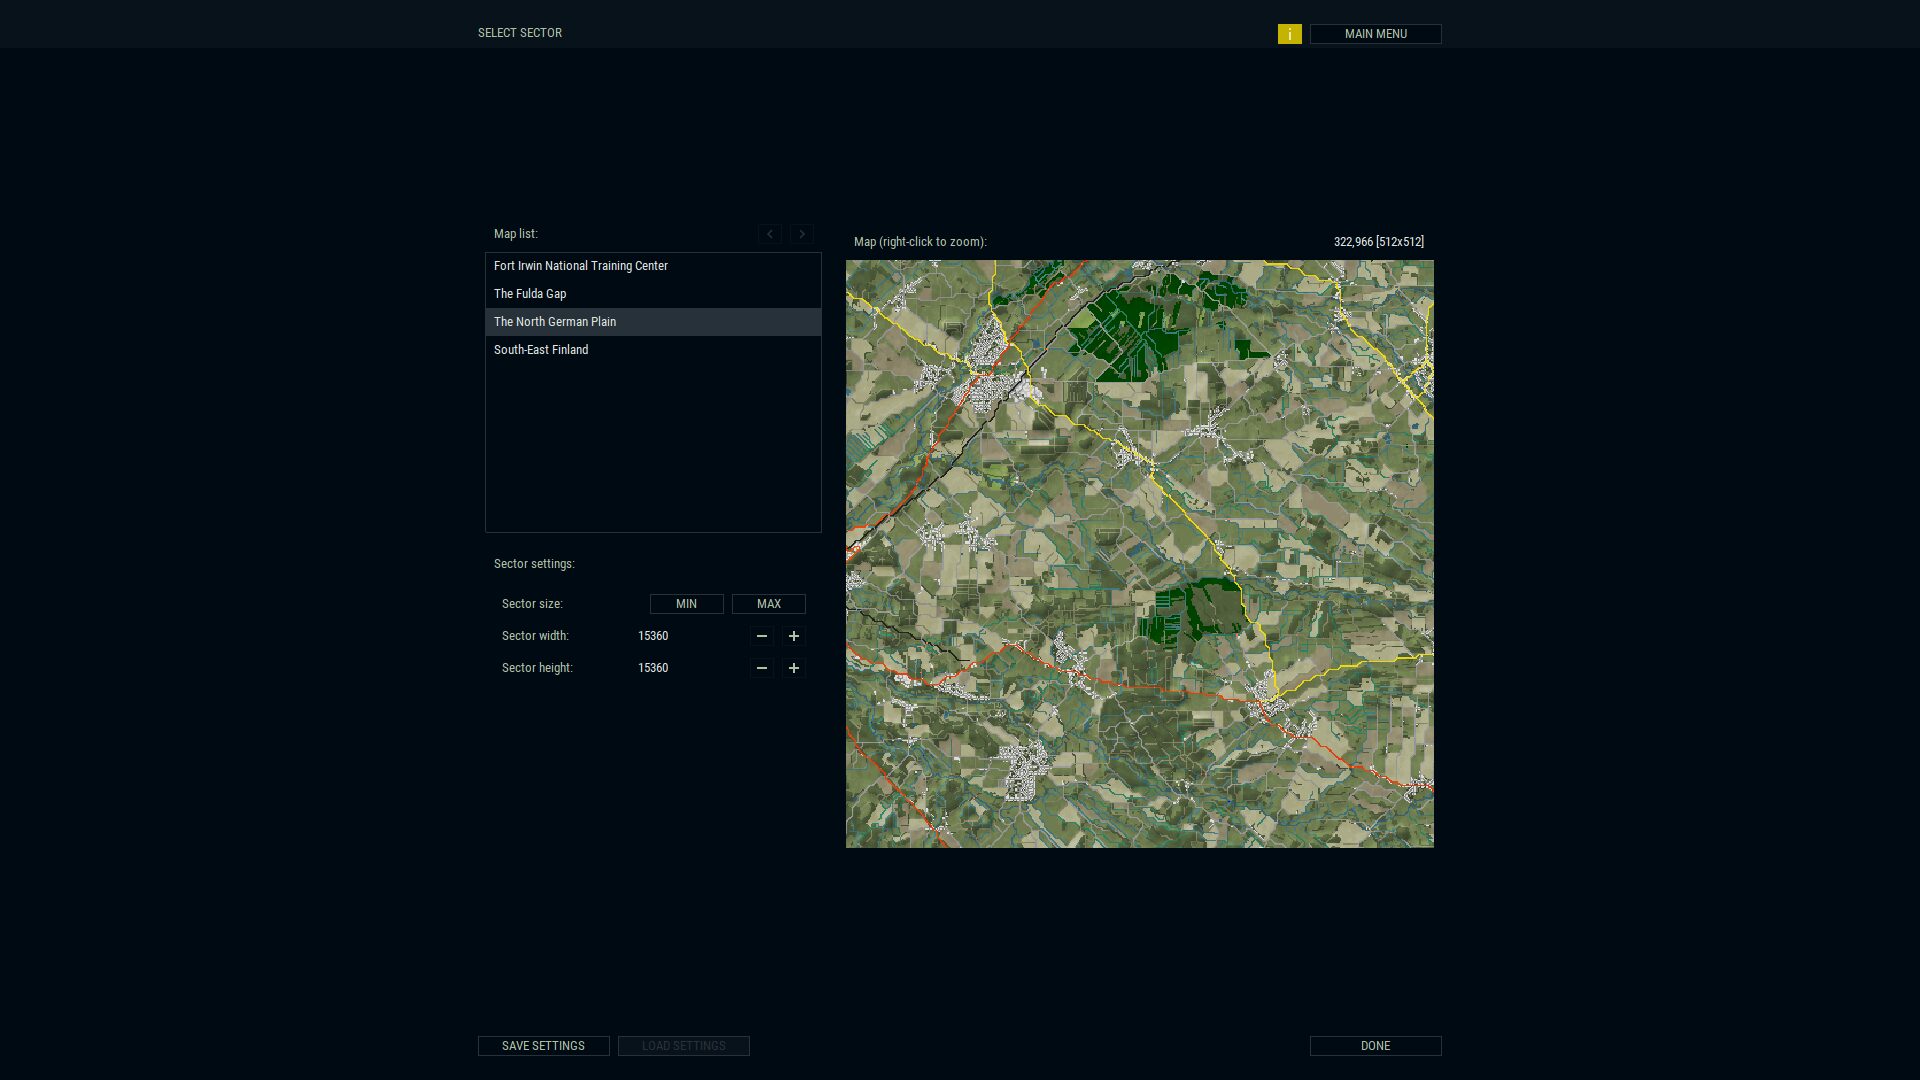
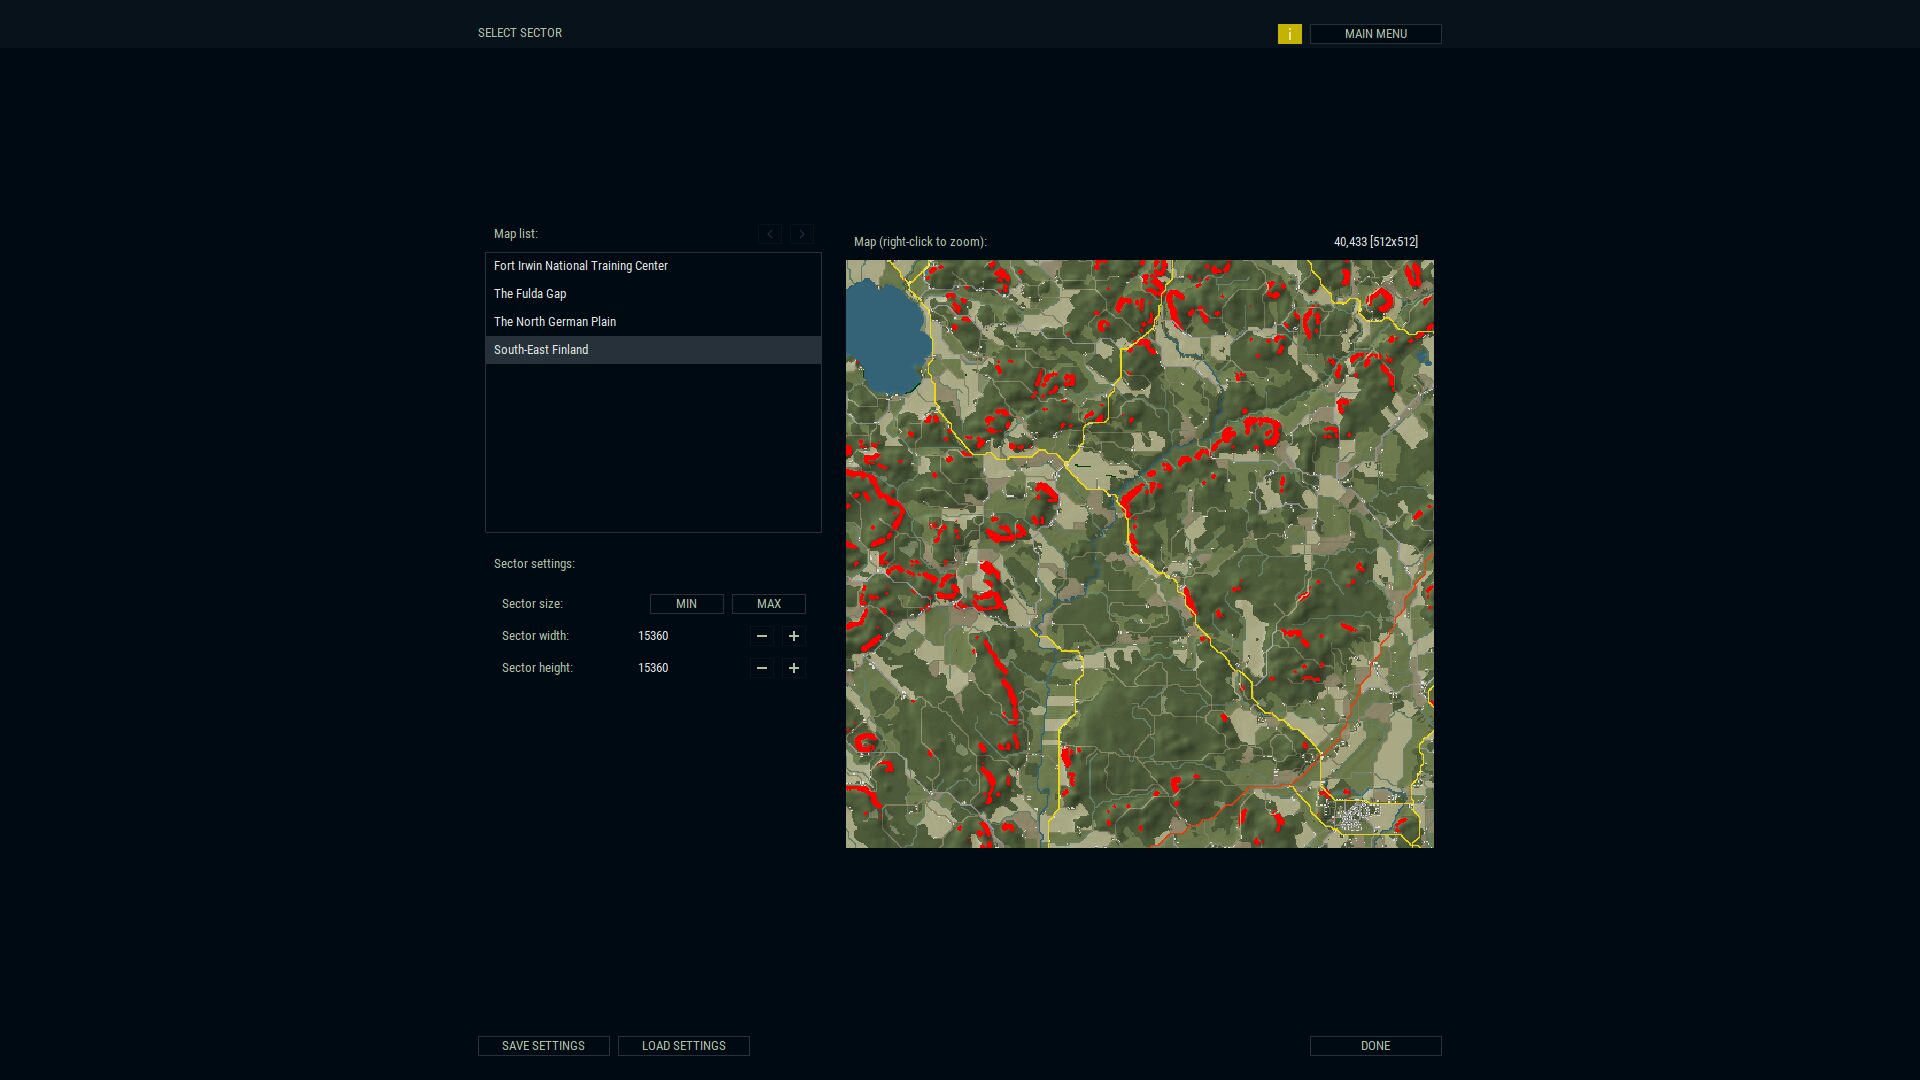
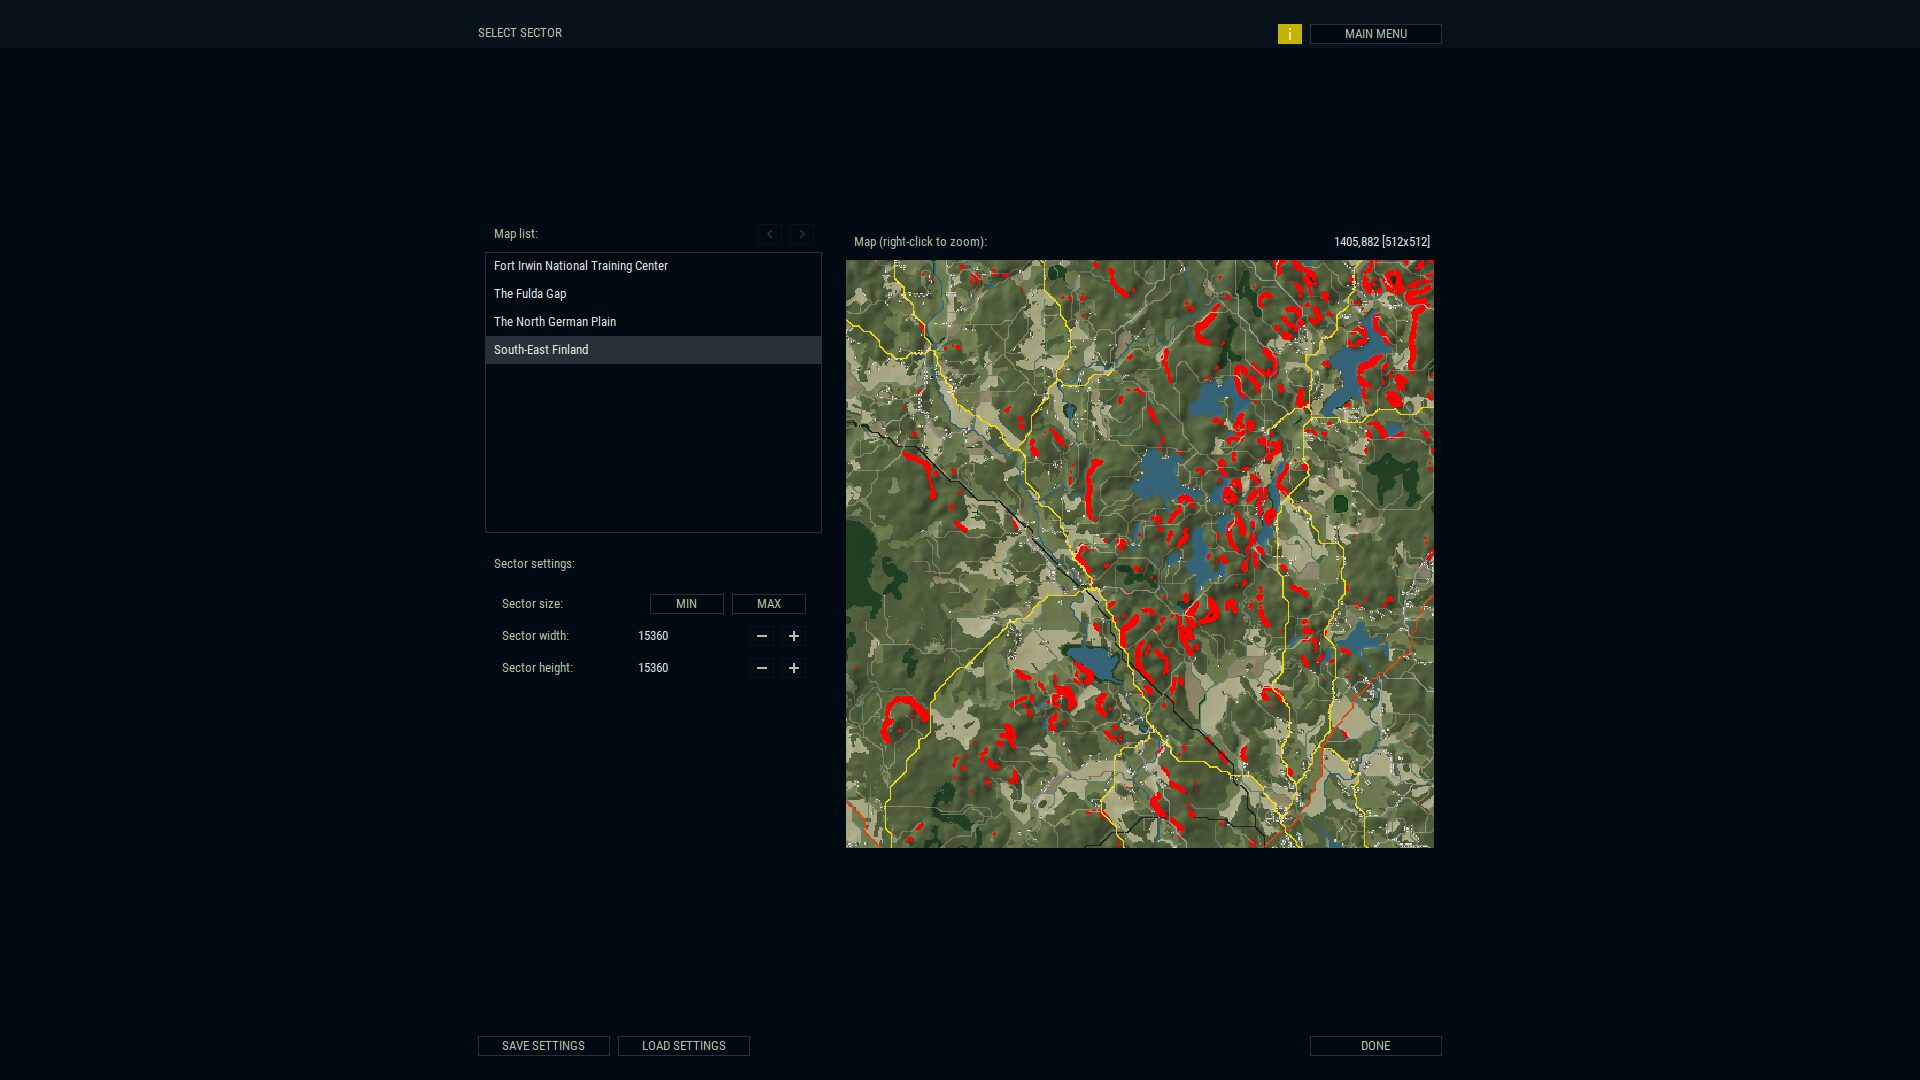
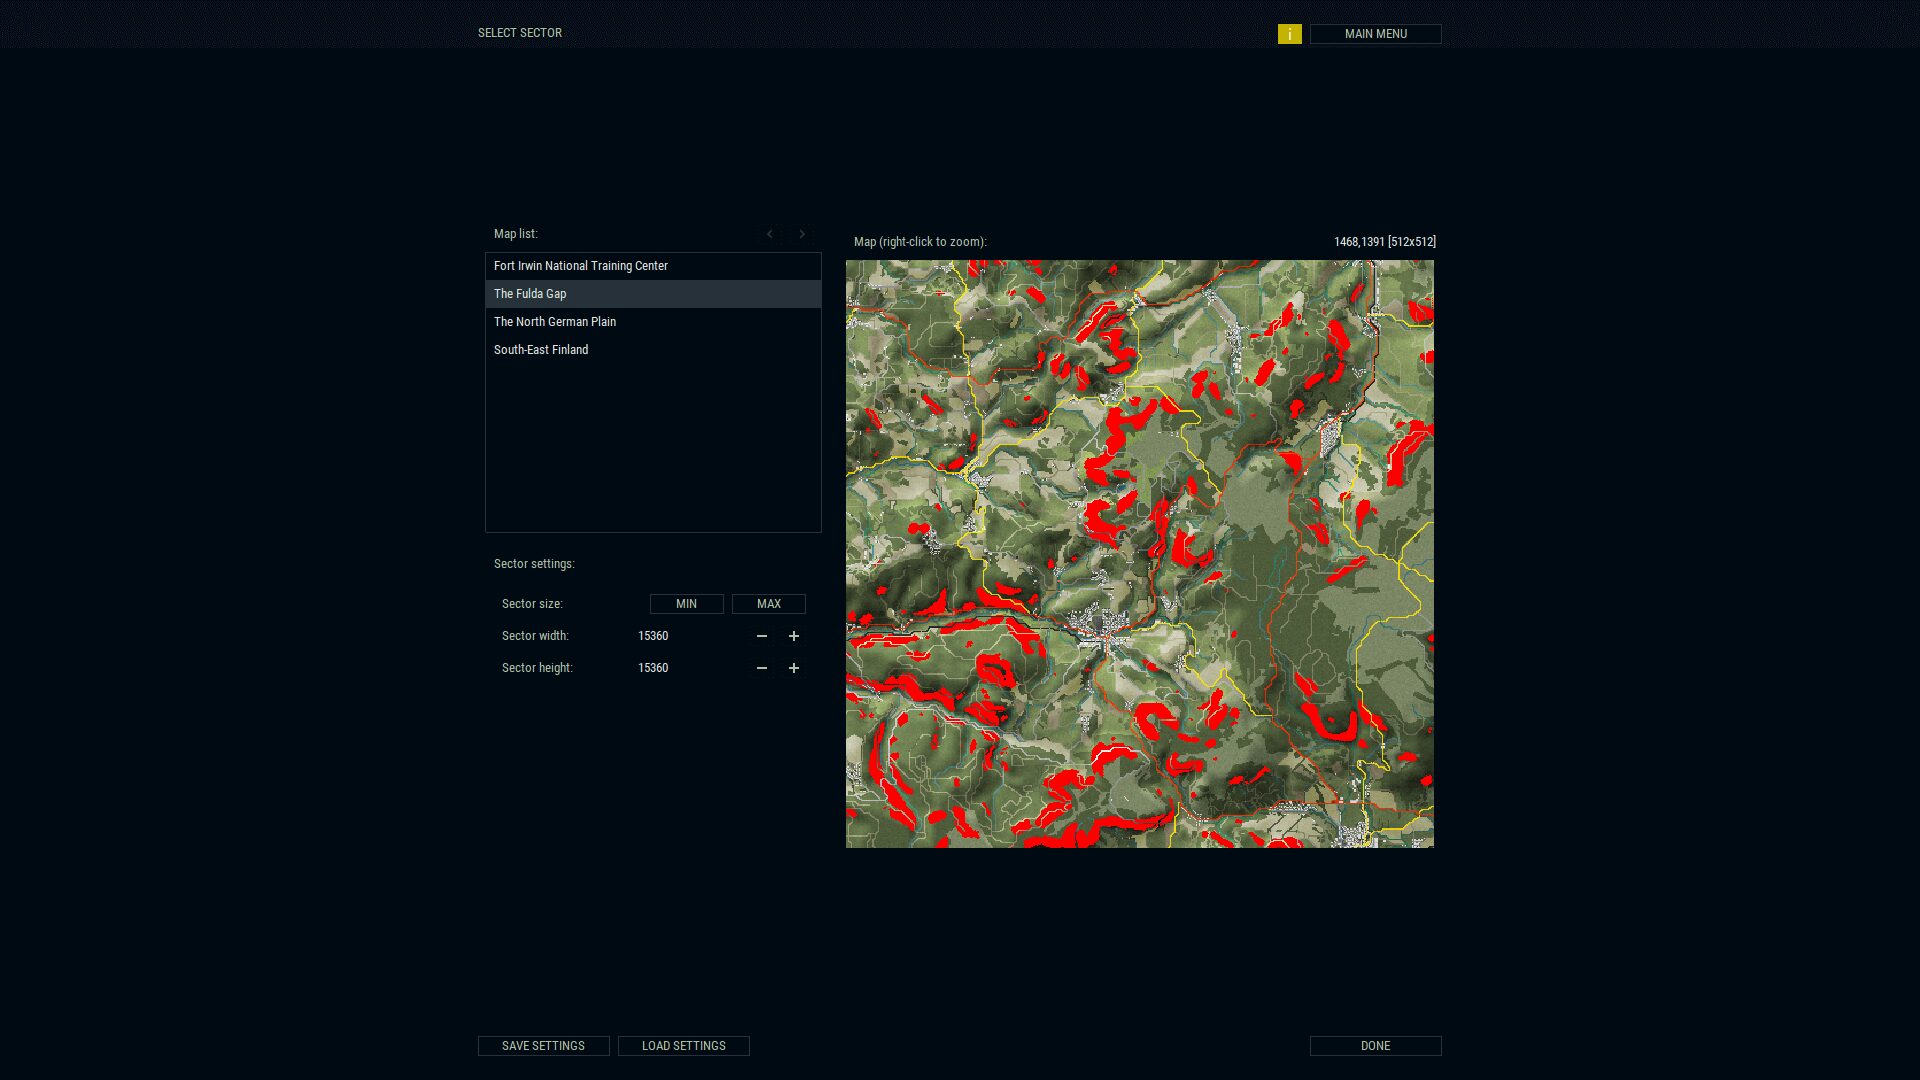
Select Sector
Okay, here we go… First, you have to choose a map from among The Fulda Gap, The North German Plain, South-East Finland or Fort Irwin National Training Center (California). The sector size has adjustable width and height. The minimum is 1920 by 1920 (30 x 30 meter cells), the maximum being 15,360 by 15,360 — with any kind of combination you want in between those values. You already know how large my playing area will be. It then makes a rectangle of that size for you to choose the location on the map where you want to fight. It’s extremely easy to adjust the area if you’re not perfectly happy with your initial choice. Of course, it shows you all of the water, roads, buildings, towns, cities, etc. Any red areas are impassable. Hint: The Fulda Gap and South-East Finland have some pretty gnarly areas.
Generate Mission
Now, we get into some of the guts. First, you’ll want to pick the two opposing sides. Your choices are the USA, USSR, Finland, FRG, GDR, Poland and the British Army. Yes, you can choose the same one for each side, but I’ve never understood that — unless you’re wanting to watch how the AI works? For me, not fun.
Each side has their own inherent Training and Morale (which can be adjusted later though), as well as both Command and Artillery delay times. Command and artillery delays are one of the brightest shining parts of Armored Brigade. Even with radios, commands are not executed immediately on the battlefield. The delays are further adjusted by being attached (or not) to a group and proximity to a headquarters unit.

For each side, you choose their force type from Armor, Mechanized, Infantry or ‘Dynamic’. Dynamic means you can use your points freely and without any of the percentages of the army makeup. A warning though: if you choose Dynamic and then reload a save and try to play as the ‘other side’, it will not work — because the AI has no template for the original side.
Between the opposing forces, you decide who has air superiority — balanced, the player, the opposition or ‘none’, meaning no air. Also, some factions can never have air units.
Directly below the air superiority is the ability to pick the number of neutral units, which are friendly and/or civilian, uncontrollable people caught up in the war. You can have none, medium or high amounts or the maximum number possible. So far, I have always run with balanced air and max neutrals. Also note right here: there’s a setting for ‘Unit Sprite Scale’. Having older eyes, I always run them at ‘Max’… in case you wondered why the units look large. As with everything else, it’s easily adjustable to fit your own tastes.

This is when I set the year, month and time of day. Armored Brigade has fully fleshed-out rules for night combat: something you’ll just have to experience for yourself. It’s really tight, man. Right after that, I set the weather from the available Bad, Poor, Fair and Good. Weather does a few different things. It affects visibility and night vision. Also, the worse the weather, the higher the probability of producing thunderstorms. Thunderstorms move with the wind and can put out terrain fires. All good, right? No. Lightning strikes can suppress units.
Speaking of wind, that needs attention/adjustment as well. Wind affects smoke and illumination flares (as well as the aforementioned thunderstorms). Your choices are Calm, Weak, Medium, Strong and Random. Along with the wind, the temperature can be adjusted as well which affects terrain fires, but more importantly, troop fatigue and vehicle breakdowns. Temperatures range from Extremely Cold to Extremely Hot, with four steps in between.
Although each map has its own terrain, you can adjust that as well. Your altering options are Barren, Summer, Autumn, Winter, Spring, Jungle and Desert. Another huge influence to movement is the ground condition itself — which can be Bad, Poor, Fair or Good.
Something else, which is unique, is the Destruction setting. The higher you set the Destruction percentage, the more collapsed buildings and burnt forest you will have.

Obviously, all of these abilities to change things leads to massive replayability. Look at all of the things you can alter on one map alone! For example, although adjustable, if you choose the Fort Irwin map, it will be automatically set to extremely hot and desert. I actually set up a Fort Irwin scenario, making sure it was July and noon. It was automatically desert with extreme heat, so to crank it up, I picked poor weather, strong wind, poor ground and 60% destruction. Suffice it to say, the battle was cooking, deadly and hard to maneuver through. However, it was a blast (furnace).
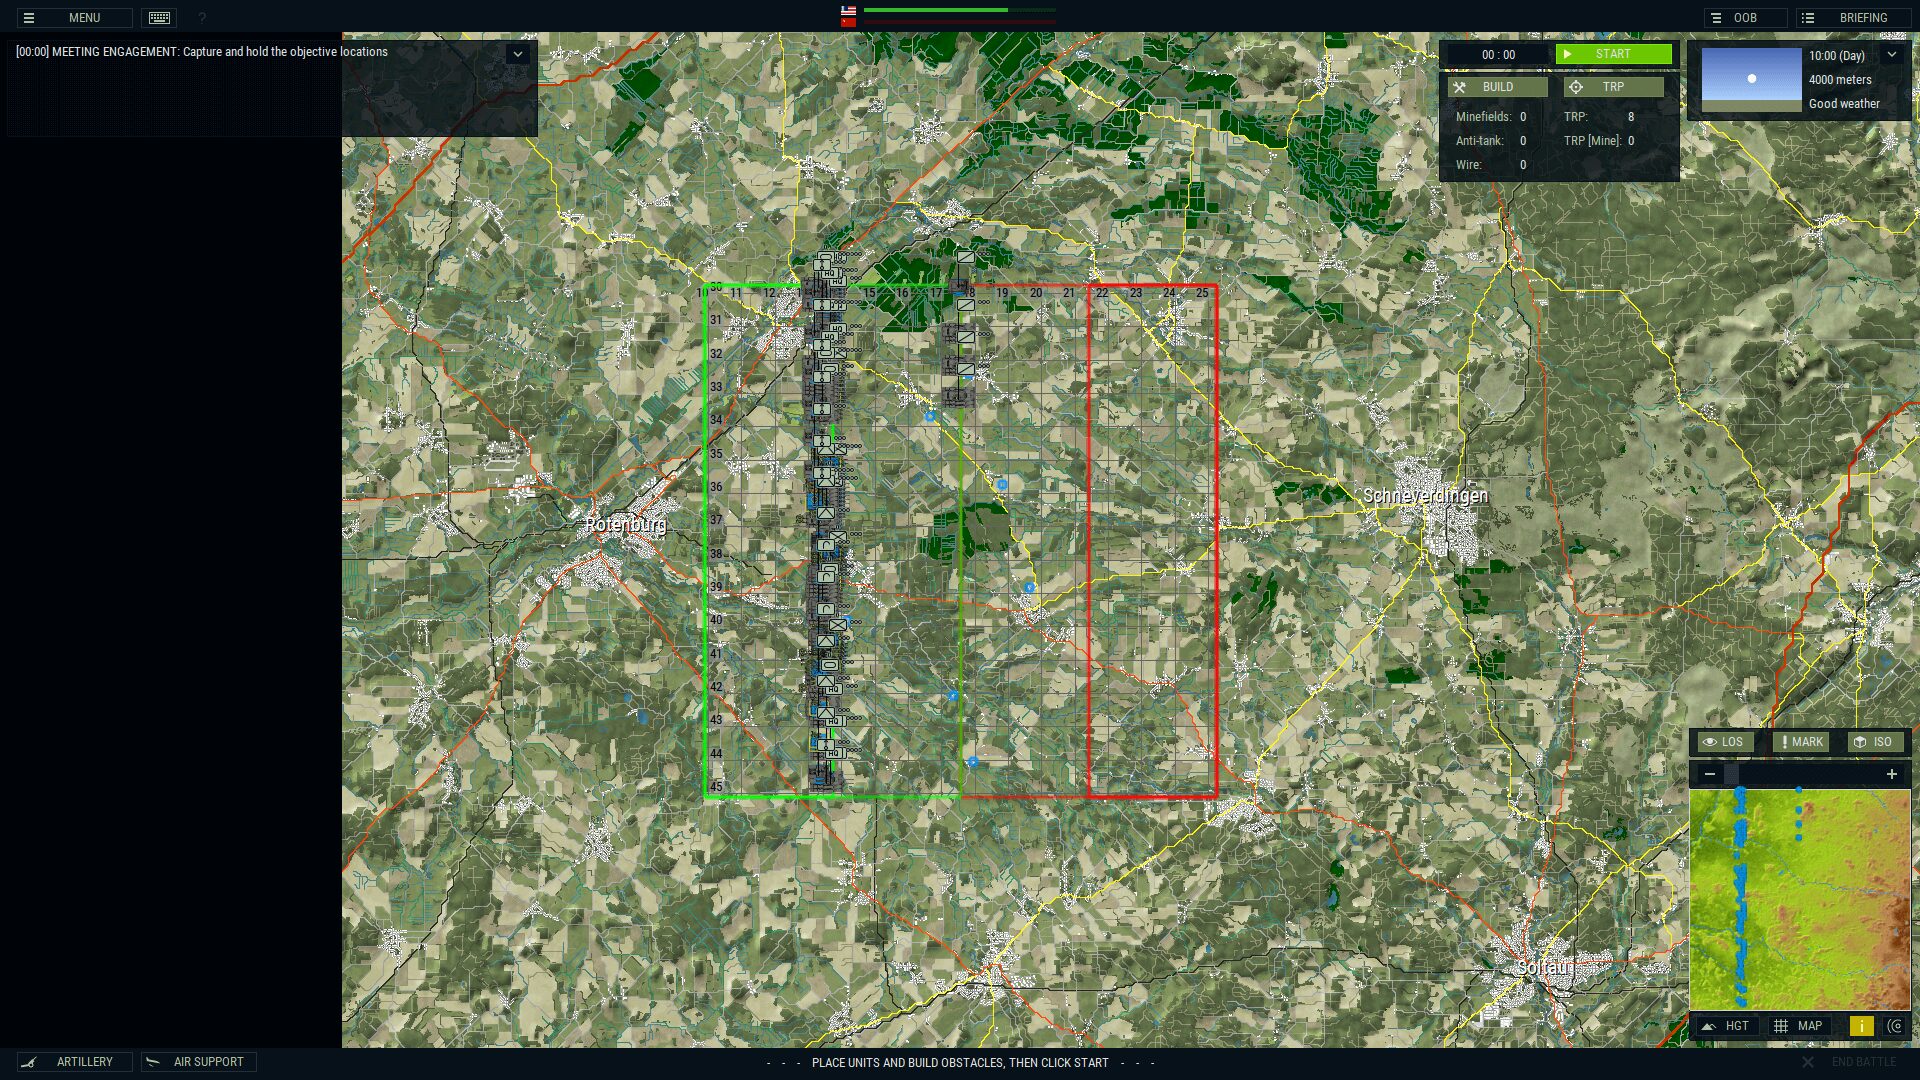
Objectives
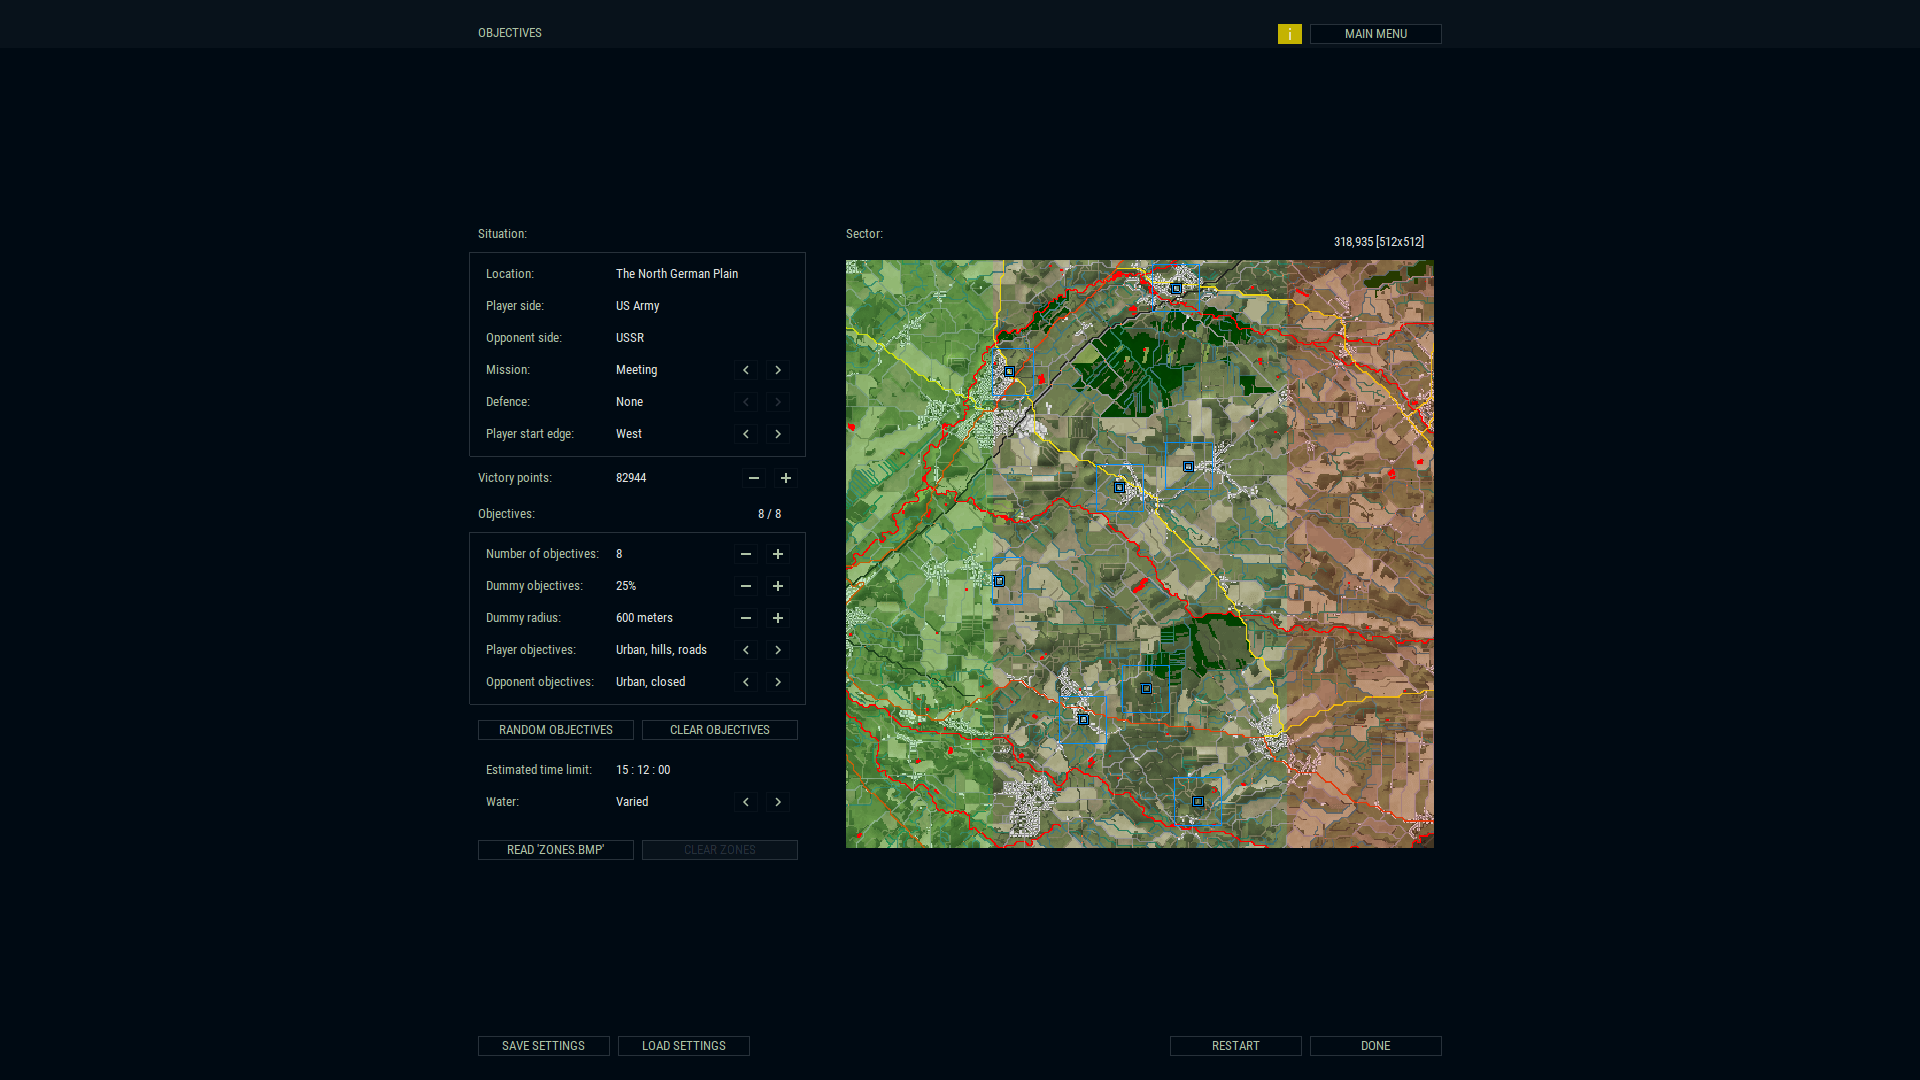
In this screen, the first thing you should probably do is set the Mission Type: Advance, Defend or Meeting. If you choose either Advance or Defend then another choice comes into play — whether or not you want the defending side to have additional defenses. You can still choose to not have any, but now you can also choose between Dug-in and Dug-in+Fortified. Additionally, the defending side will have all of the objectives in their section of the map. If Meeting is chosen then all of the objectives are placed in the area between the two force’s set up sections. Now, you can also choose which direction you want your army to set up — as though you have arrived from that direction.
Next, you set the amount of Victory Points for the scenario. Obviously, the higher the number of points, the longer it’ll take the battle. There’s a timer at the bottom of this screen that will give you an approximate length of the conflict. It changes synchronously with the amount of VPs added or subtracted. Oh, you already know that I set the number very high.
Right here, I’ll go into the winning/losing/victory-or-not part of Armored Brigade. The scenario ends when either you or your enemy runs out of victory points. There are two main ways to become victorious. First, occupy the objectives — which I’m getting to cover. Second, avoid casualties. Casualties are the worst and make your victory points drop quickly. The mission type that you set affects the balance between objectives and casualties. If you chose either Advance or Defend, then the defending side has half as many victory points than the advancing side. If you’re doing a meeting engagement, casualties affect scoring 50% more than in the other two types. So, General, we’re going to war. Try not to get anyone killed, m’kay?
Right after your VPs, you can set your number of Objectives (from 1 – 16). Another unique, and extremely cool, part of Armored Brigade is while doing this, you can set a certain percentage of Dummy Objectives (0, 25%, 50% or 75%) along with their size (300 – 1500 meters). Neither you nor your foes will know which objectives are ‘real’ or no. After knowing how many total objectives you want, you then set them on the map. There’s a Random Objective button that I like to use that places them all down. If I don’t like it, I can hit it as many times as I want. There’s also a Clear Objectives button as well. If you chose either Advance or Defend, all of the objectives will be in the defender’s setup zone. If it’s a meeting engagement, they all go in the middle, in no-man’s land. I’m generally happy the first time they’re randomly placed… except for a pet peeve of mine: I don’t like them to overlap each other. That’s just an idiosyncrasy of mine which is probably meaningless as to how the game plays.

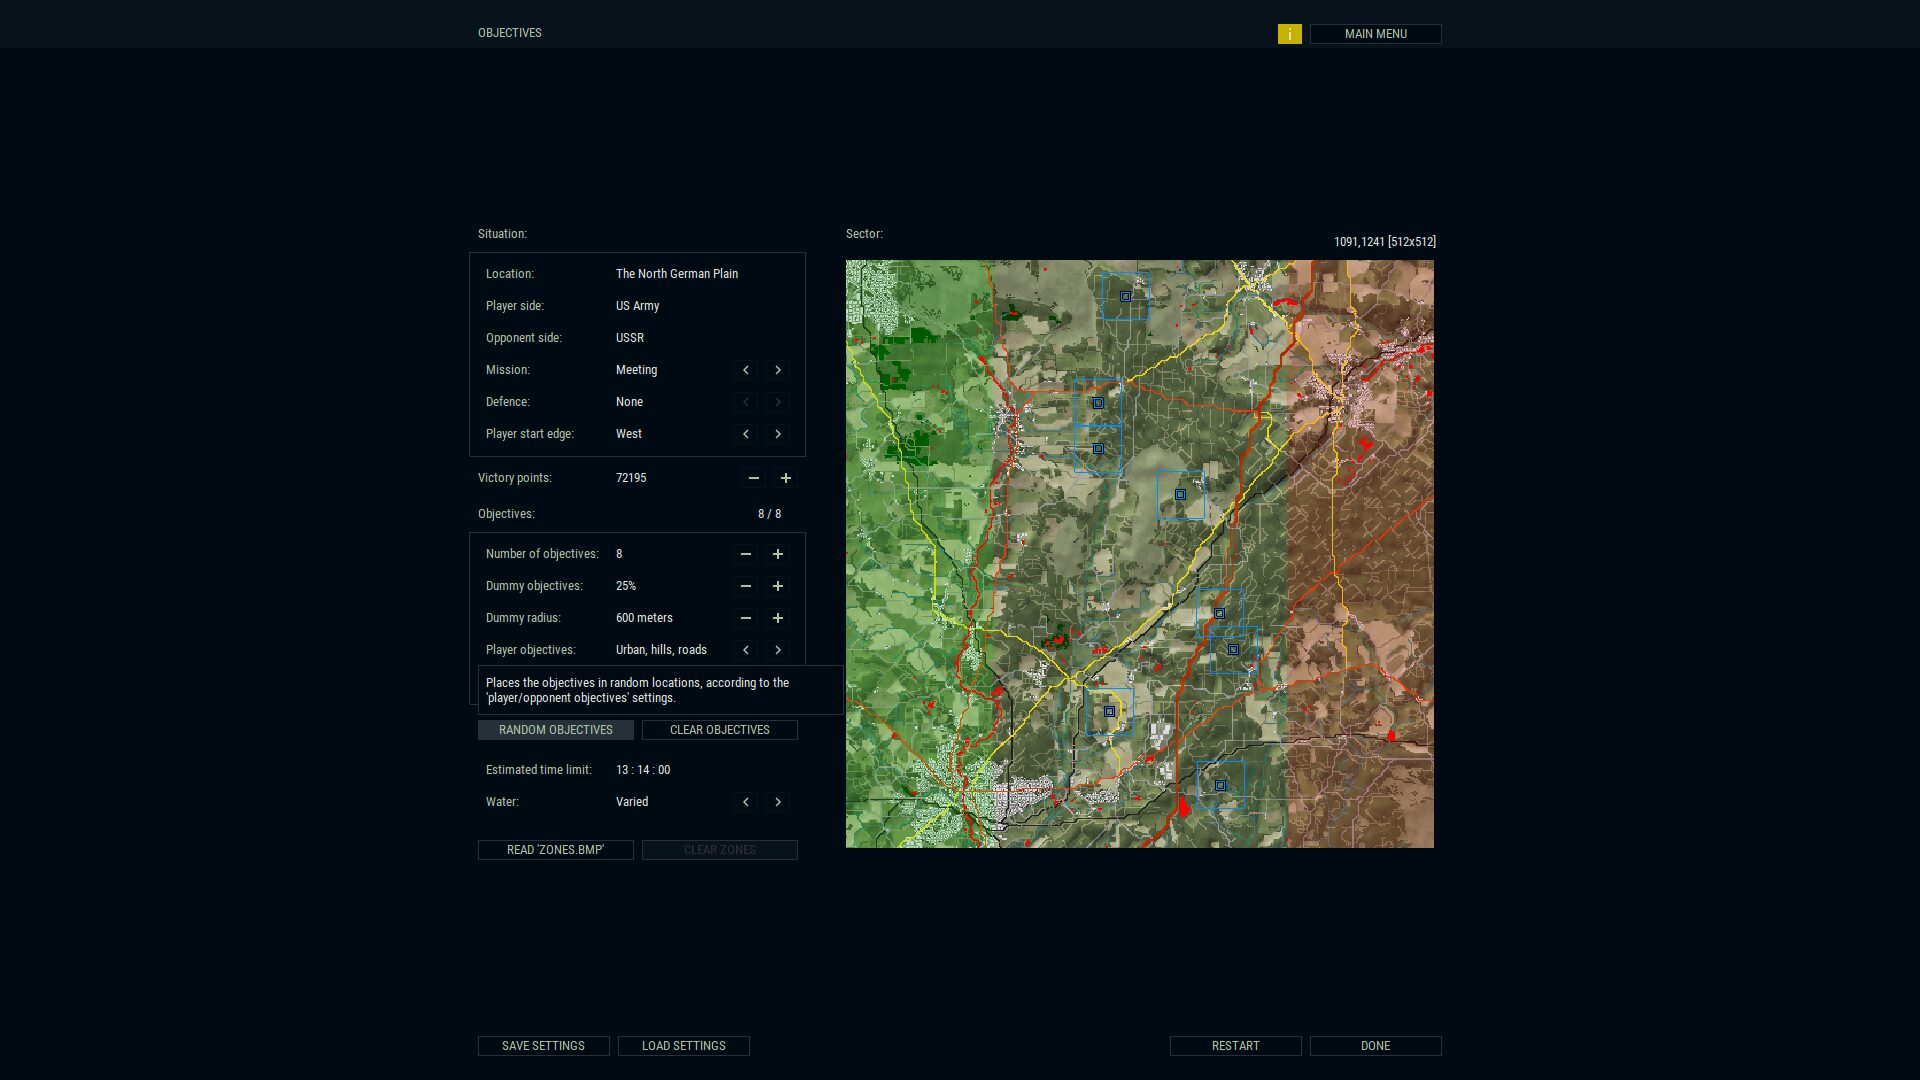
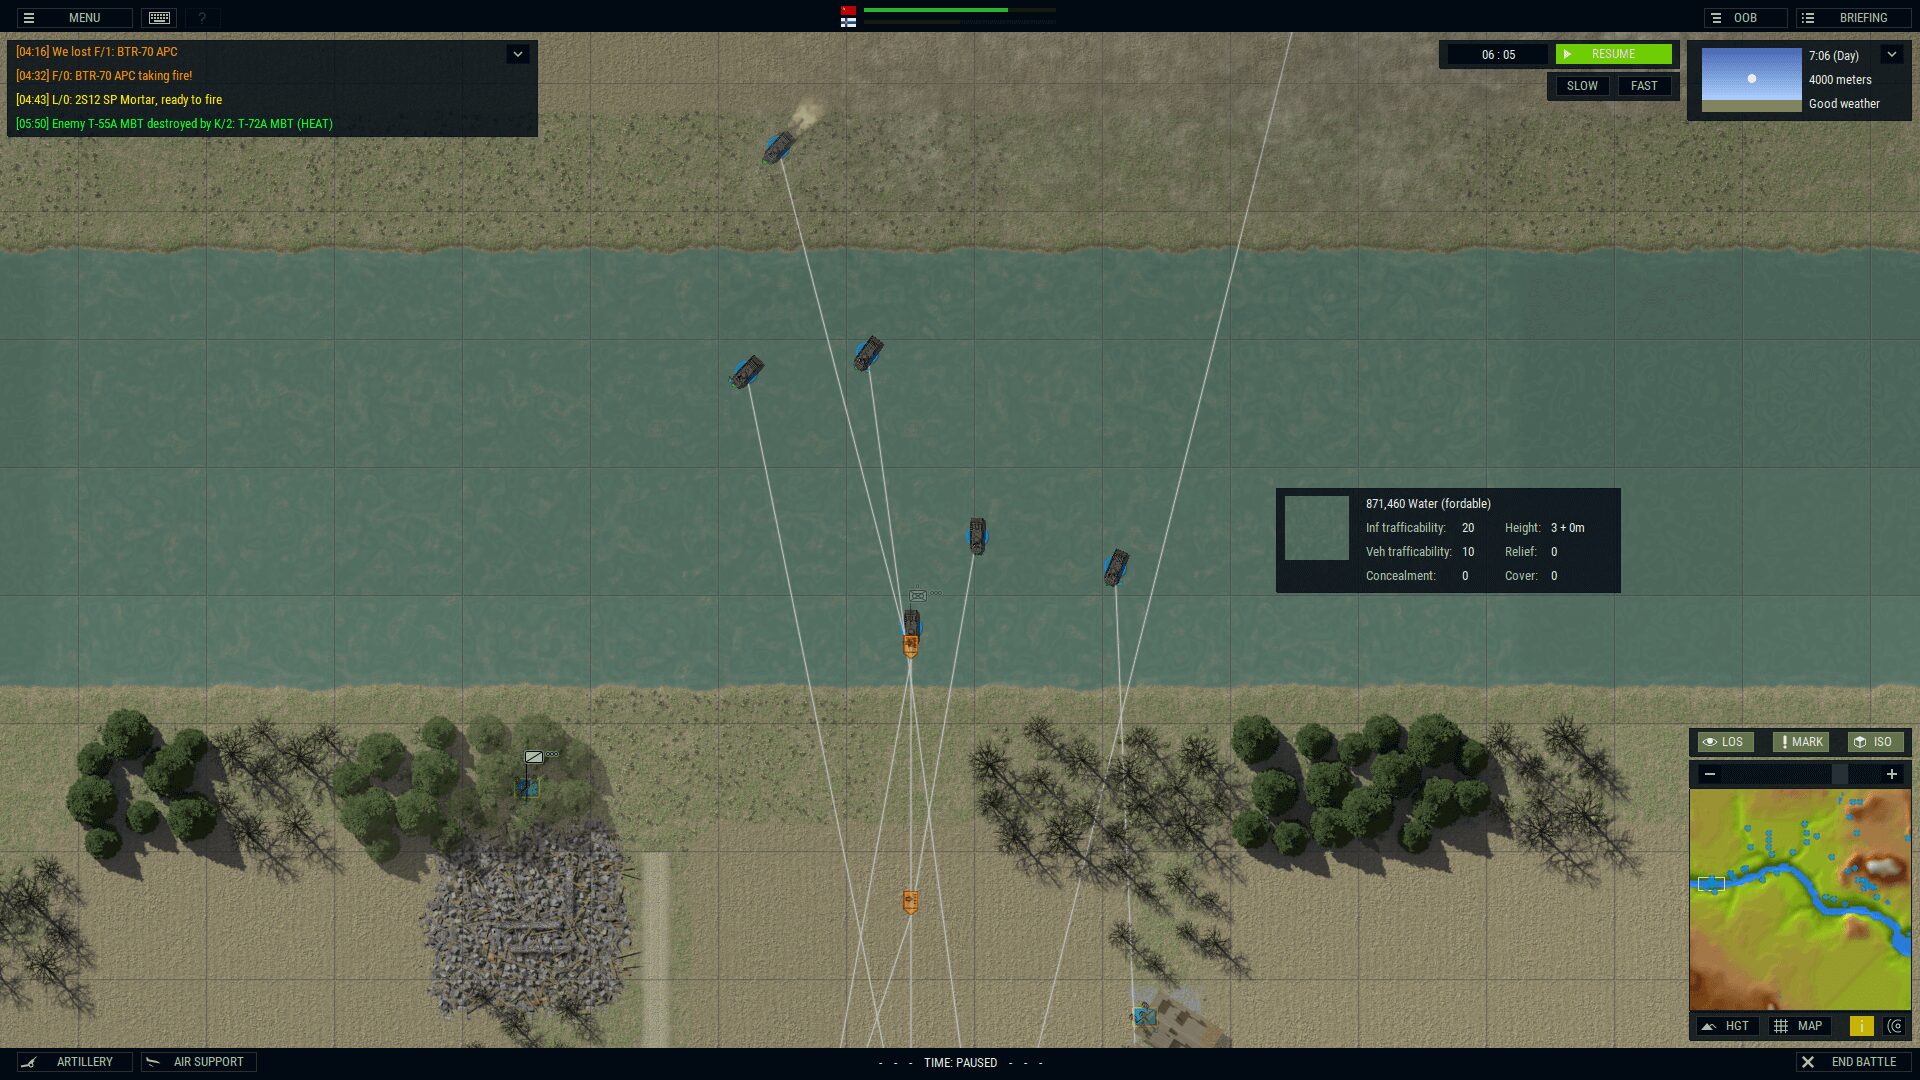
After they’re set, you then choose each force’s player objectives, which don’t have to match each other, of course. They are 1) Urban, hills roads 2) Urban, closed or 3) Open, roads. The defaults are based on the force type settings you chose (Armor, Mechanized, Infantry or Dynamic). Lastly, you can adjust the water type which can be Varied, Fordable, Frozen or Impassable. Warning: if you choose all of the water to be Impassable, it could possibly make the scenario unplayable. I always go with Varied —so I can ford some, but not necessarily all.
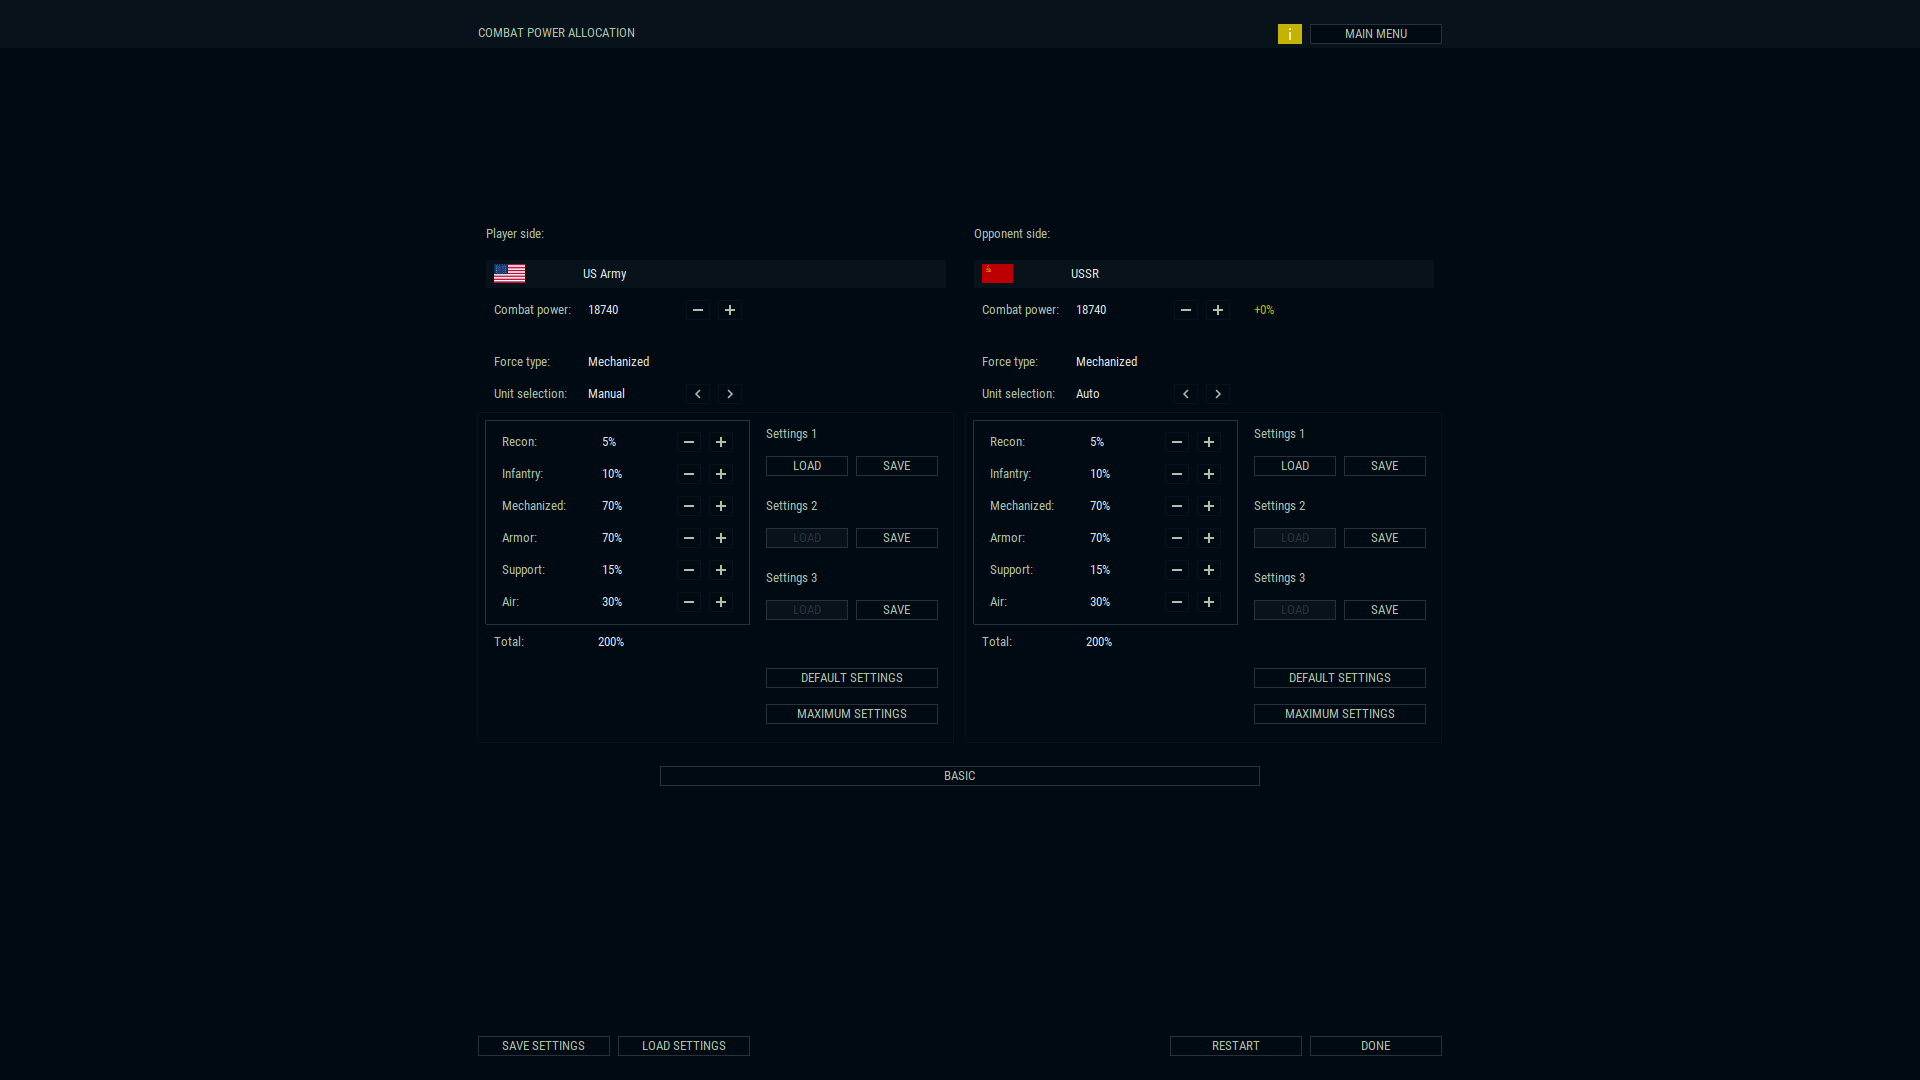
Combat Power Allocation
Whew. Well, we got the map set up. Now, even better guts to play with (or, are we into intestines now?). Now is when you set the Combat Power — meaning how many Purchase Points you get to spend on various portions of your army. Right here is where you can also give your opponent an advantage or disadvantage, in percentage. Since you’ve already chosen the two force types, you can now decide whether to make the unit selection(s) manual or automatic. If you did not choose Dynamic initially, then your force is divided into percentages — which, of course, you can change. You have Recon, Infantry, Mechanized, Armor, Support and Air. Off-board artillery is at the bottom, and will cost purchase points, but is not factored into the makeup of the total units.
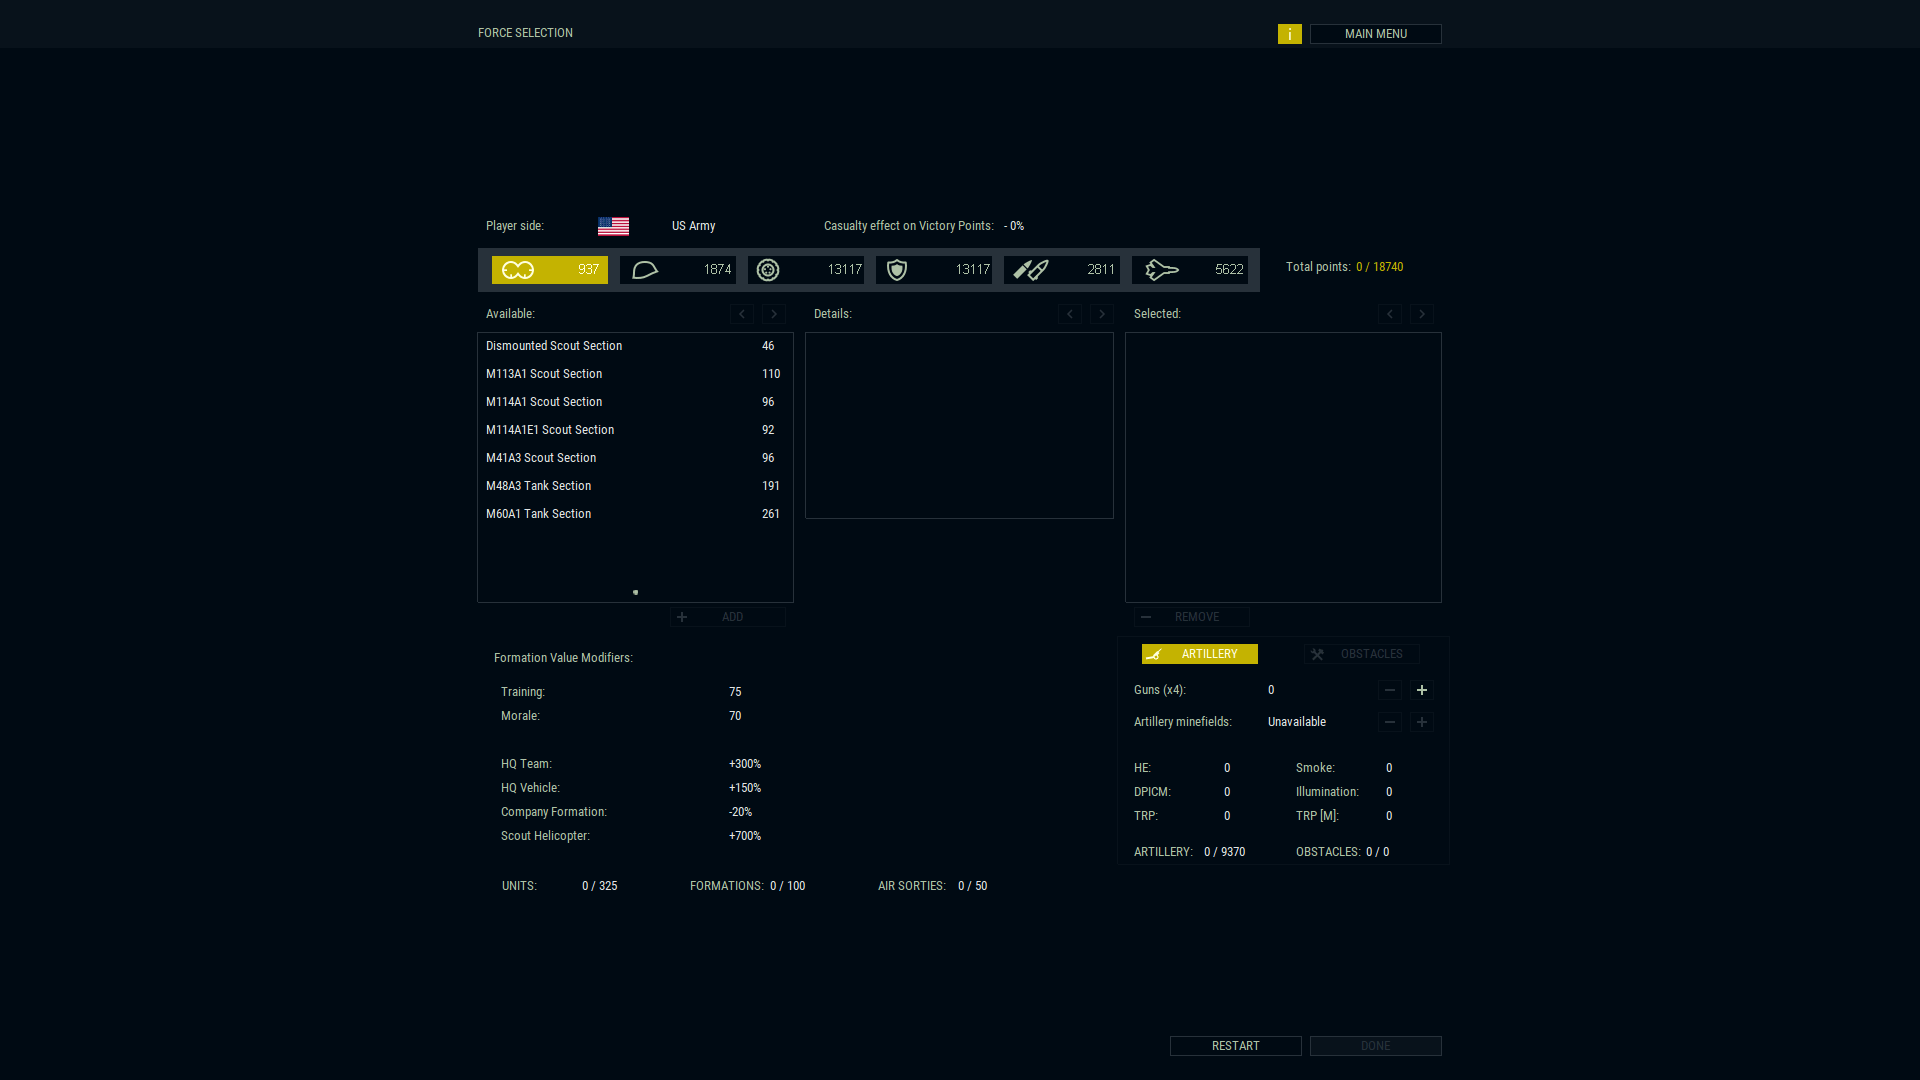
All this means is that you can’t exceed the percentage of your total army in each specific category. Once again, all of the values can be easily changed though. The defaults serve both as an outline of a basic order of battle as well as determining how the AI will spend the points allotted to it. This is especially useful if you have the AI choose both country’s units.
I always do Manual for mine and Auto for the enemy. It’s more surprise-y that way. However, I don’t want to be taken aback by what I’m going to be using. Idiosyncrasy, part two. You can always just use the cards you’ve been dealt. The only time I ever got into trouble was once when I had my Recon set too low. Go back and start all over? Newp. Just dealt with it.
This brings me to my only complaint with the game. You can’t go back a page. However, you can, and should, save your progress at the bottom of every screen. That way, if you’re pinheaded like I am, and have to start over, at each screen you can simply hit ‘Load’ until you’re back to the point where you wanted to change something. Whew, crisis averted.
Mission Options
This is a real-time with pause game. However, if you want to play it WEGO, there’s a button on this screen that says Rounds. You can set the rounds from between 30 to 360 seconds. However, just like a WEGO game, you cannot pause or save during the round. Even at thirty seconds, that’d be too much for me. Many times I’ll see something I did fatheaded… six seconds after I un-paused it. Yes, it’s possible to be both pin- and fatheaded.
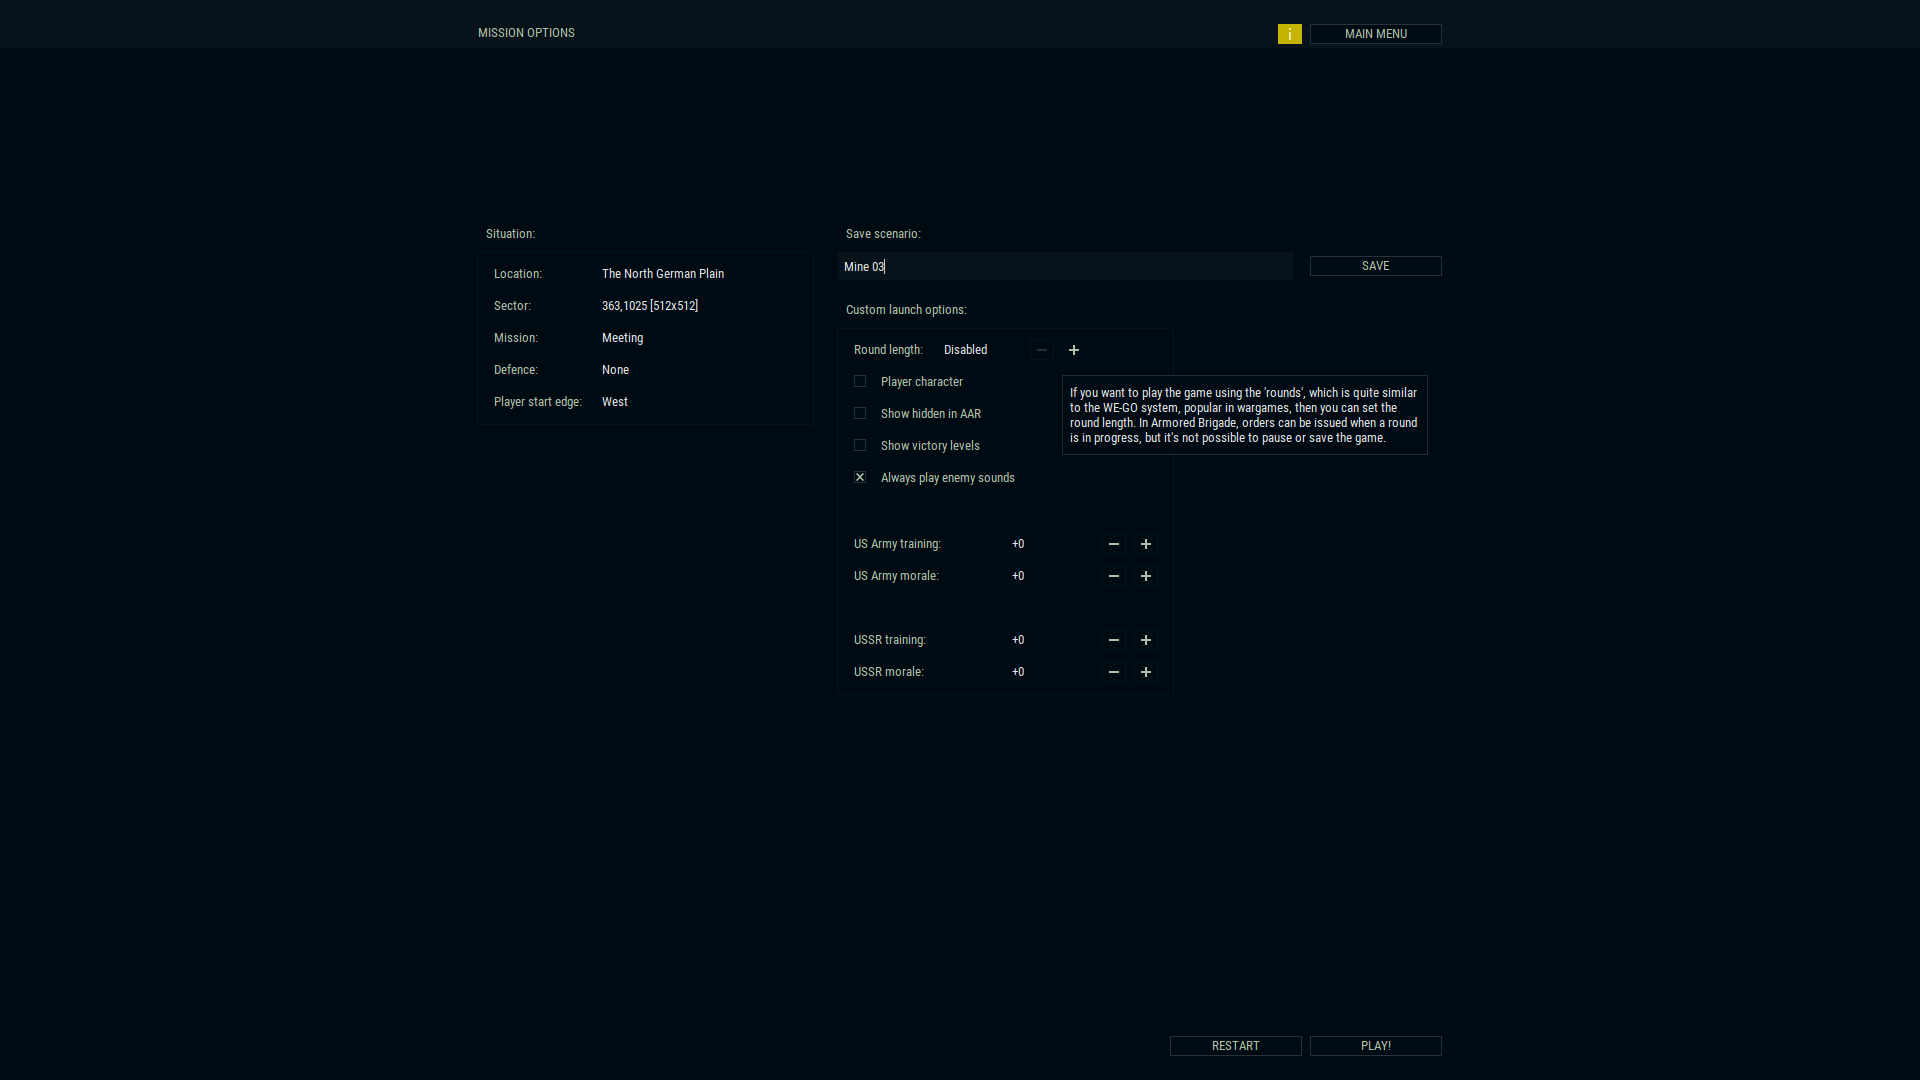
The next wicked-cool option on this screen is deciding whether you want to be on the battlefield! If you die, it’s game over immediately. So, if you feel that you’re mauling them and think it’s about 98% complete… one of their unseen scouts sneaks to your position and takes you out, you’re done. You lose. Sound also goes along with you being on the battlefield. You can only hear what your character can hear. This gives you an eerie uneasiness to the entire confrontation. At this point, though, I’ll point out that also on this page is a button to always hear all of the enemy sounds — negating your limited hearing range I just described. As with everything else, it’s always your preference. I liked being in the fray, but I also wanted to hear the whole war. There’s still the sense of protecting yourself, but I enjoy hearing everything that’s going on.
Along with being out there, for you, there is zero command delay. Also, your morale is static — it stays the same regardless of anything else happening. As important as I was out there, I generally used myself as a forward observer for artillery. Finally, the command unit can call in helicopters for help as well.

To finish this screen, there’s a box to turn off the fog of war. There’s also a button that will track the victory levels as the scenario plays out — negating the fog of war. That’s what I read anyway. No way in hell I’m playing a wargame without the mystery that accompanies fog of war. Finally, remember how I said, very early on, that each faction has its own, intrinsic training and morale? On this screen, you can adjust those levels to your heart’s content. After all of this, it’s time for the…
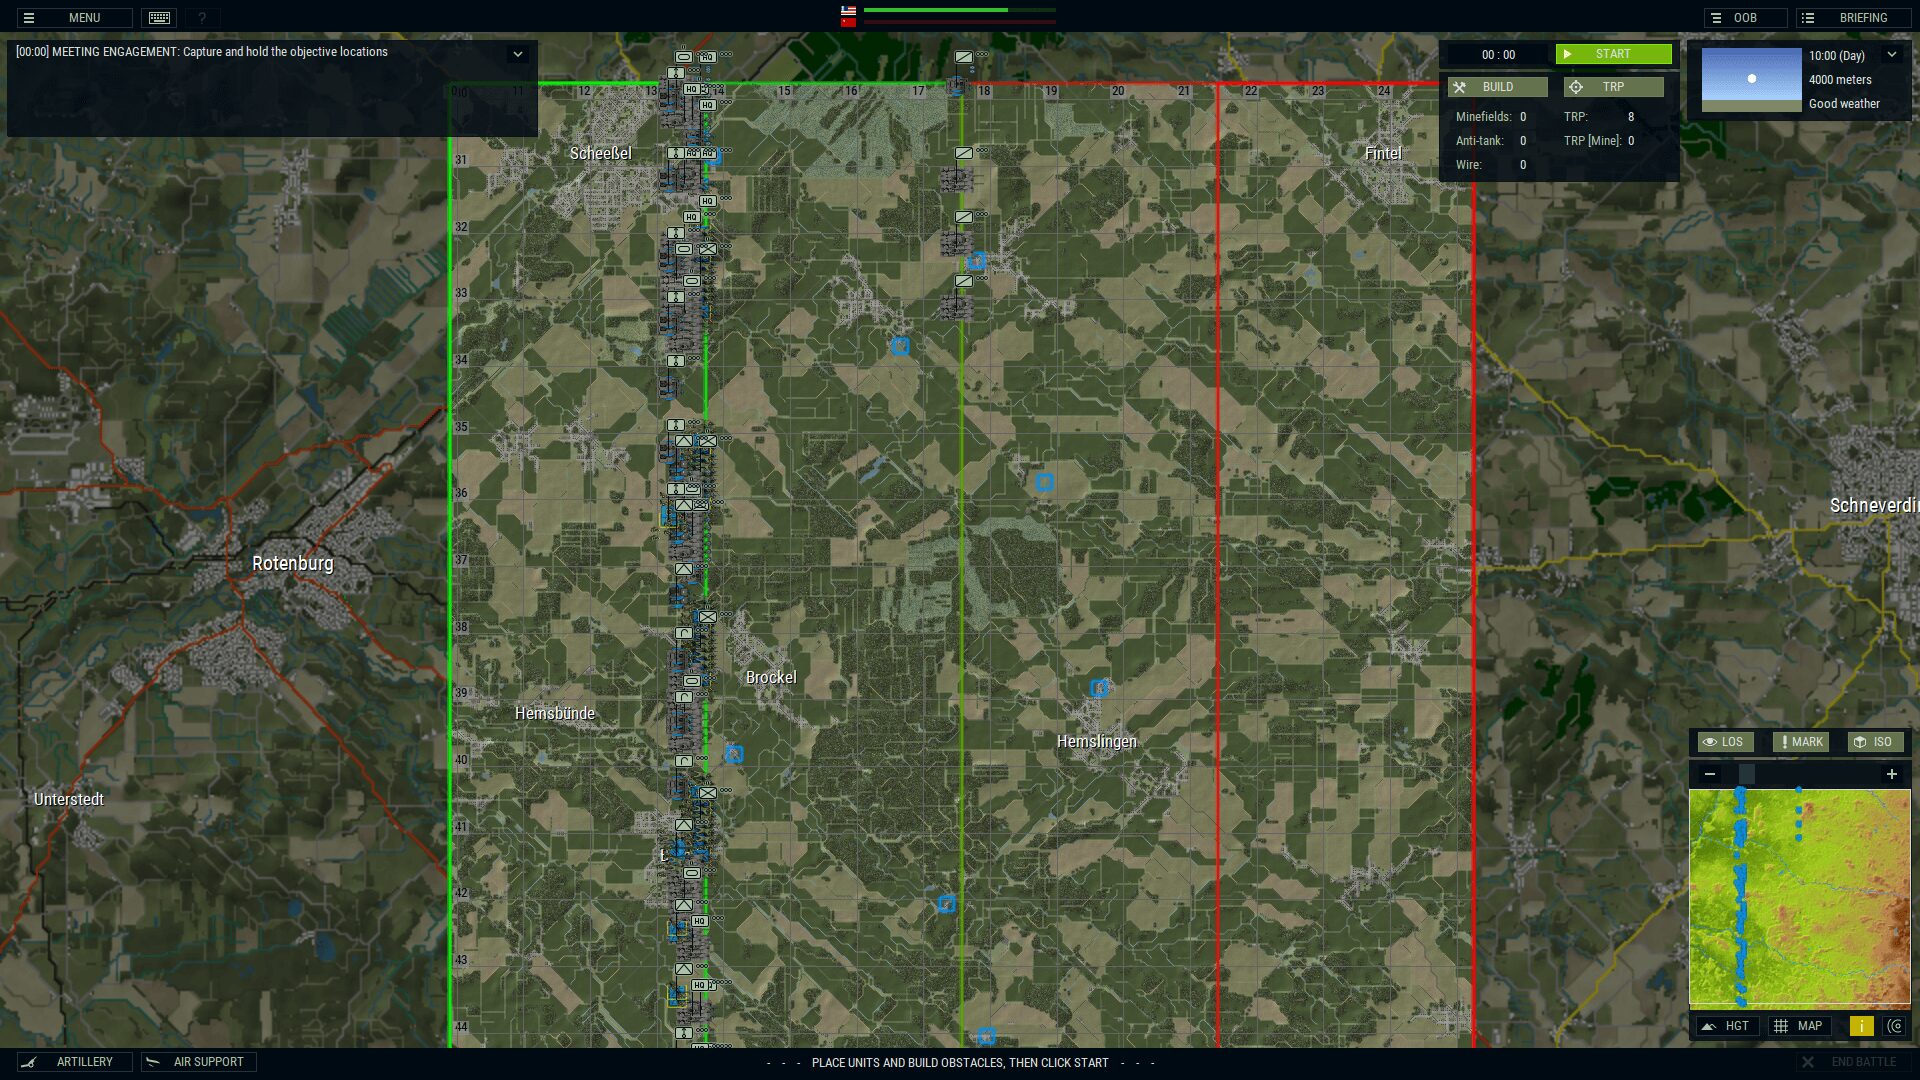
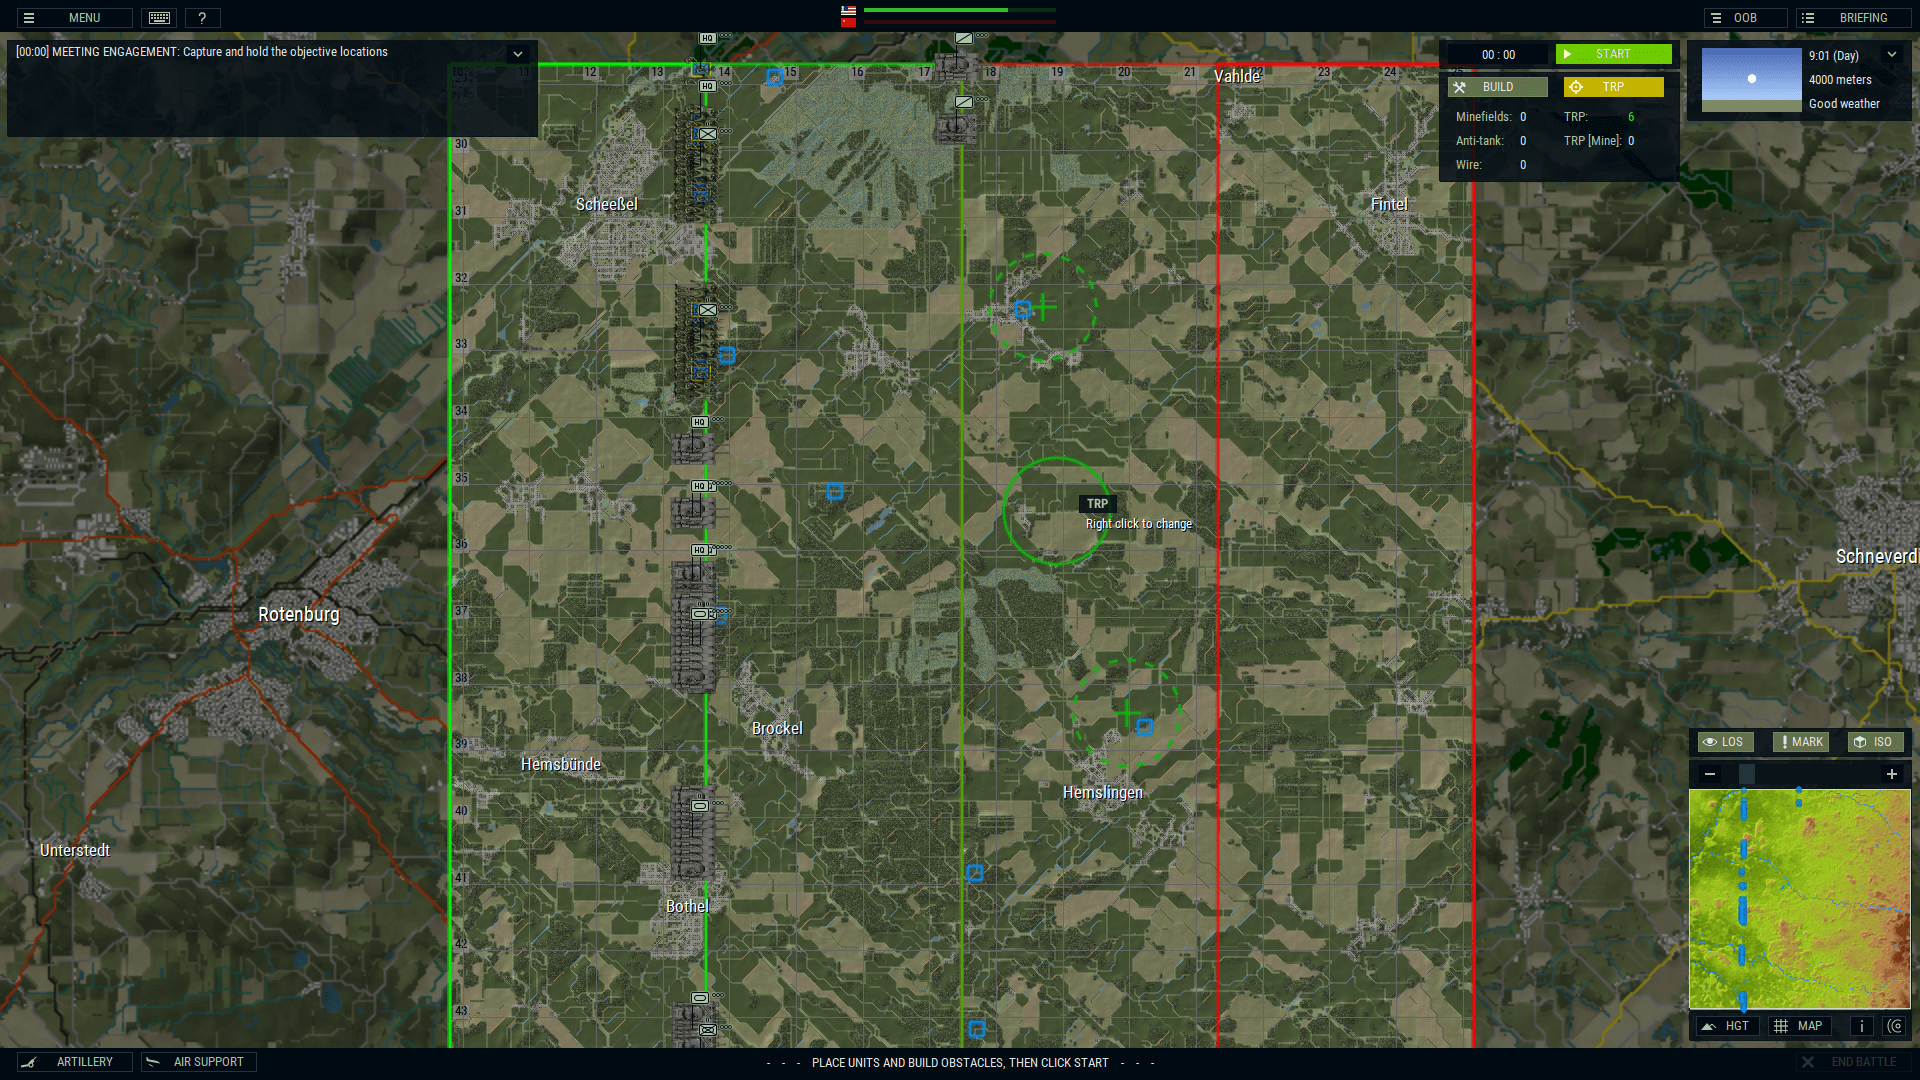
Deployment Phase
This is where you do all of the setup. You place your units within the confines of your deployment area, with recon units having a line further out. If you’re playing as the defender, provided you bought defenses (minefields, anti-tank and wire), you can deploy them now as well. You can drag and drop as many units as you want as well. You can move them individually or by an entire company. However you want to do it.

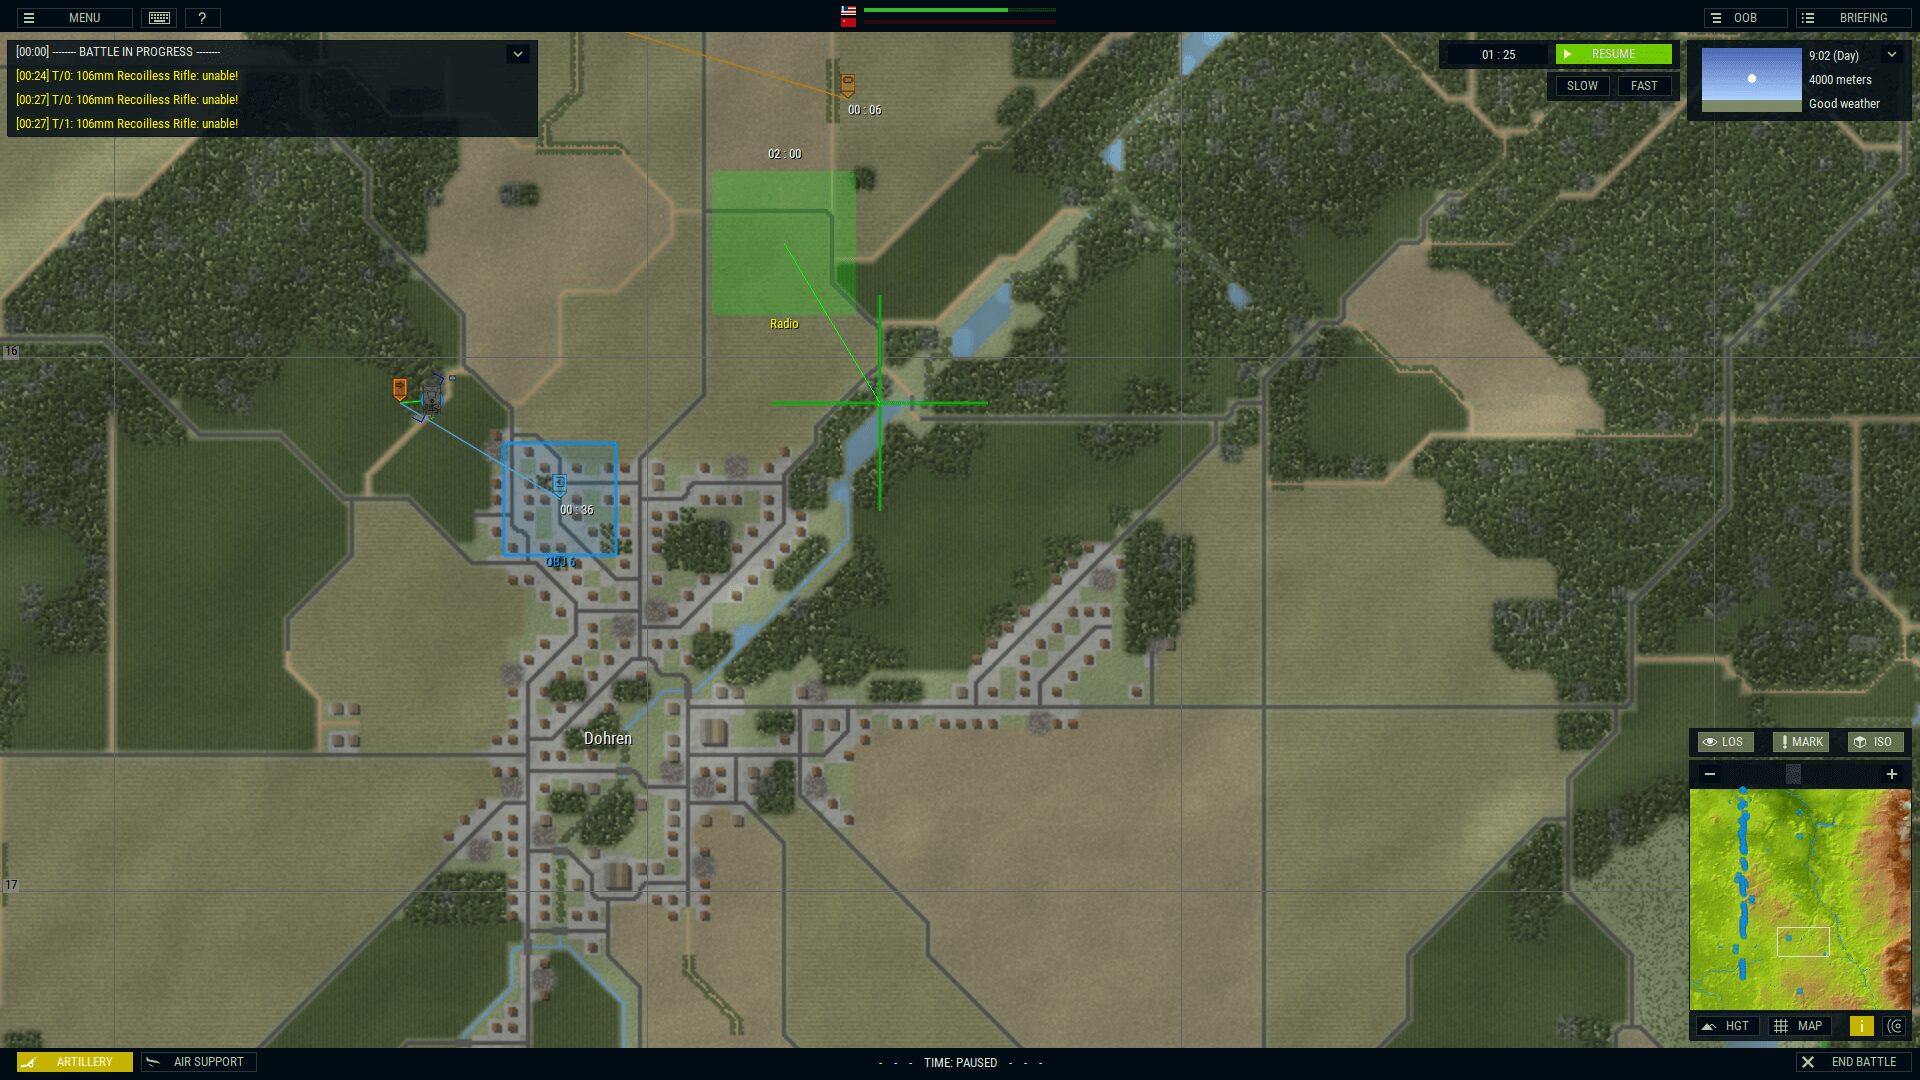
If you bought artillery and/or artillery mines, you also set your Target Reference Points now too. The game won’t let you even start if you haven’t set the TRPs. These are used to reduce the off-map artillery delay if the target area is close to them. Otherwise, as I have mistakenly done by placing TRPs in the wrong areas, I’ve called in artillery to a spot — not close to a TRP and without LoS from any unit. I’ve personally had six and eight-minute delays! Not good.
During gameplay, once the delay is over, it’ll start to rain down your arty for you. If you bought helicopters, you’ll also set from where they will arrive.
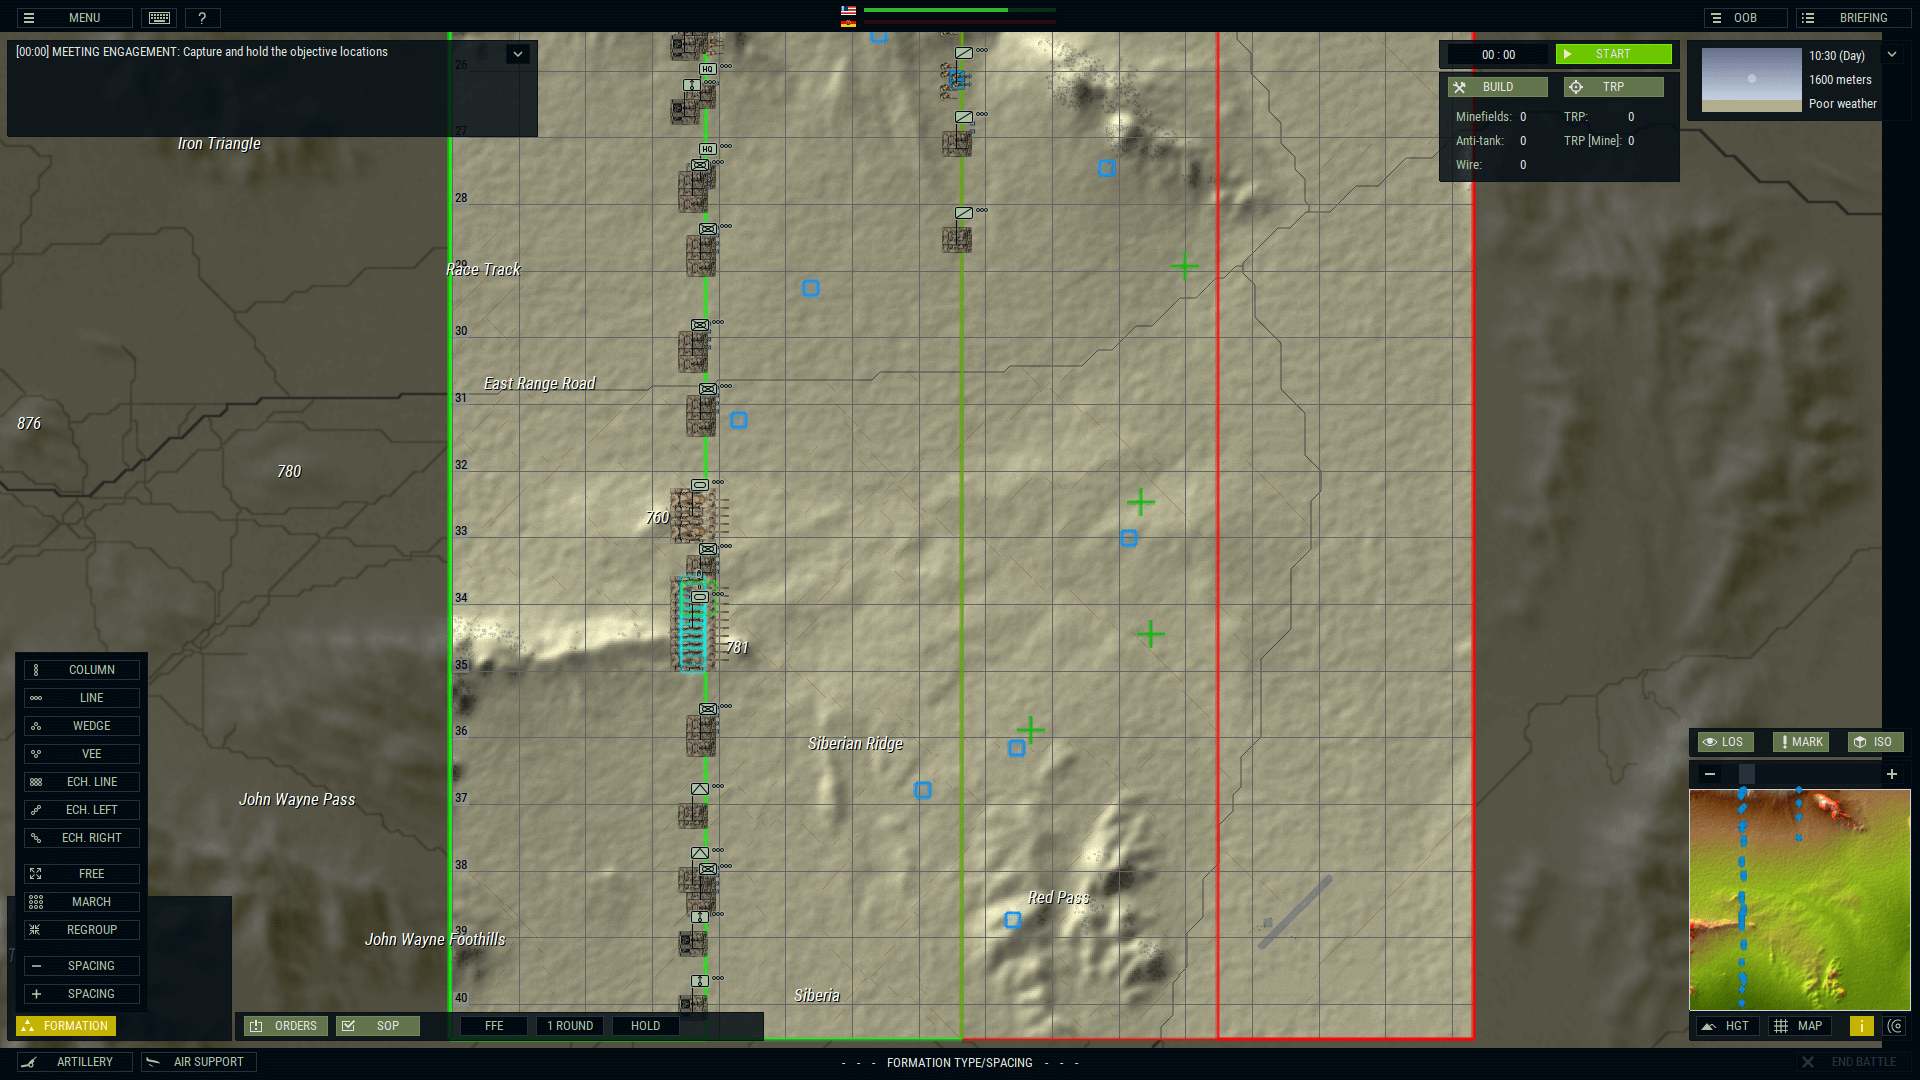
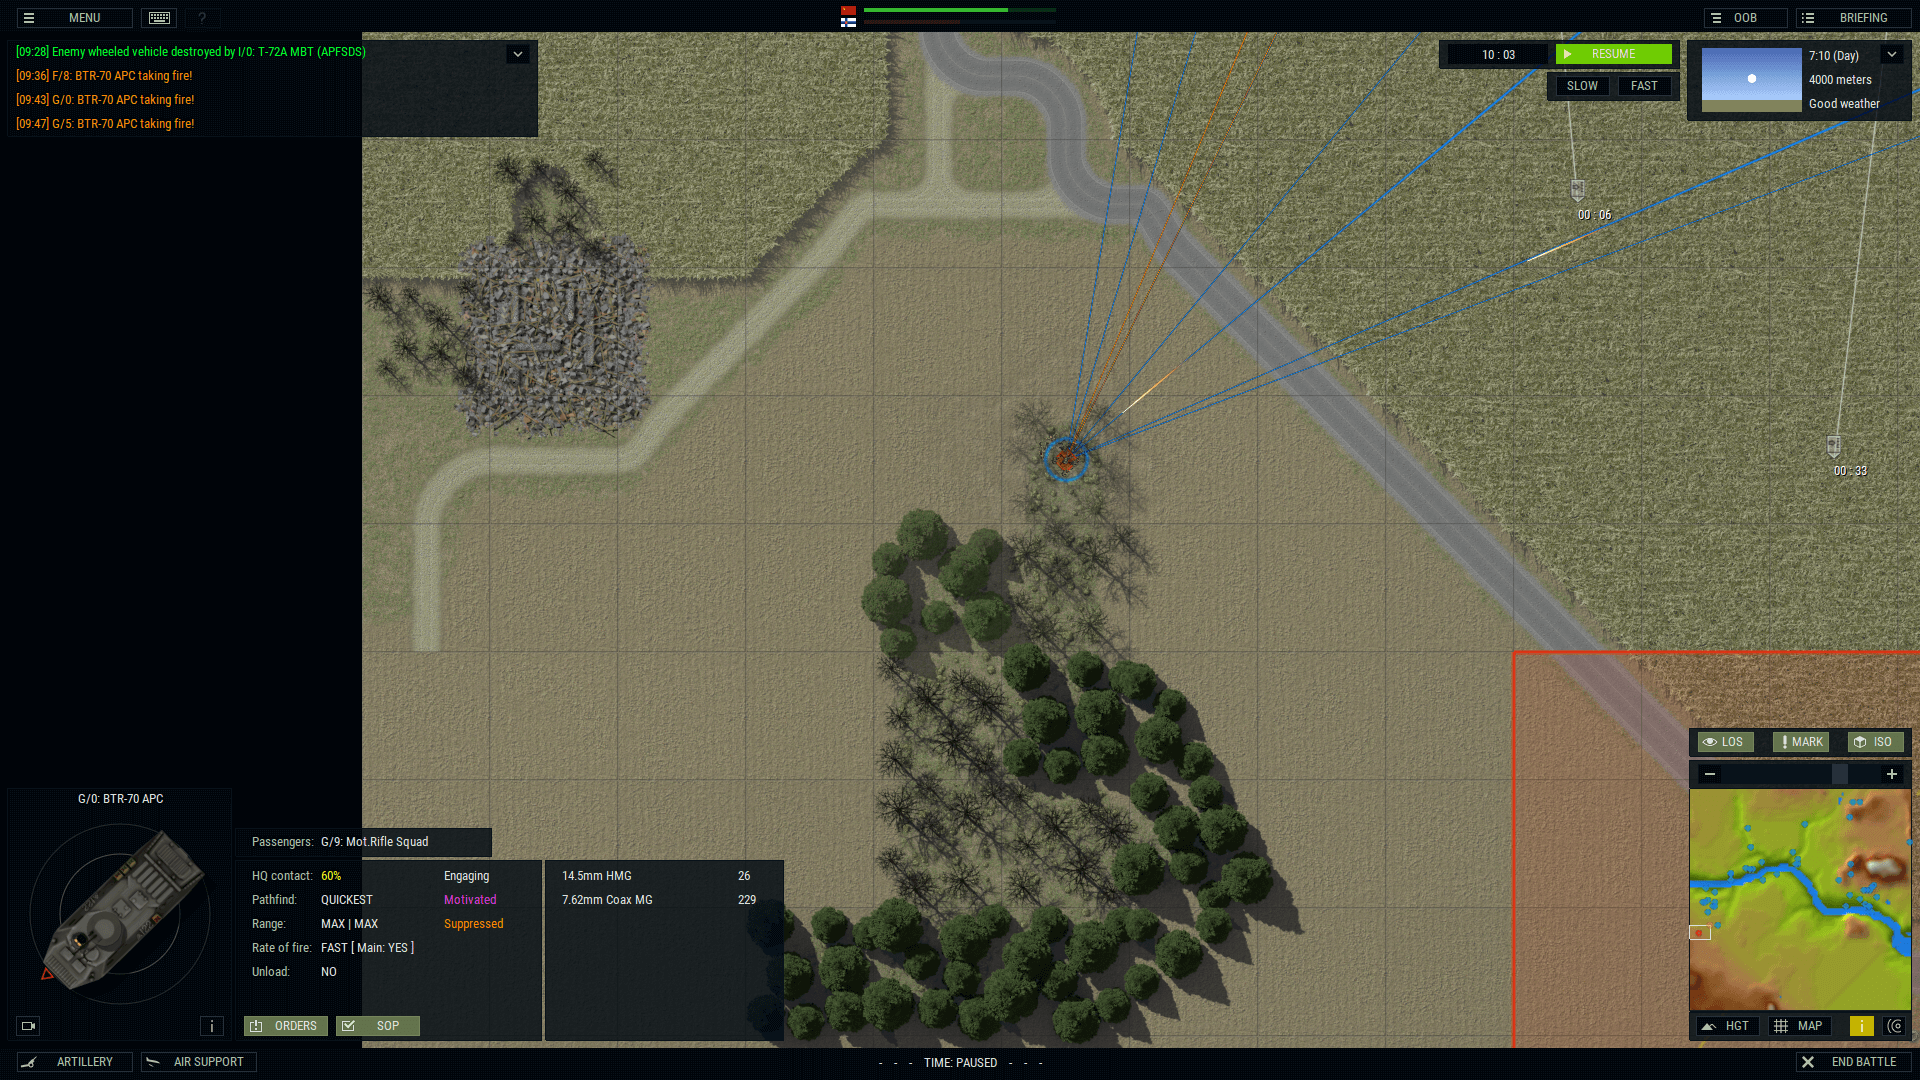
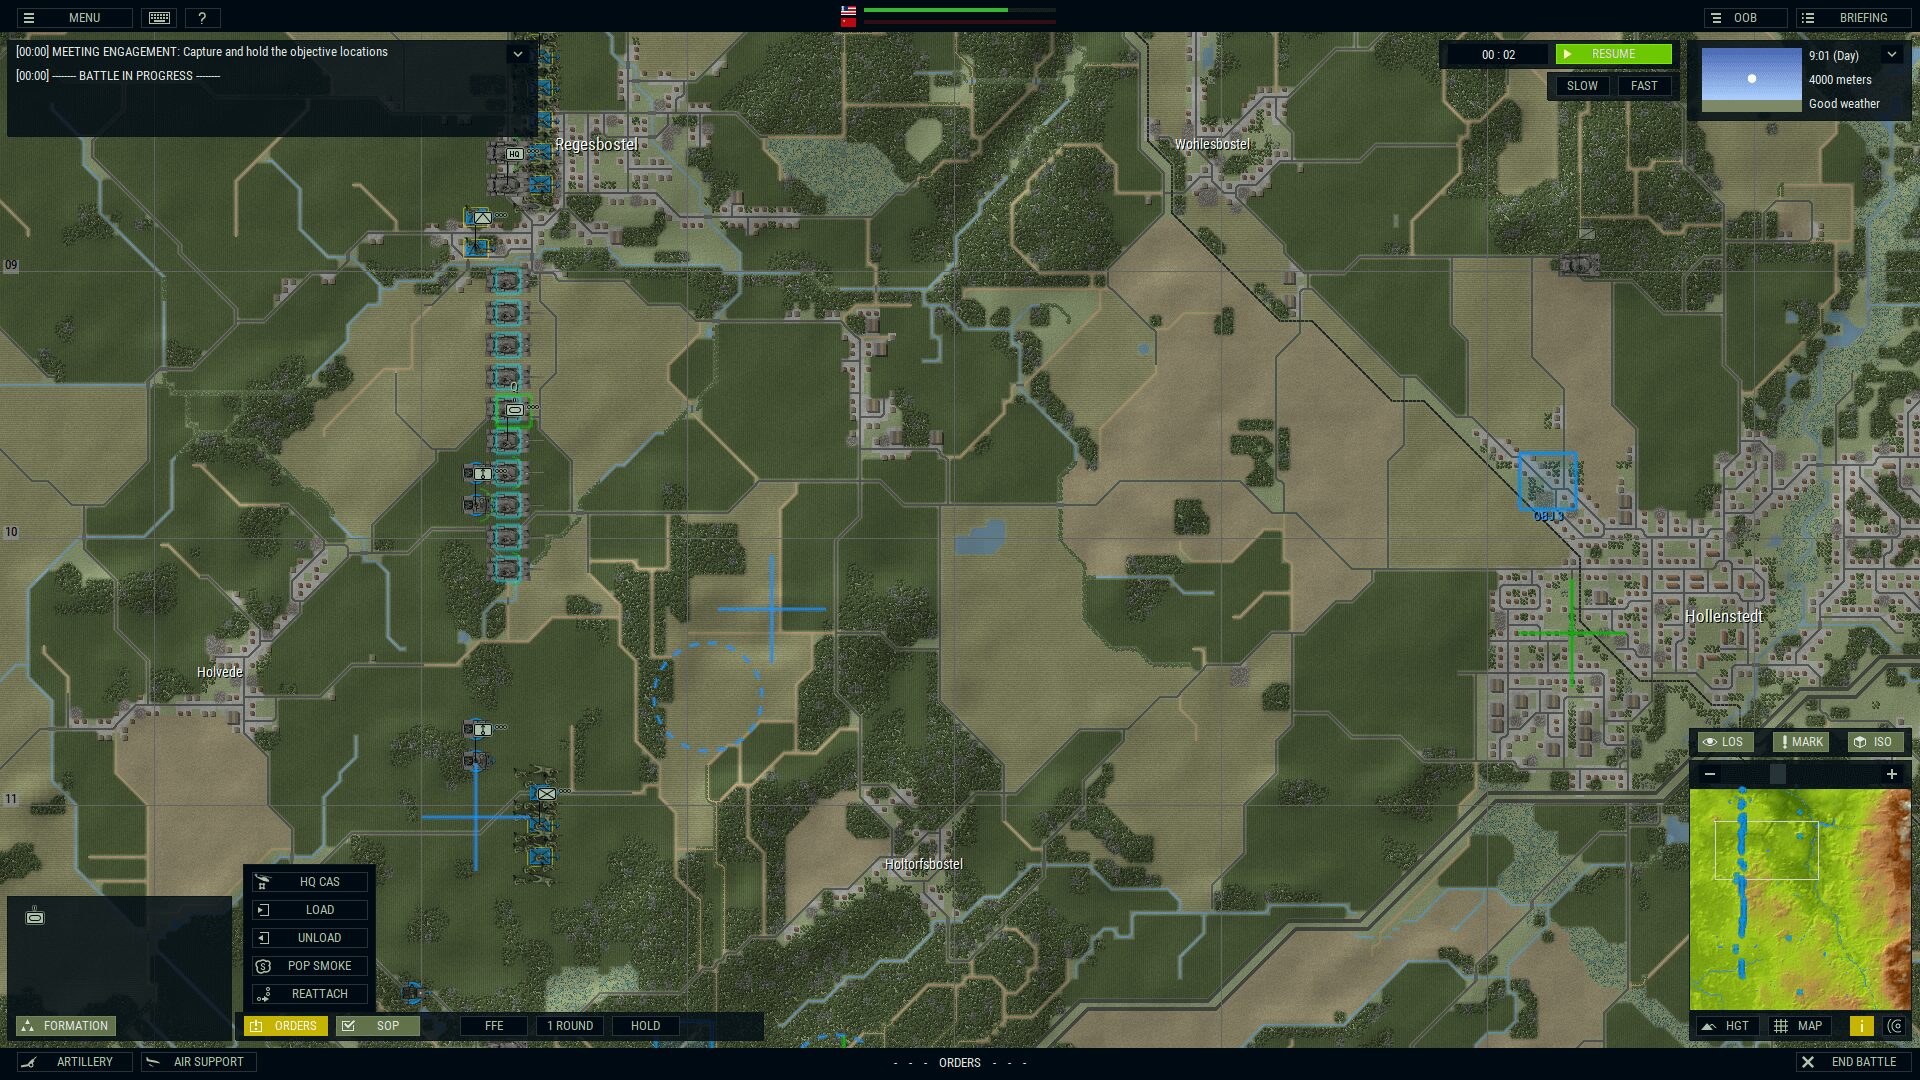
Once you’re satisfied with everyone’s placement, it’s time to give them orders. More absolute greatness from Armored Brigade: you can command entire platoons and companies all at once. Once you highlight a whole platoon/company, then the orders you give apply to all of them. Sure, you can still micromanage the hell out of them if you want, but once you choose an individual unit and do something different with it, it automatically detaches. Later then, you’ll have to manually reattach it.
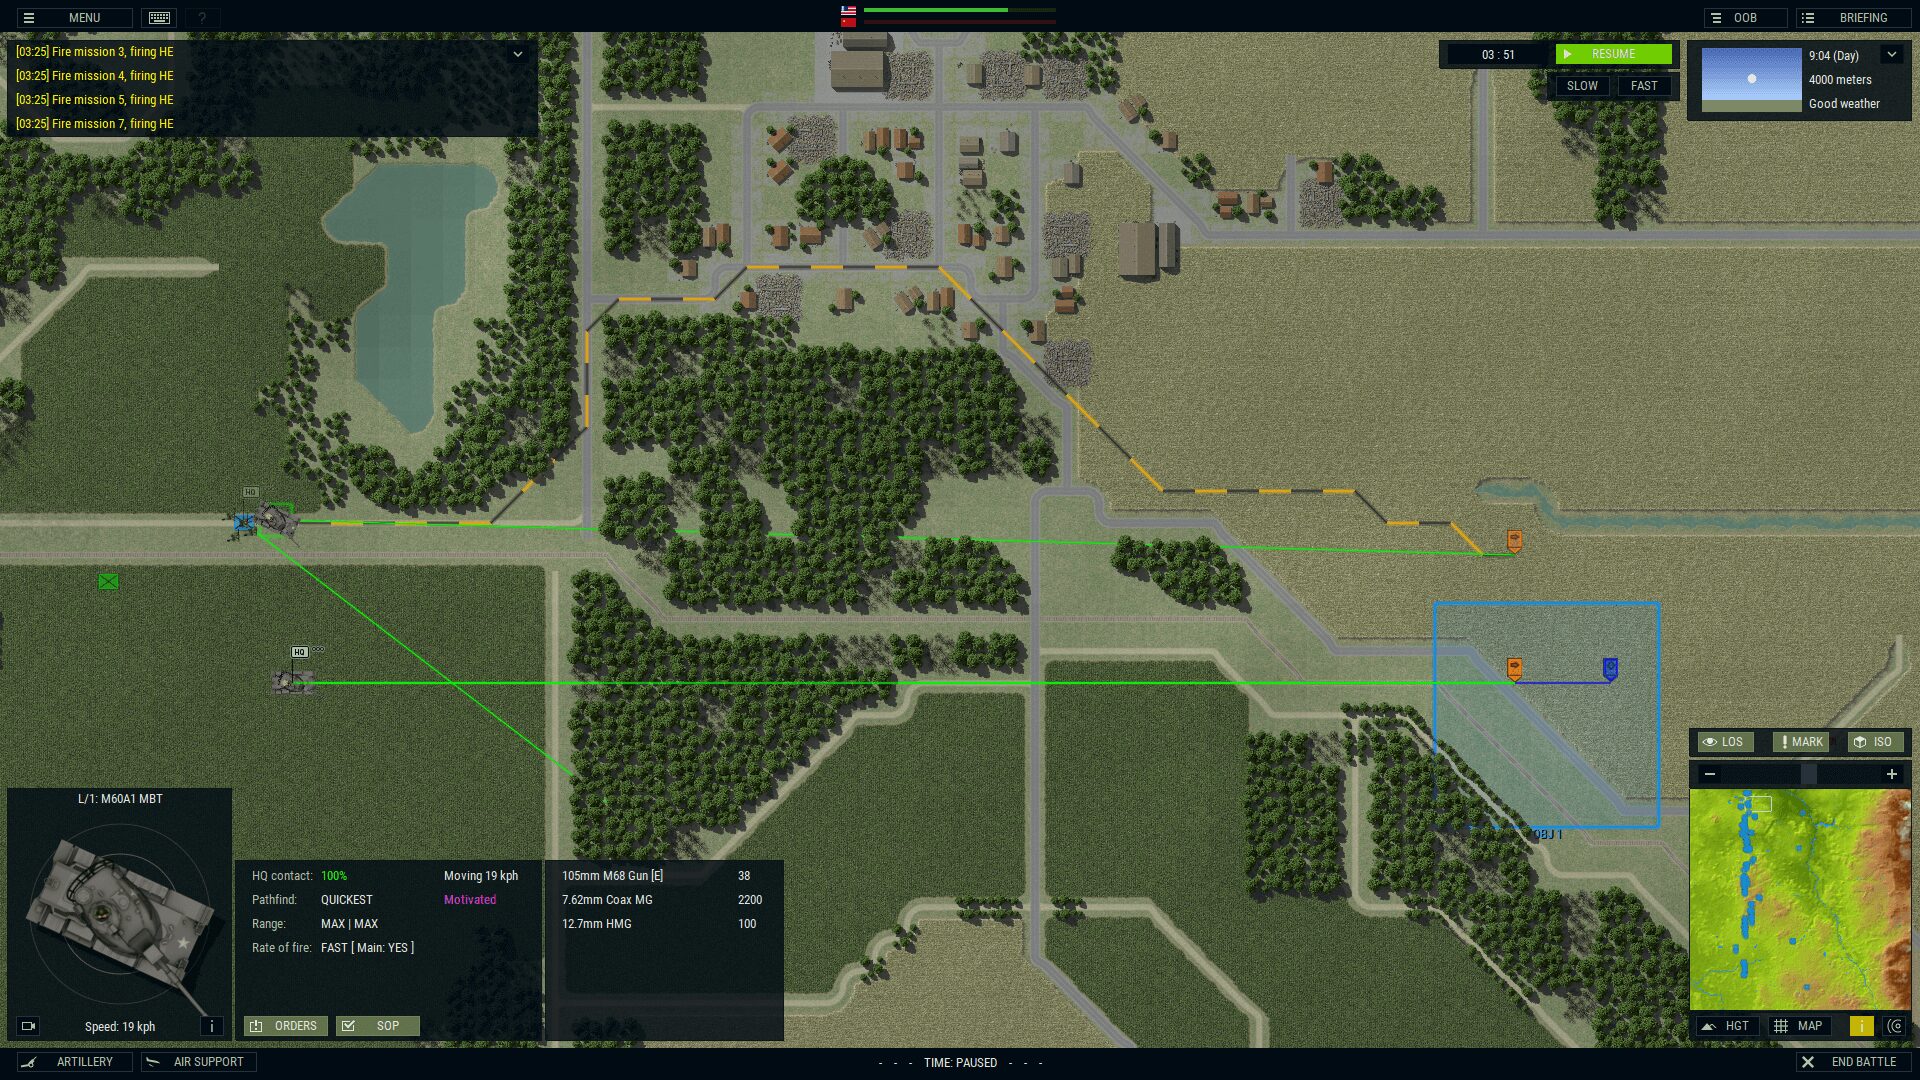
The first thing you can set is their formation — column, line, wedge, vee, etc. Then, you can even tweak the spacing between the units. You can give them special orders like load, unload, pop smoke and reattach. Next, and very important, is to set their Standard Operating Procedure (SOP). This will tell them how to behave, without micromanagement hell. Note: they are really very good about following orders. Insert more gushy Armored Brigade applause here. It’s incredible to be able to control a vast amount of units with very little effort.
Their first SOP to set is how they pathfind: Short, Quick or Cover. All pretty self-explanatory — the shortest path, the quickest path or slowly move to the destination while using cover as much as possible. Right or wrong, I use Cover a ton more with infantry than with vehicles.
Next, you want to set their Soft Target Range: Hold, Effective or Max. You’re deciding when they should fire on soft targets. Obviously ‘Hold’ is to either stay hidden or to use as an ambush. In the latter case, you’ll just have to pay attention to who you have holding — so when the enemy is close, they’ll get a nasty, pre-planned surprise. Boom. Gotcha.
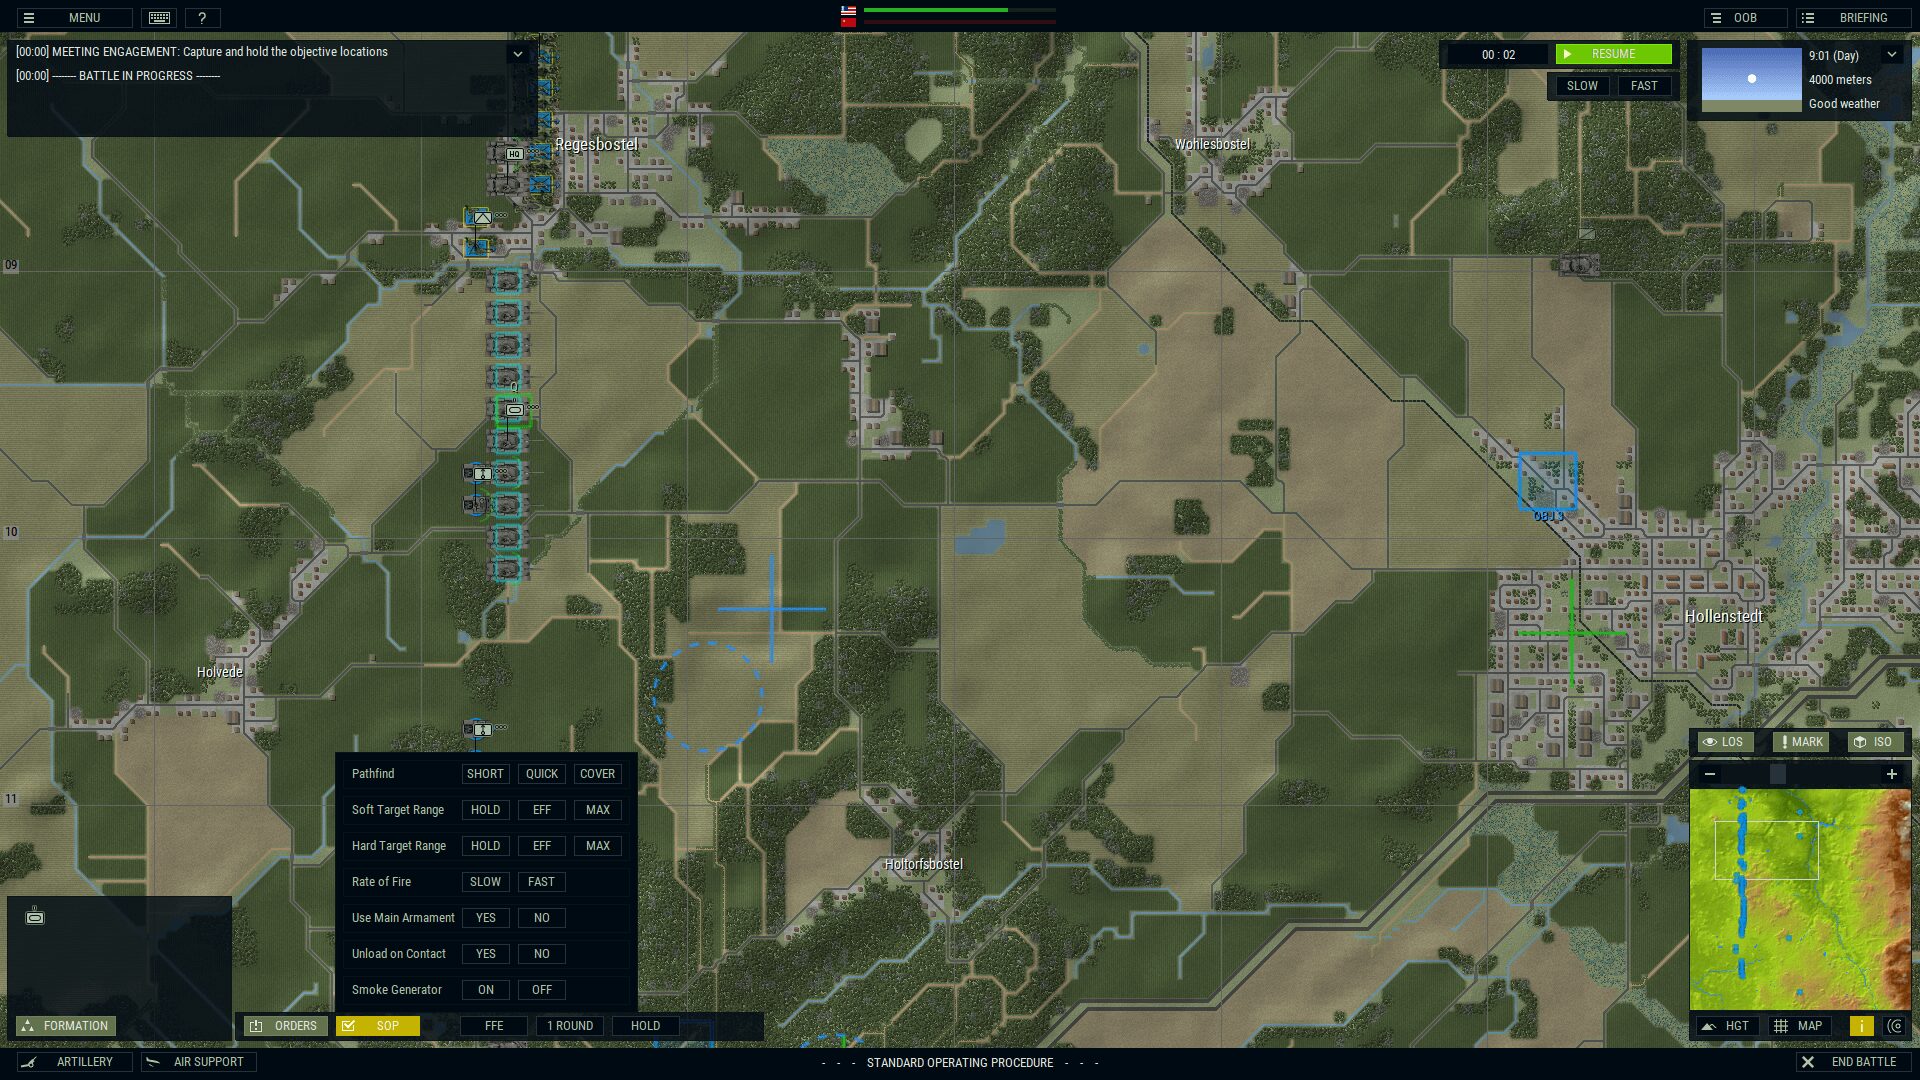
Then, setting their Hard Target Range works exactly the same way. You can set their Rate of Fire to slow or fast (or neither, and they just use their default values). For your bigger beasts, you can tell them whether to use their main armament or not. Next, and something I use a lot, is Unload on Contact (yes or no). If I’m going to lose an APC, I’d rather it be empty, you know? Hopefully, upon contact, the passengers can scurry out on time. It’s like that in every wargame, but remember, casualties are a huge part of the scoring. Finally, you can also say whether their smoke generator (if equipped) is on or off.
Orders
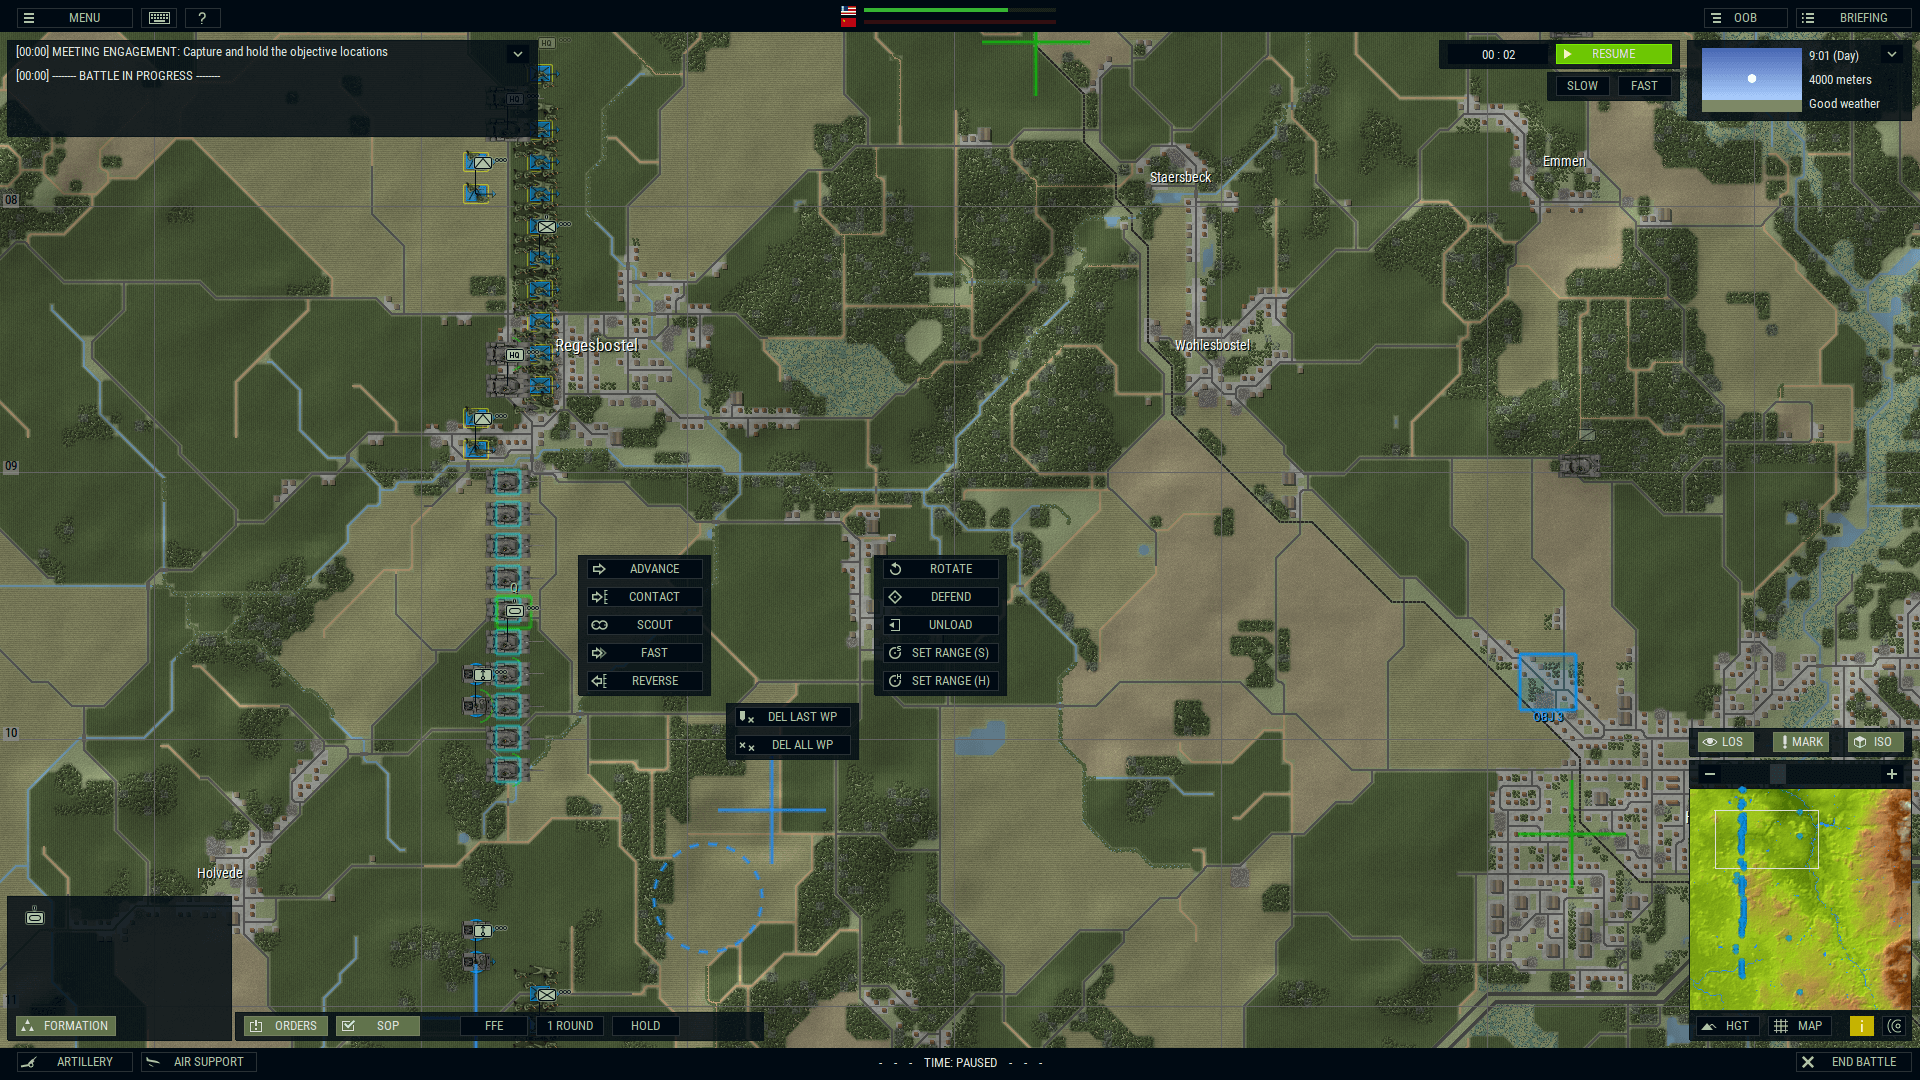
Now, it’s time to give them orders. Two great parts of this are 1) Again, you can issue them to whole companies at once and 2) you can chain them together! More on that in a bit. Armored Brigade is all about waypoints:
ADVANCE to a waypoint is your standard movement order.
CONTACT is move until you come into contact with an enemy unit.
SCOUT is advancing cautiously until you come into contact with an enemy unit.
FAST is advancing, well, fast to a waypoint.
REVERSE is reversing to a waypoint.
You can ROTATE to a waypoint…
As well as DEFEND a waypoint.
UNLOAD is to unload passengers at a waypoint.
SET RANGE (S) or SET RANGE (H) means you can also fine tune your soft or hard attack ranges, respectively.
Finally, you can DEL LAST WP, deleting the last waypoint, or DEL ALL WP which obviously deletes all of the waypoints set for that formation (or unit).
What I meant by chaining them together is that you can issue a string of orders starting and stopping at different waypoints. Let’s say you have a mechanized platoon with loaded APCs. It’s the beginning of the game, it’s open ground, there a lot of trees ahead, then more open ground, then trees in a row running across that part of the battlefield. So, you could tell the entire platoon to Advance (to the trees), Scout around them (just in case there are bad guys around), Fast (to get across the open field quickly), then Contact — if your SOP is set to Unload on Contact, the troops will unload. Or, after the Fast order, if you have a place spotted where you want to deliver your infantry, change the Contact to Unload — and they’ll debark upon arrival. Simple. By the way, all of the command lines are different colors, so it’s easy to tell at a glance who is ordered to do what.

We’re still in Deployment, so you can issue strings of orders to every platoon or company involved in the fray. If you’re not playing with rounds, if something goes sideways then you can just change their orders. Keep in mind, there will be a delay as the orders come down the pike, but hopefully, they’ll have enough time to carry them out.
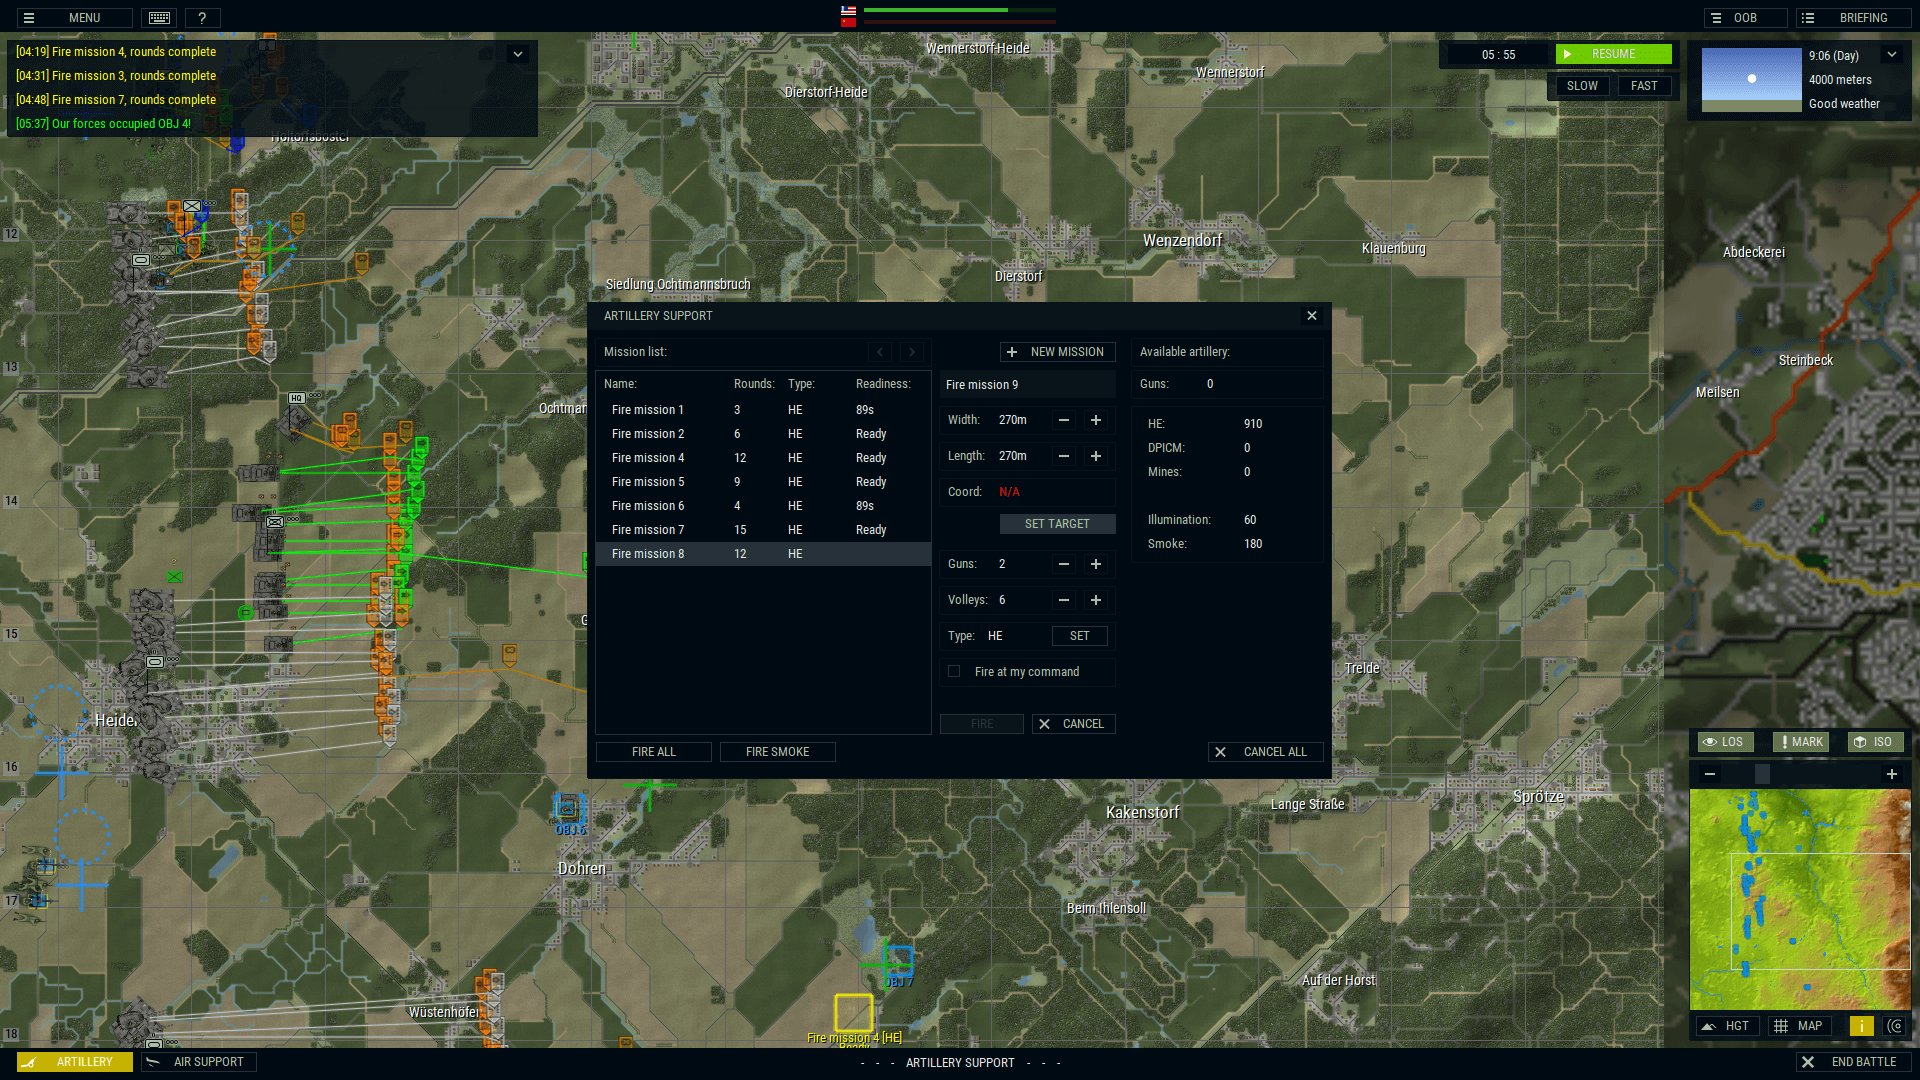
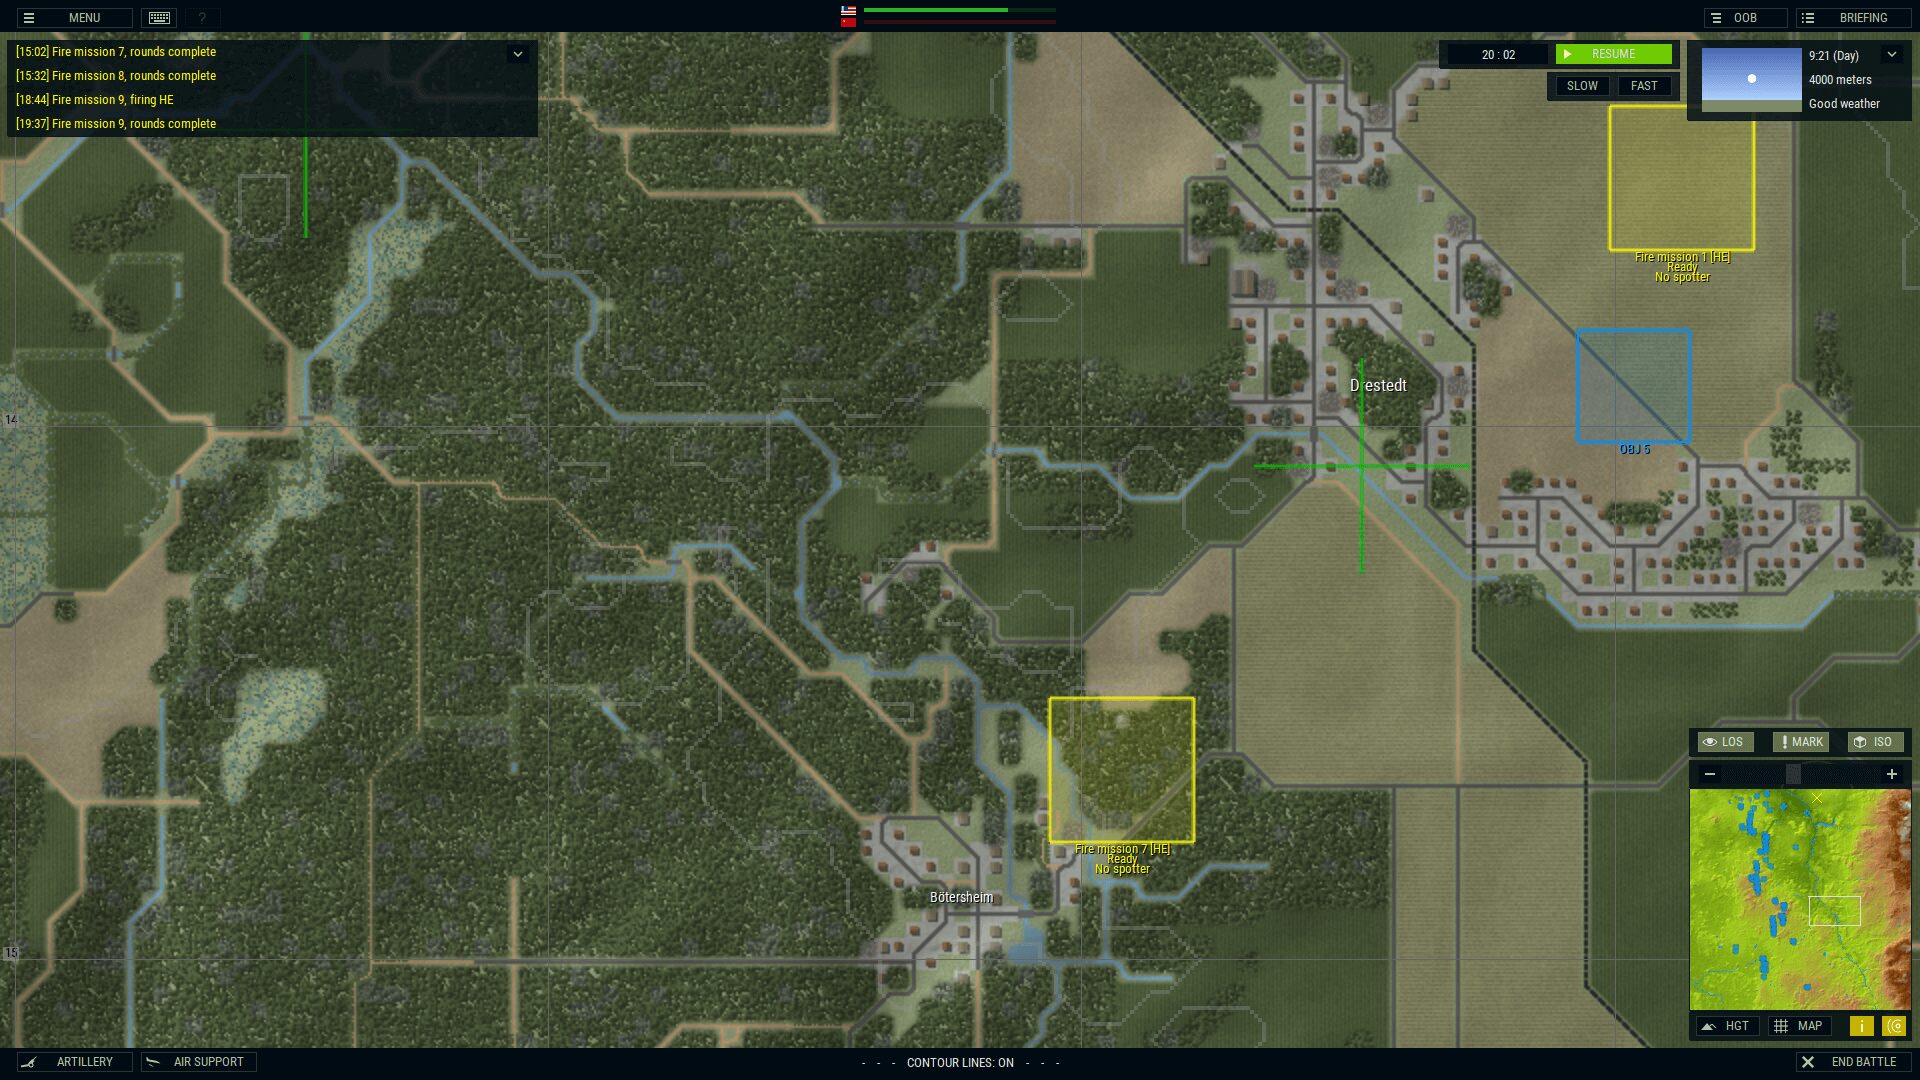
You might want to wait to see how the battle unfolds, but, at this point, I’d also place where I want my artillery to fall. You can always adjust or cancel it later (costing you delay, of course). You’ll have a certain amount of guns available, depending on how many you bought. Then, for each artillery mission, you’ll decide how many guns to use and how volleys. You choose the width and length (area covered) of the fire mission as well as the type (HE, illumination, smoke, etc.) This leaves only two choices left. First, once the delay is over, the arty will shoot. Or, there’s a box you can check to hold it back until you give the order yourself. Either way, once the delay has counted down, it’s off-board bombing time.
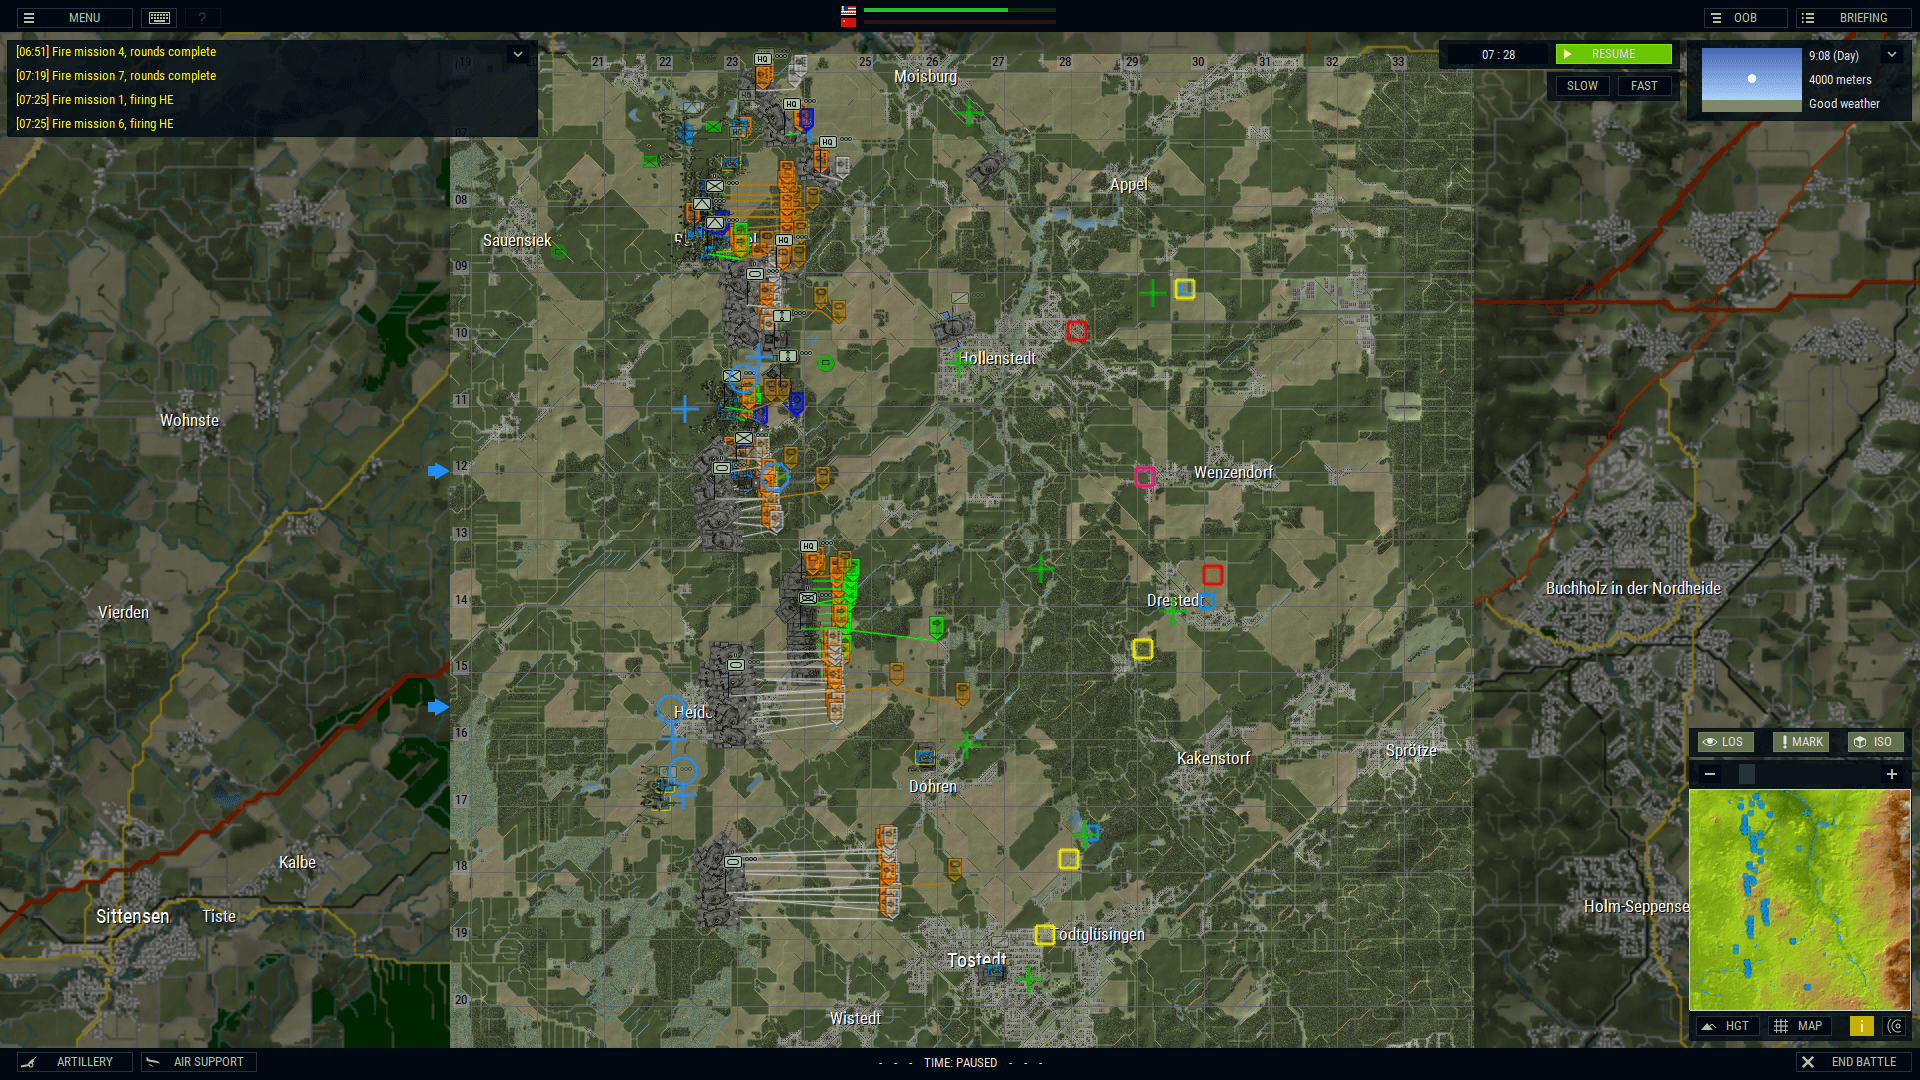
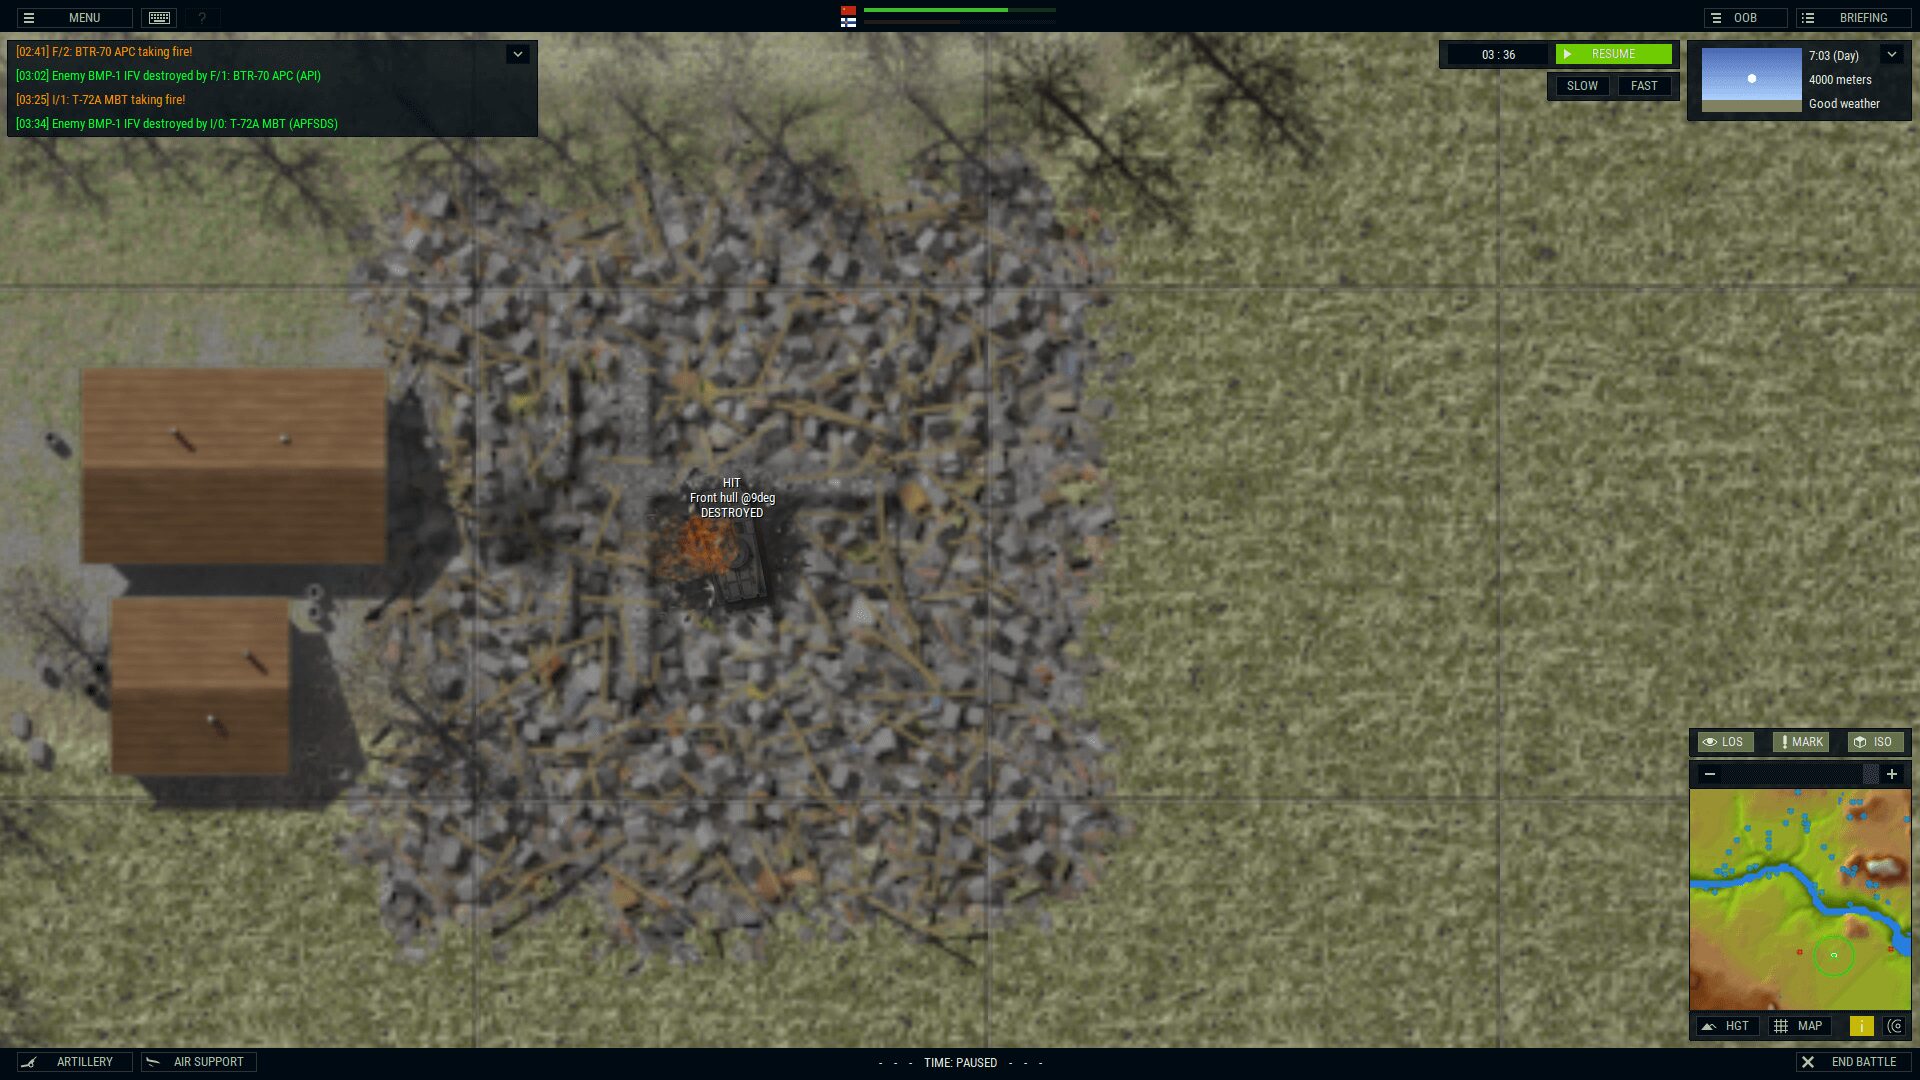
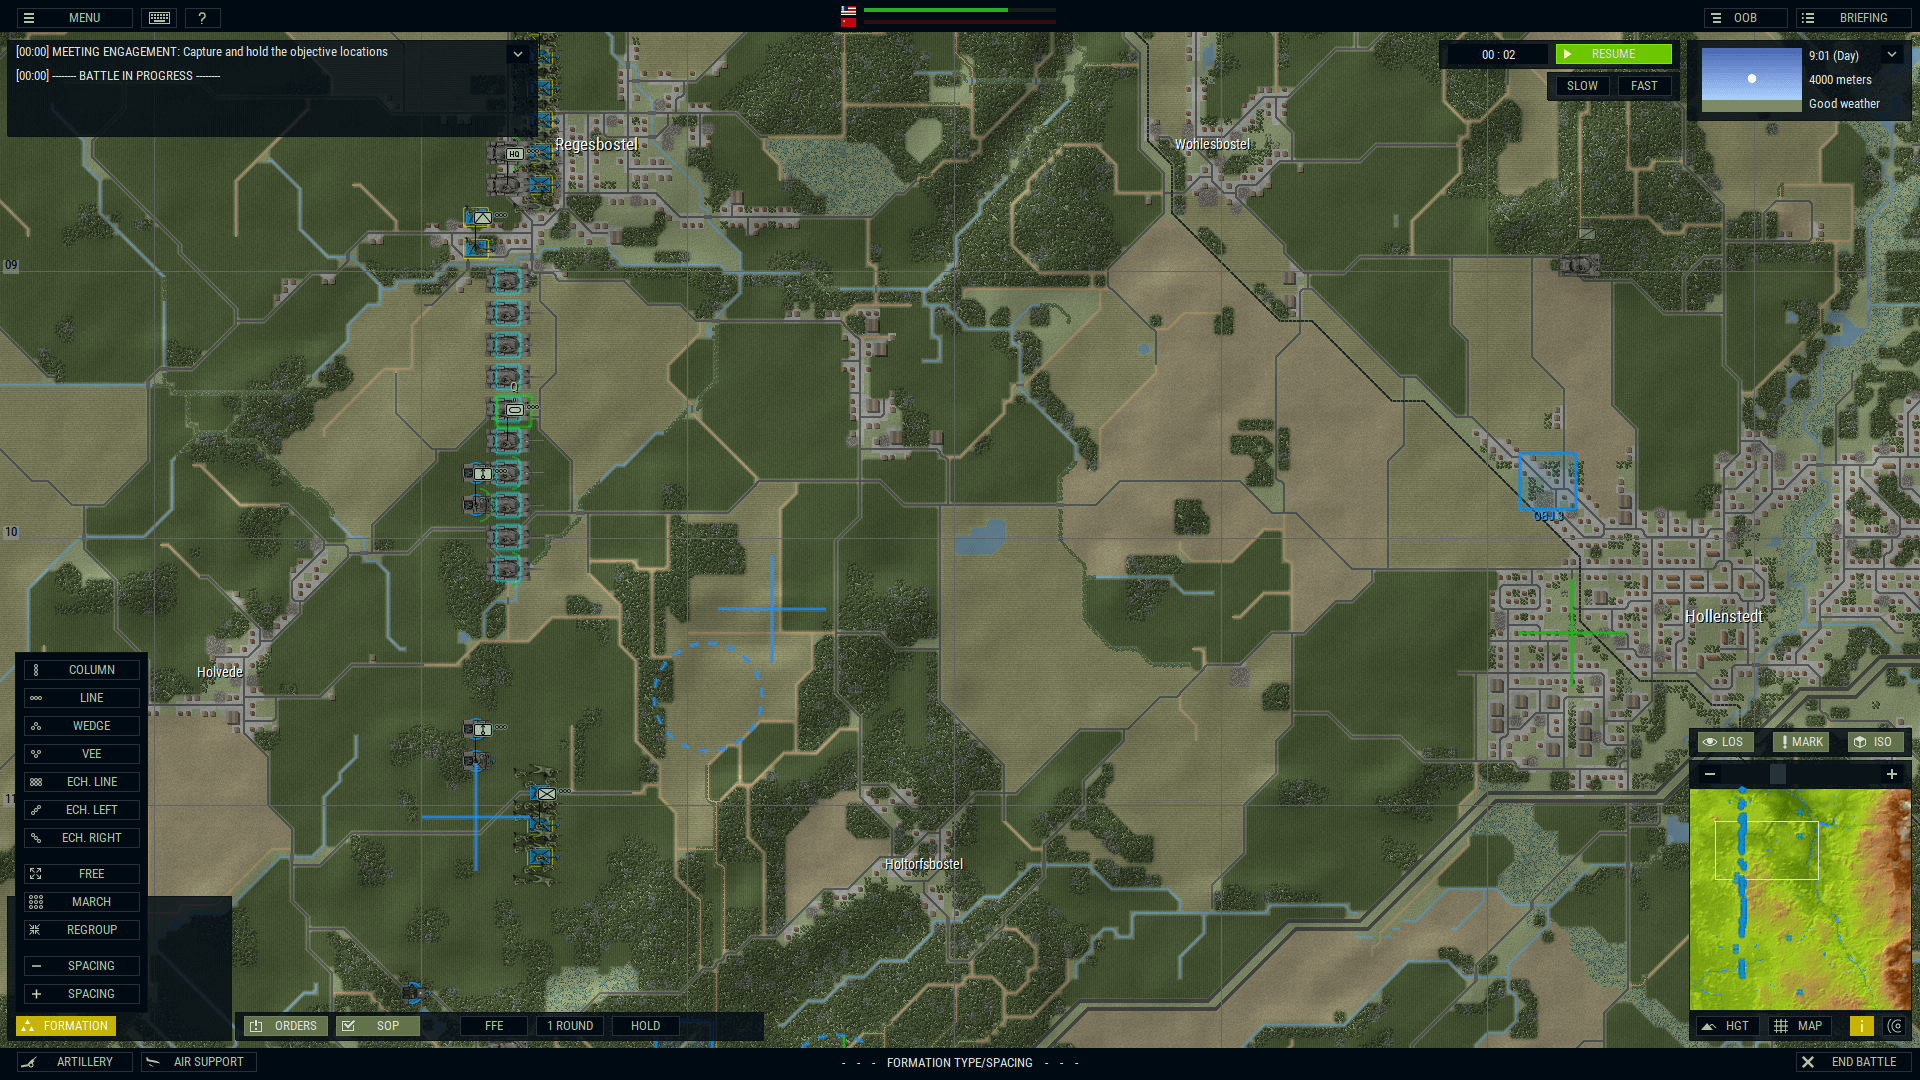
Play!
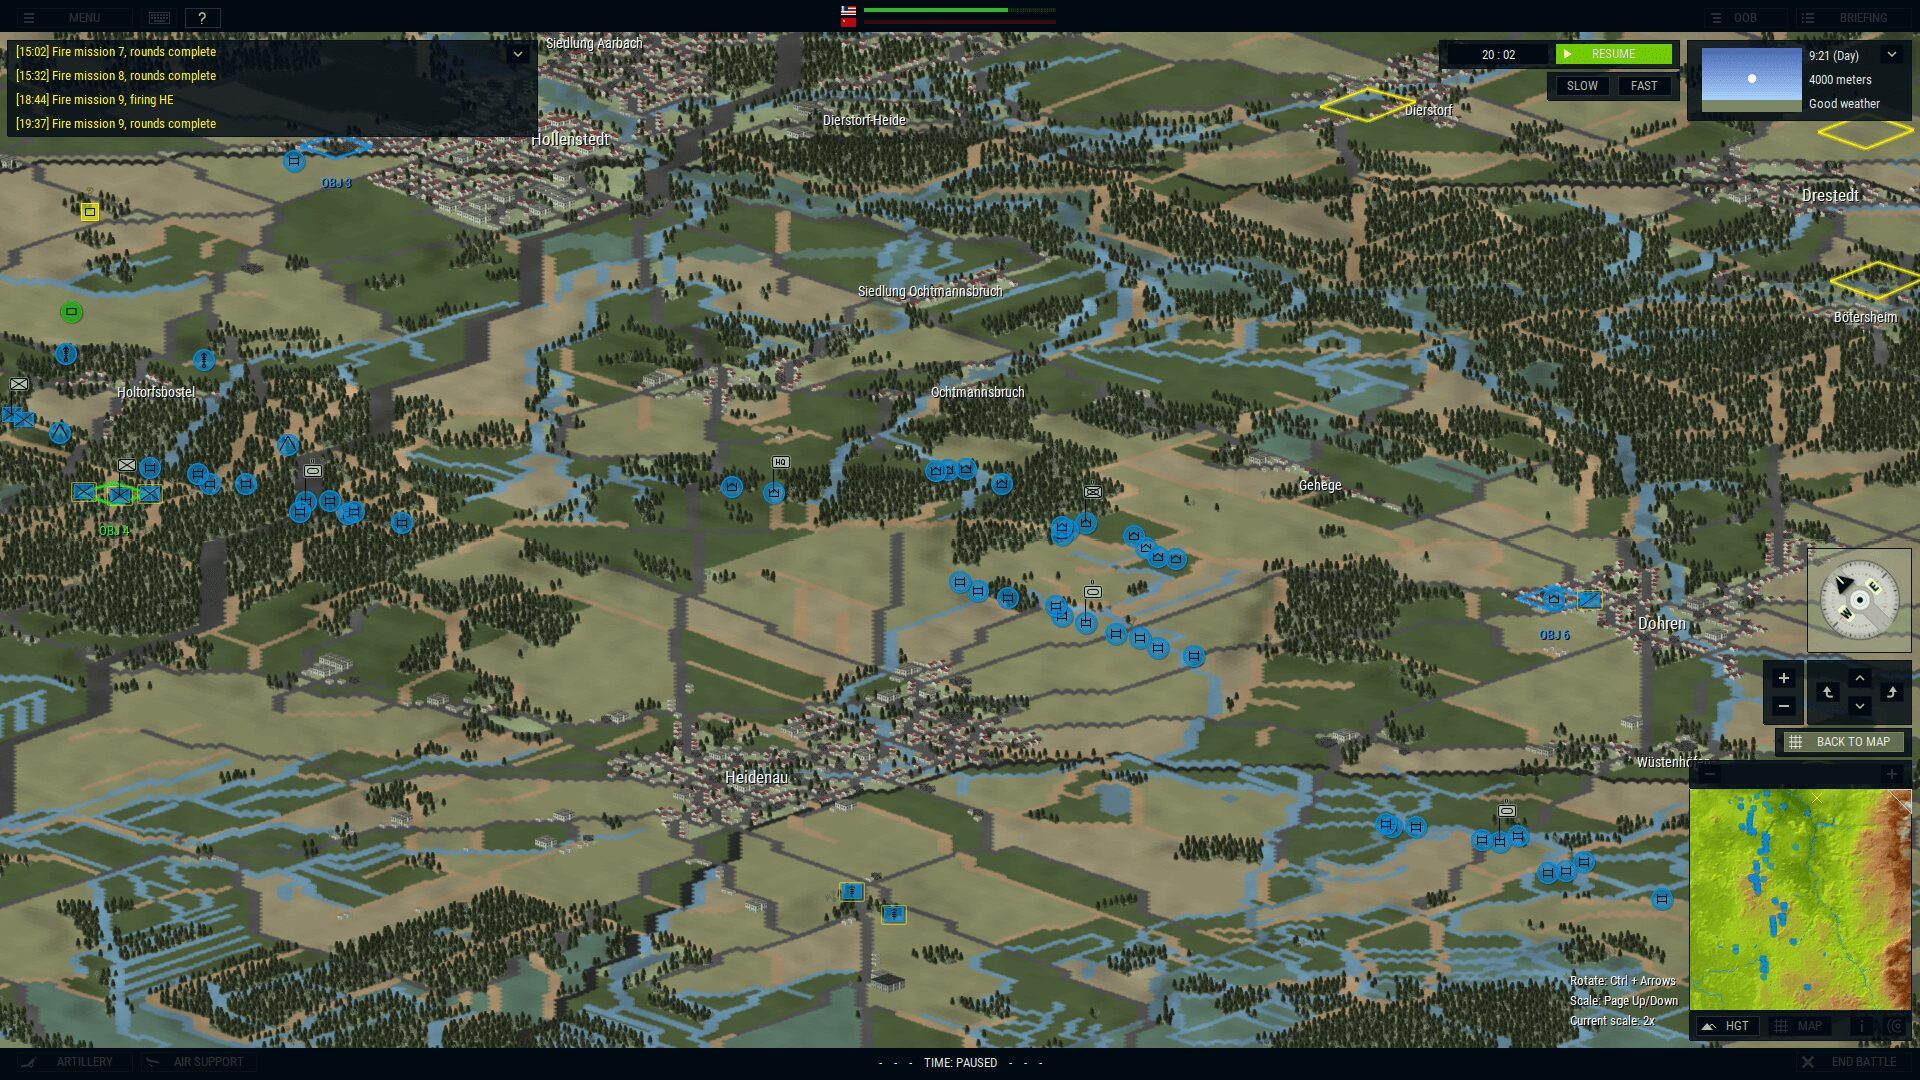
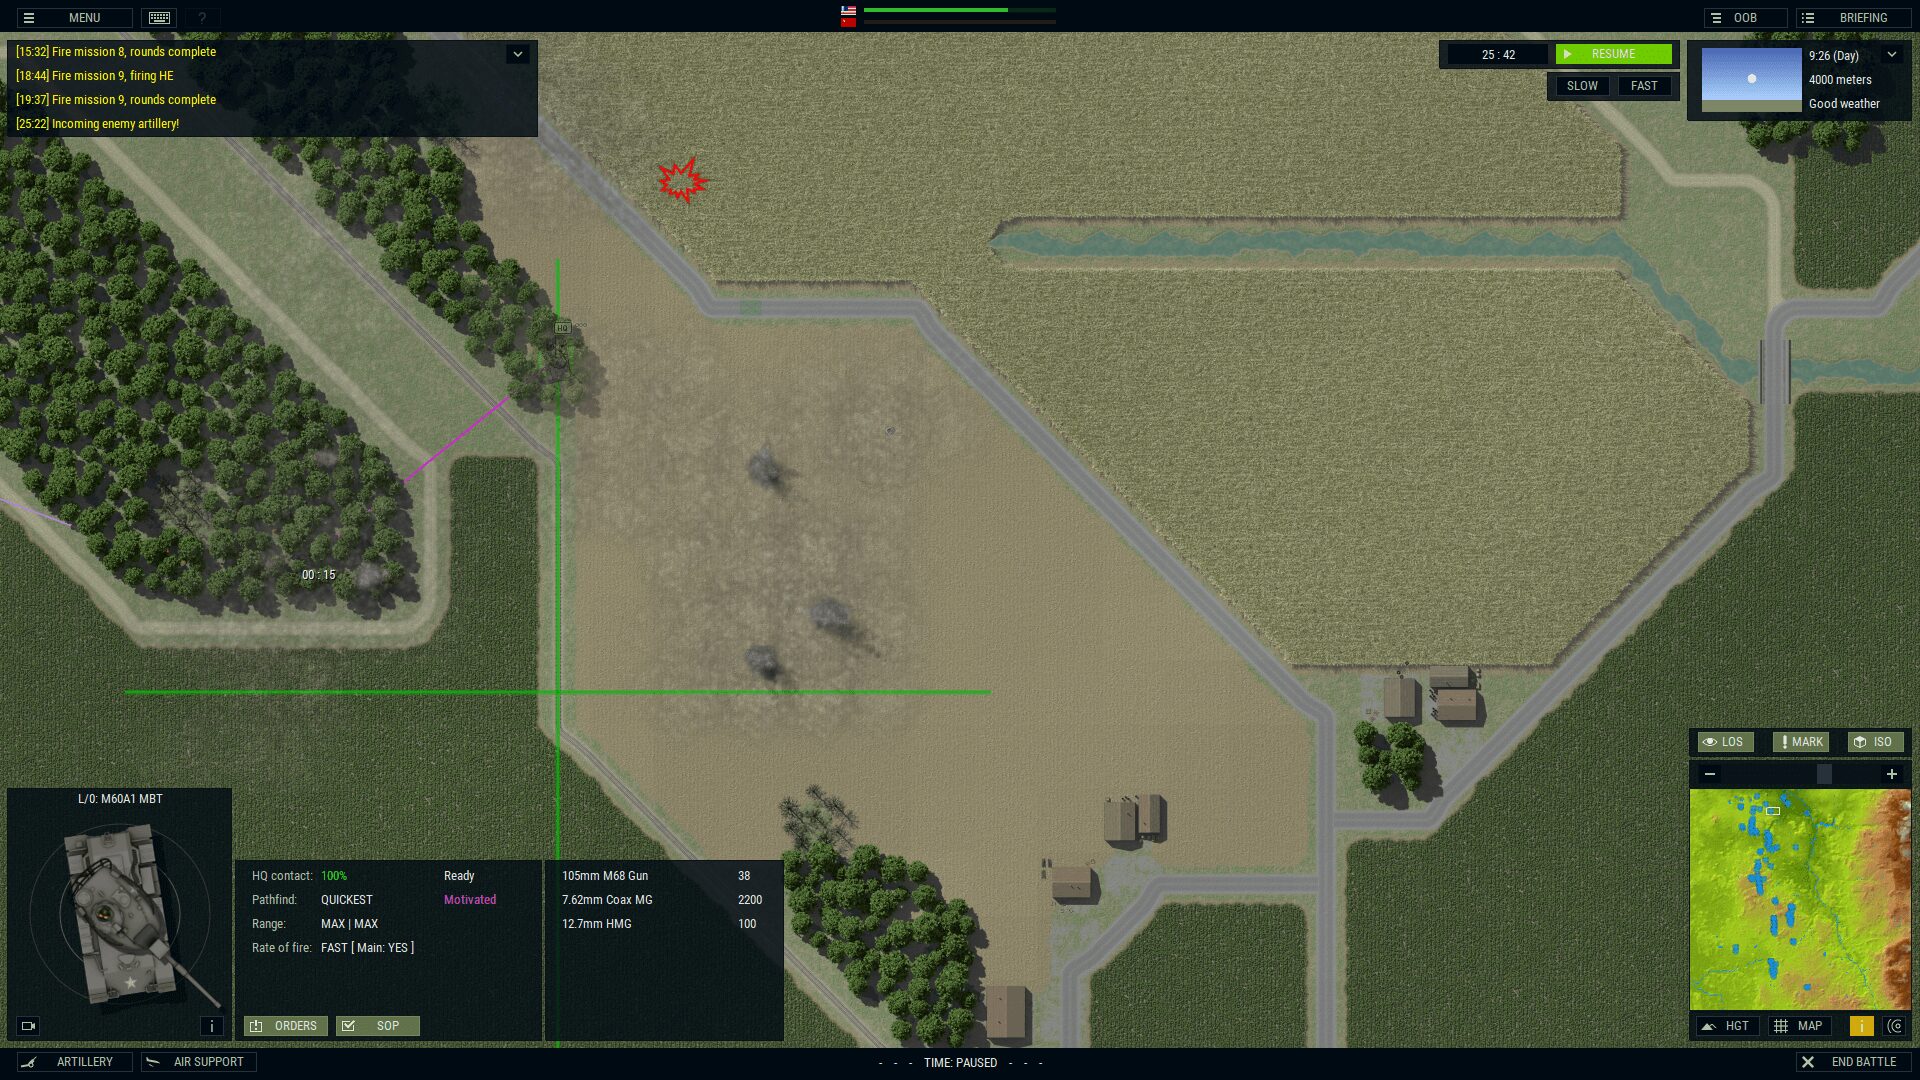
You’re happy with the setup, the TRPs are set, everyone has orders so now it’s time to HIT THE START BUTTON already! Let’s see what kind of commander you really are. Things are not going to take off immediately, like most RTSs. All of the little numbers you’ll see are each individual’s delay time. Just like with the arty described above, once the delay is over, things will start moving. Provided, of course, that you gave them orders. hahaha If you see little dashed, yellow circles, or little yellow squares, those are unidentified units. Known enemy units will be red. You’ll see plenty of those, trust me.
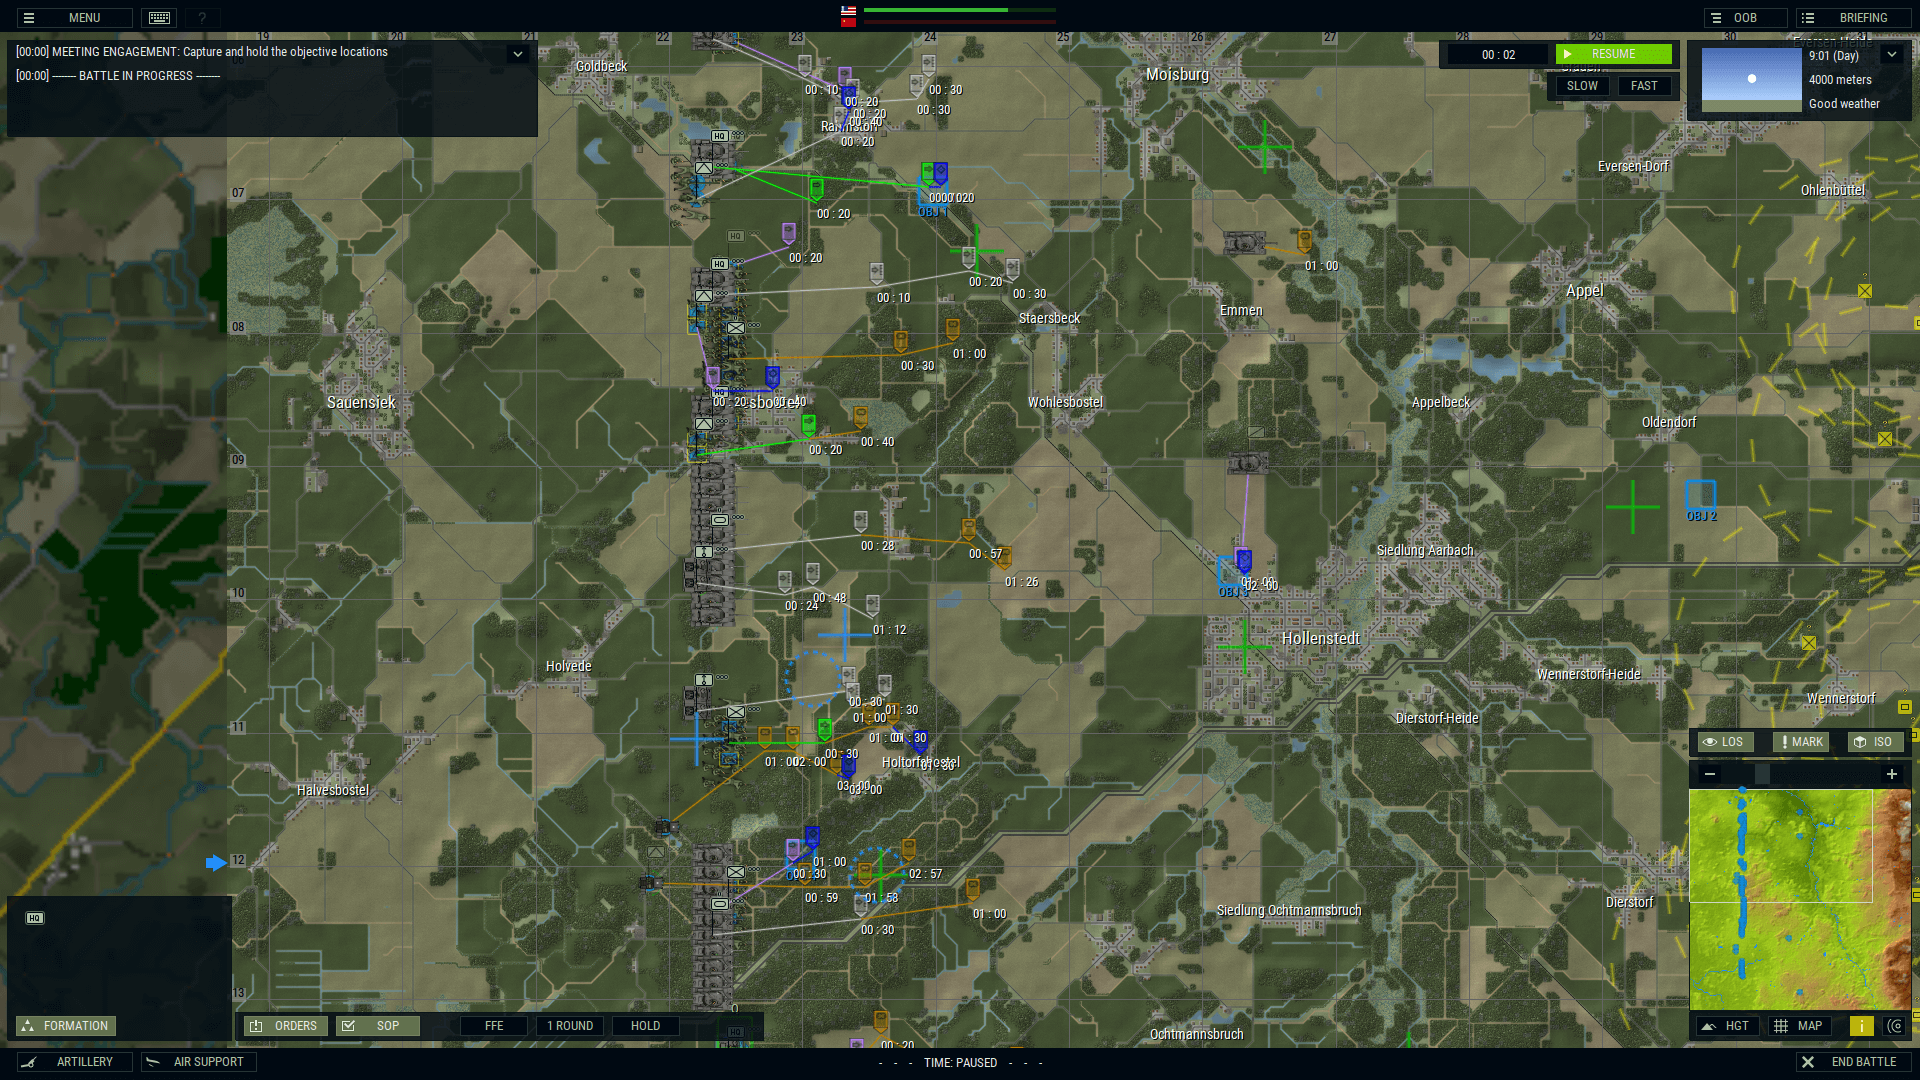
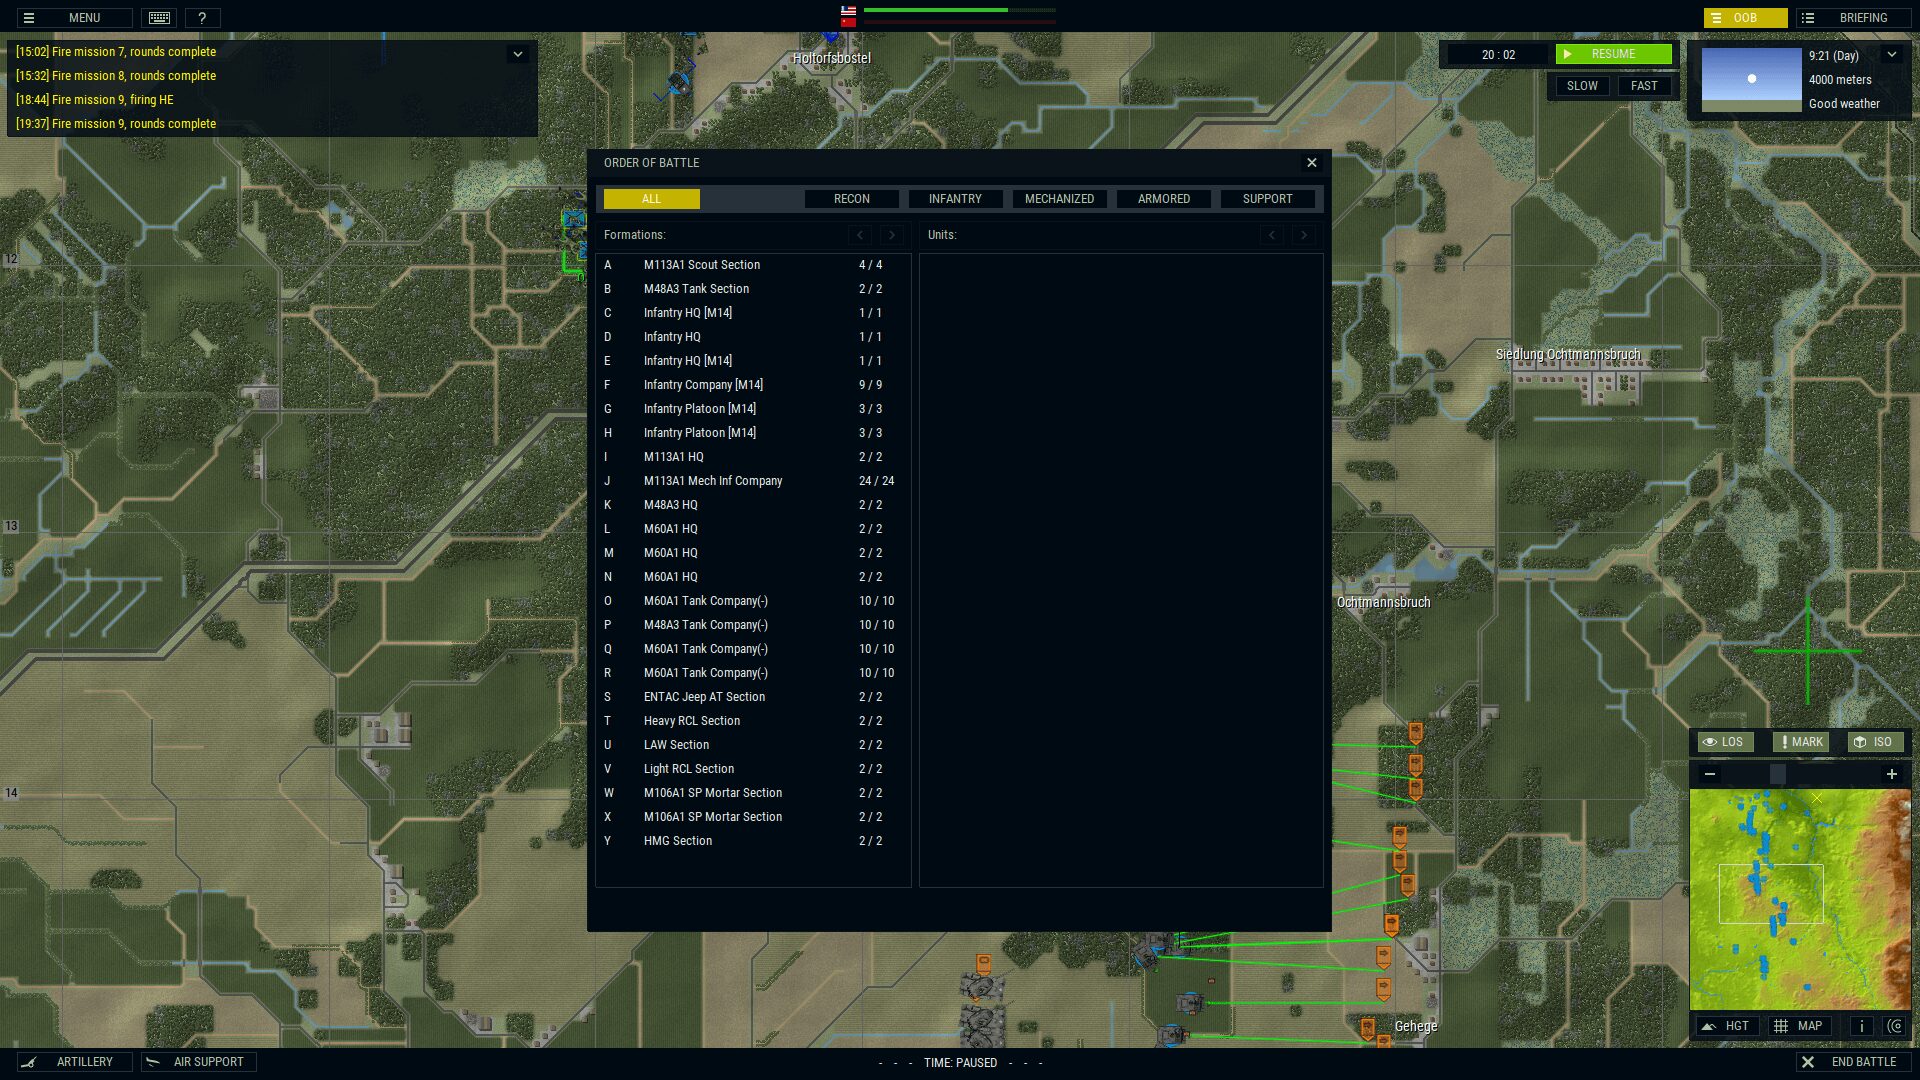
Below the start/pause/resume button is where you can speed up or slow down time. Besides the start/pause/resume button is the weather. It automatically shows the time of day, visibility and weather. If you expand it, then it’ll give you the wind, temperature and ground conditions. Your OoB is in the top right, above the weather. You can open it to find any of your units.
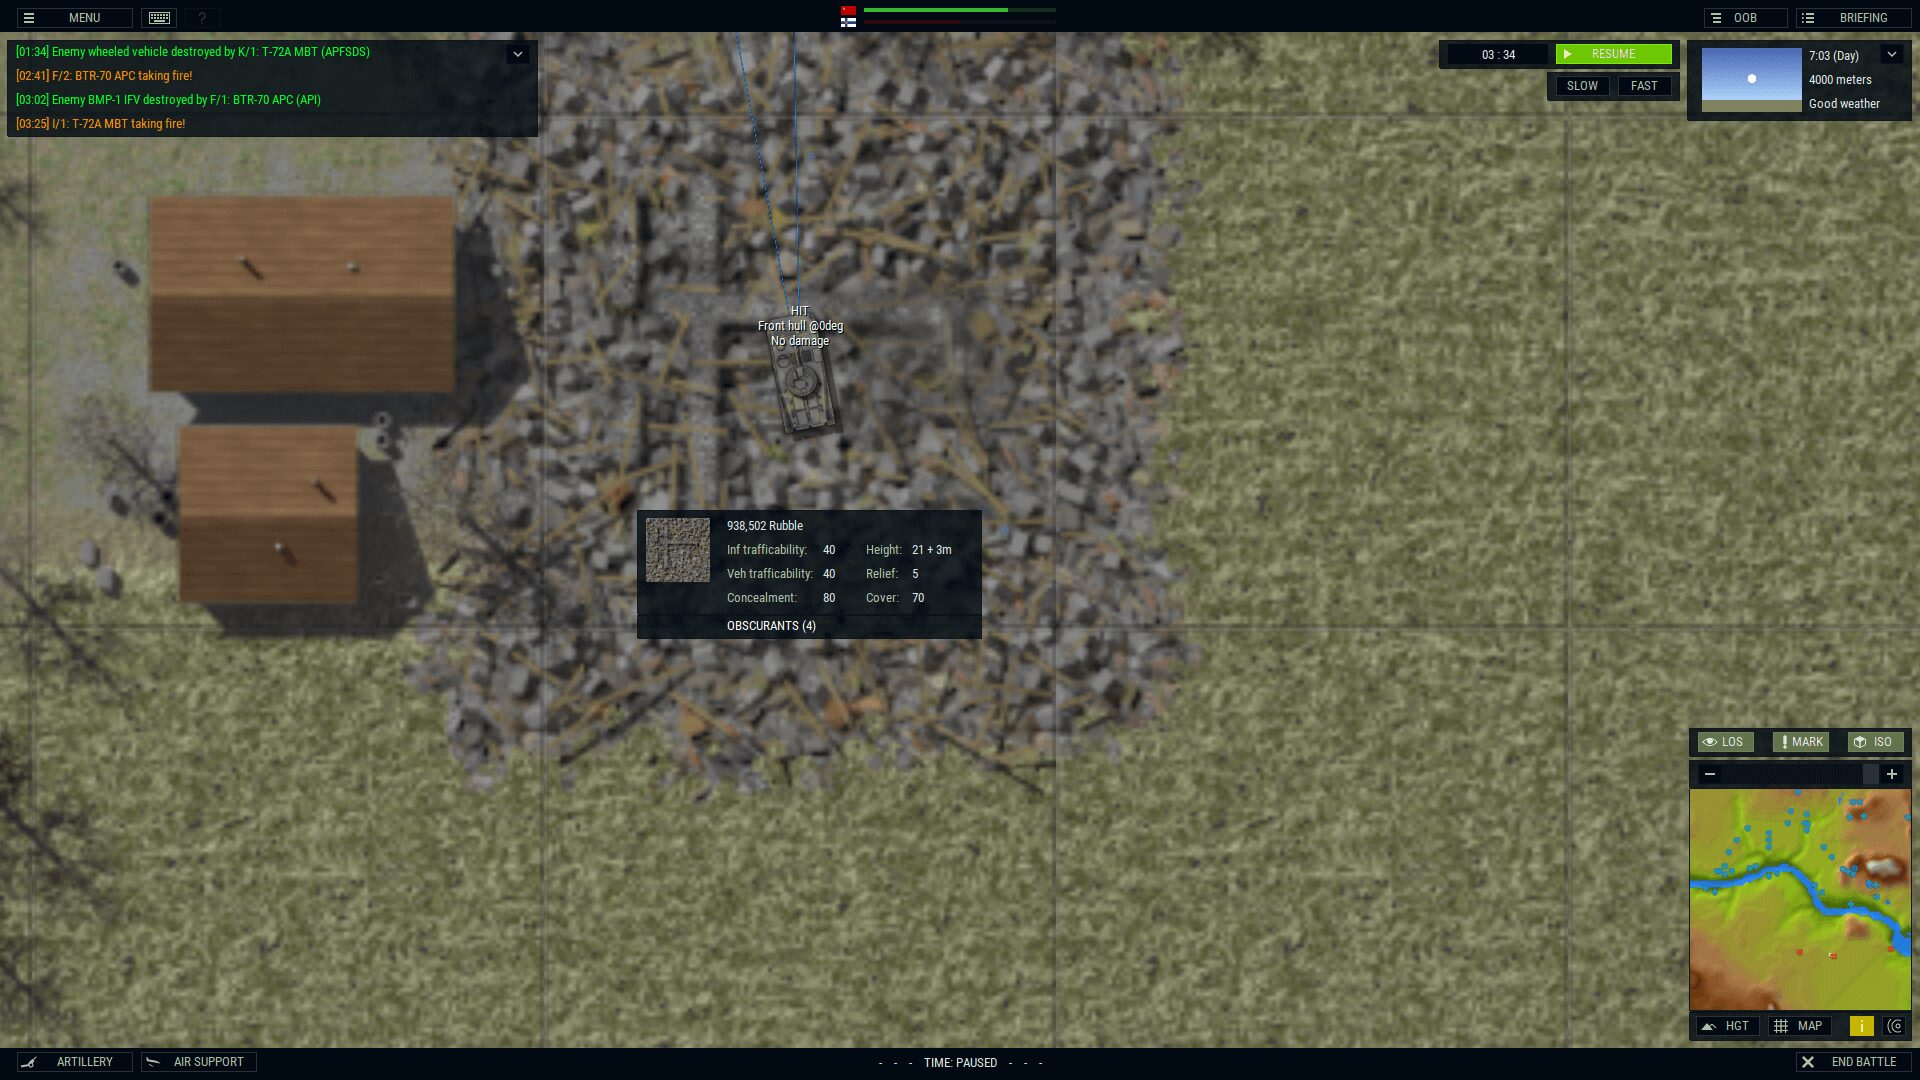
When artillery starts and ends, as well as when things really start heating up, you’ll start getting messages in the top left. Hopefully, it’s recording your kills and not your losses. The pathfinding is superb — unless you tell them otherwise, the vehicles will go around obstacles and try to stay in formation. Everyone will do their best to complete their orders.
Armored Brigade is by far the best Cold-War-turned-Hot wargame I’ve ever played. I’ve set up games and jumped around through a lot of the years just to check out the different countries and their OoBs. I’ve clicked all over the various maps to see the myriad of situational differences… and possibilities. The options and adjustments available are completely insane. Easily one of the most flexible engines ever produced. This one stays on the hard drive forever.
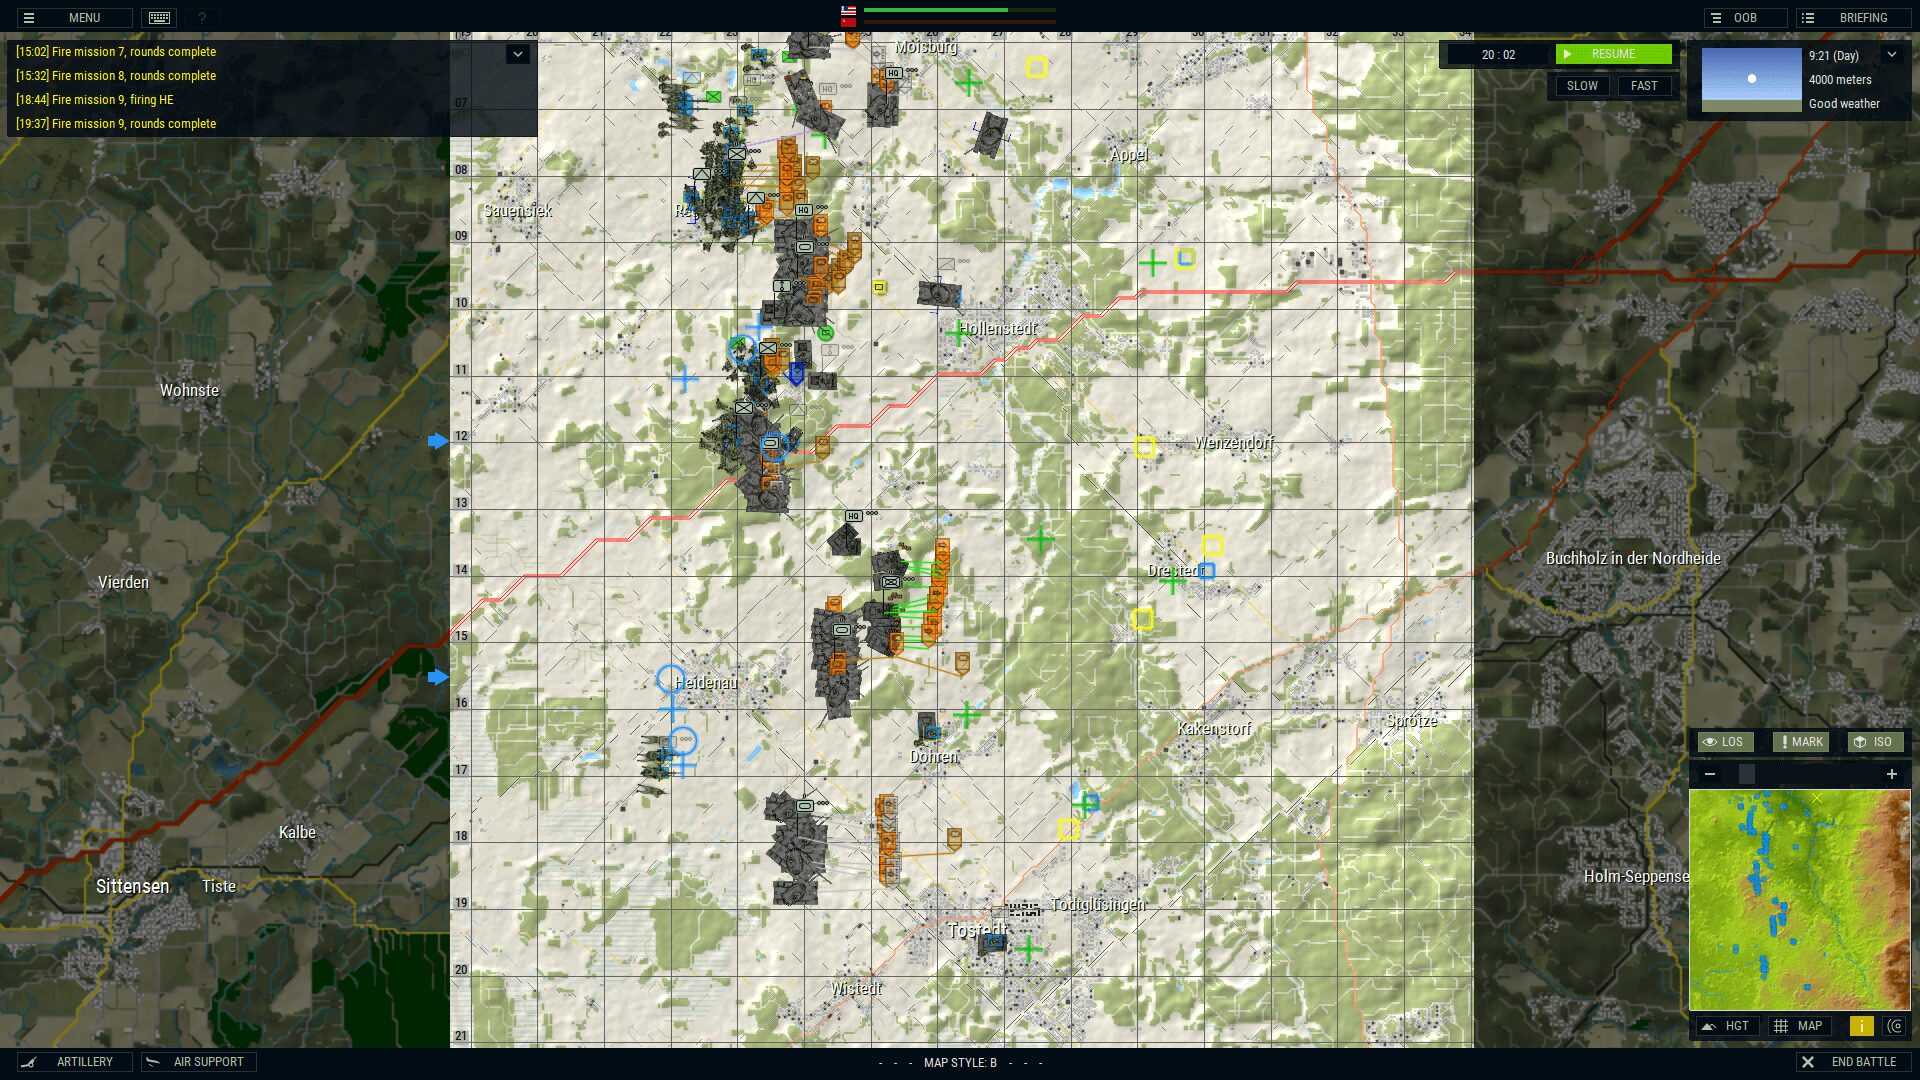
Map Variations
Prev 1 of 3 Next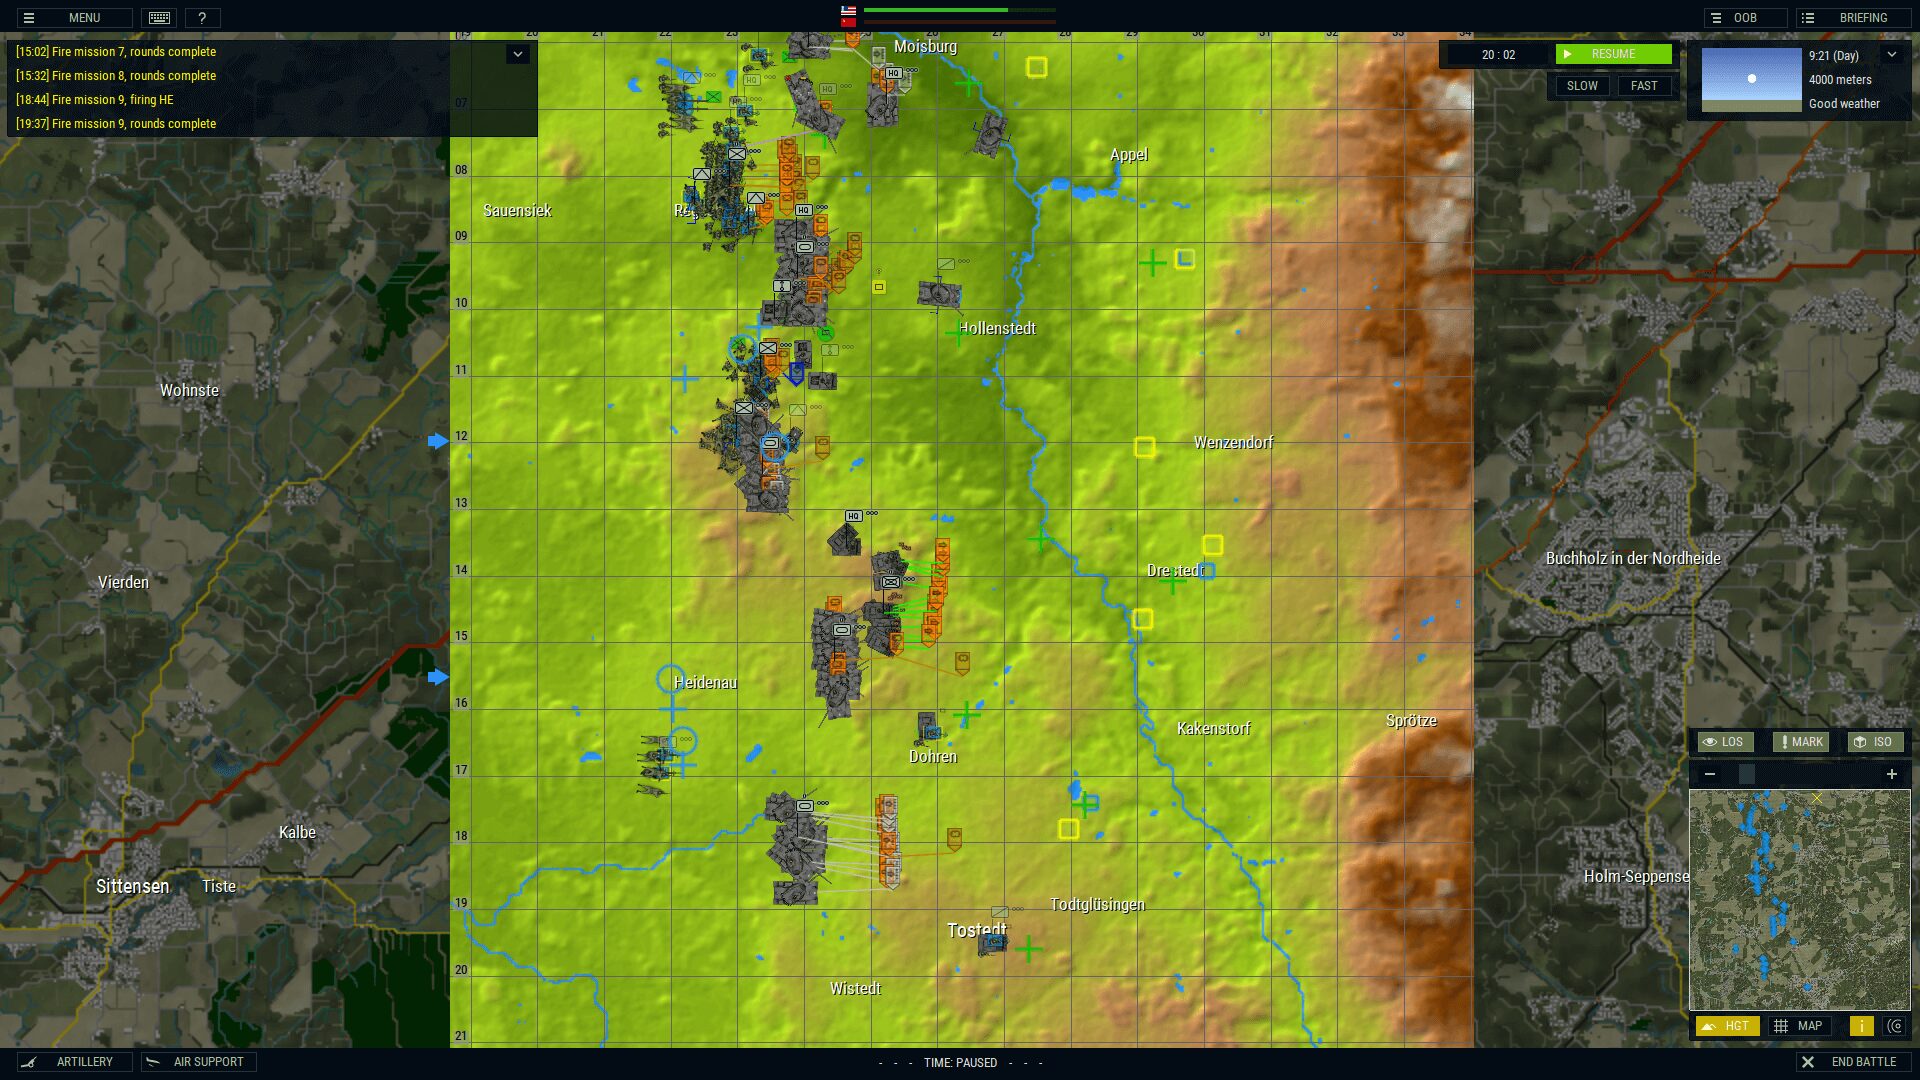
You know, I’ve explained all of this from an OCD, picky, finicky, Micromanagement King’s™ point of view. You can just as easily pick a map, choose the two sides, auto-buy both sides’ equipment, go with whatever deployment the game gives you, issue some basic orders and hit the Play button. You can generate a scenario in about twenty seconds. However, when I play something, especially a wargame, I want to know what everything does. Not that I’m competitive or anything — I just want to win, dammit! So, every tiny detail that can help me accomplish that, I want to know about it. The AI surely does… and will use it all against me. Tip though: if you’re not used to hardcore wargaming, I’d go through all of the scenarios first. Actually, I’m going to play the ones I didn’t. I’m sure I missed something along the way.
More Armored Brigade
Prev 1 of 11 Next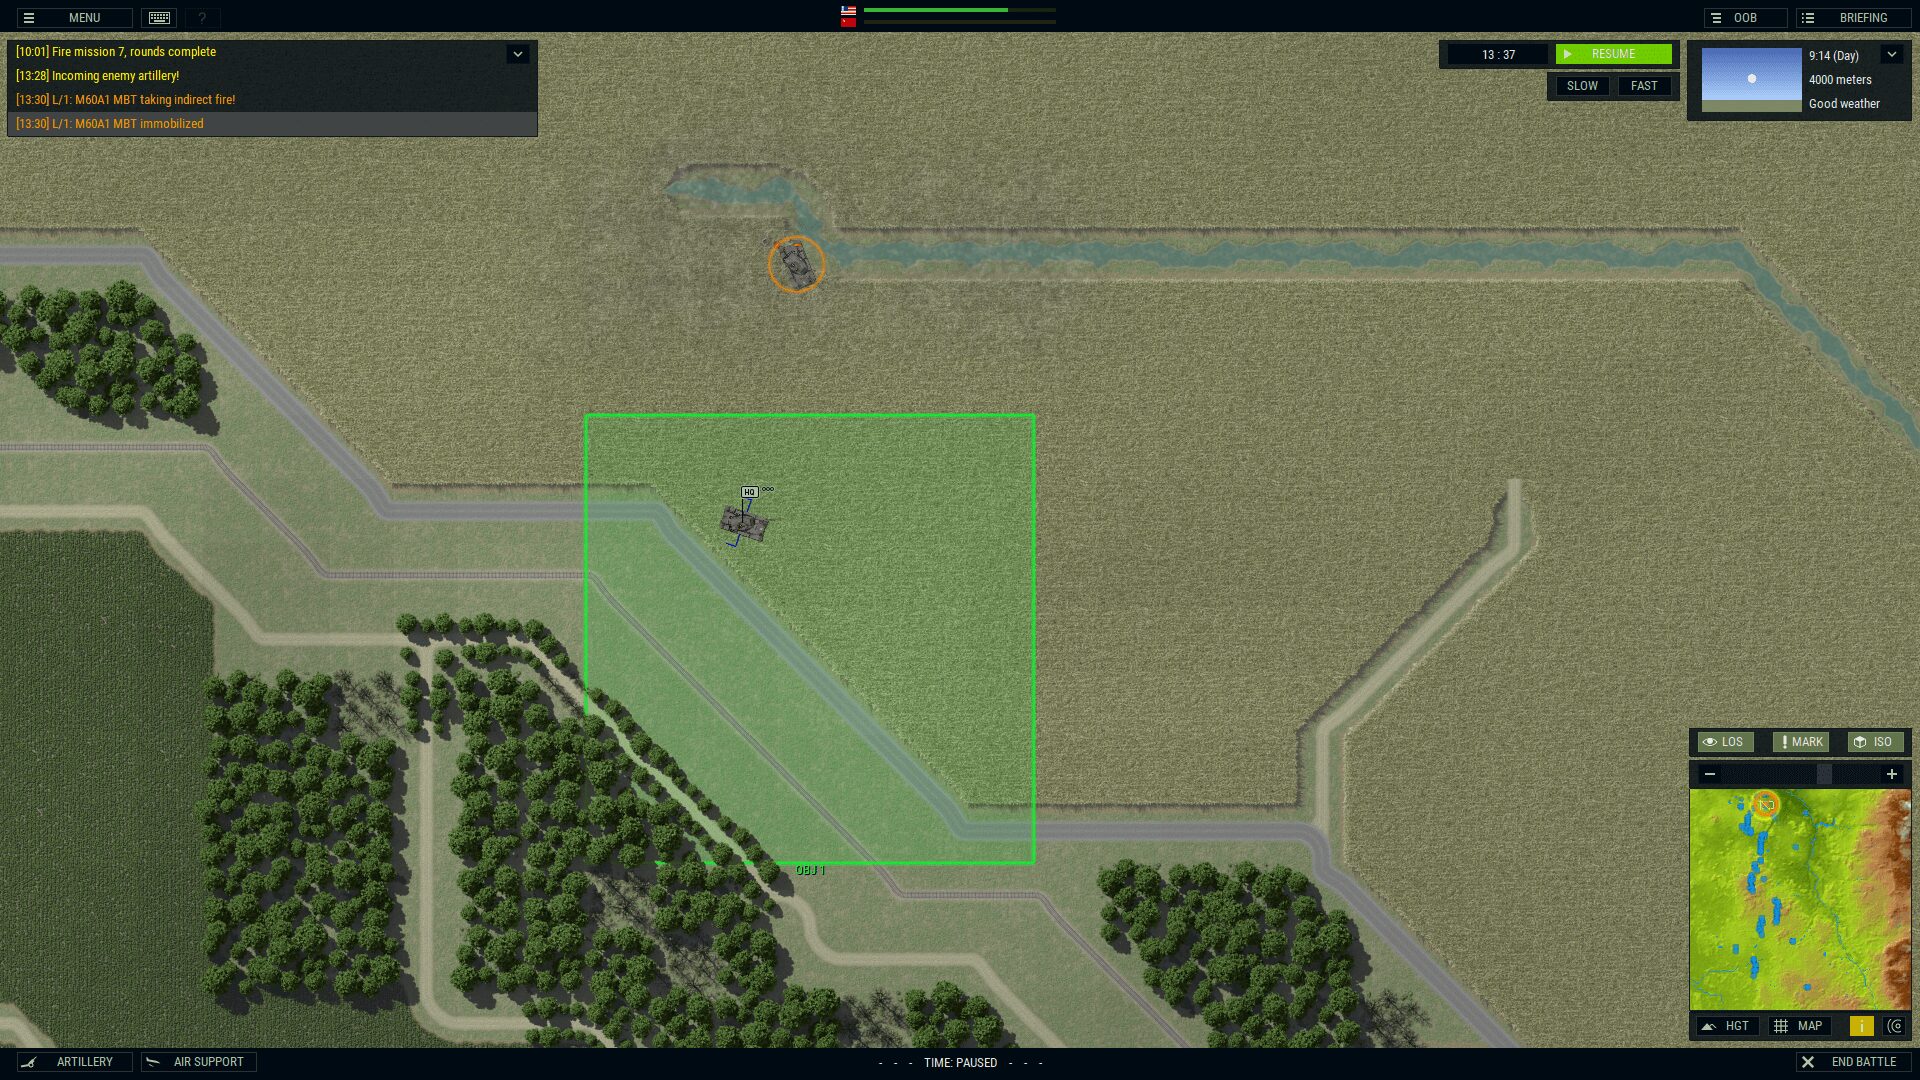


Armored Brigade released Nov. 15th, 2018 and is available on PC via Matrix Games’ storefront.